
• Home
  • MAC
  • Virtual Machines
    • VMware
    • VirtualBox
  • Windows
  • Linux
  • Downloads
    • ISO Files
      • Open Mamba ISO
      • AnduinOS ISO
      • Windows 7 ISO
      • Windows 11 ISO
    • macOS DMG
    • macOS ISO
    • macOS VMDK
    • VMware Workstation Pro
    • macOS Unlocker
    • DirectX 12
    • MSI Afterburner
    • Hyper-V Server 2019
  • Others
    • Android
    • Discord
    • iOS
    • Internet
GEEKrar
  • Home
  • MAC
  • Virtual Machines
    • VMware
    • VirtualBox
  • Windows
  • Linux
  • Downloads
    • ISO Files
      • Open Mamba ISO
      • AnduinOS ISO
      • Windows 7 ISO
      • Windows 11 ISO
    • macOS DMG
    • macOS ISO
    • macOS VMDK
    • VMware Workstation Pro
    • macOS Unlocker
    • DirectX 12
    • MSI Afterburner
    • Hyper-V Server 2019
  • Others
    • Android
    • Discord
    • iOS
    • Internet
No Result
View All Result
  • Home
  • MAC
  • Virtual Machines
    • VMware
    • VirtualBox
  • Windows
  • Linux
  • Downloads
    • ISO Files
      • Open Mamba ISO
      • AnduinOS ISO
      • Windows 7 ISO
      • Windows 11 ISO
    • macOS DMG
    • macOS ISO
    • macOS VMDK
    • VMware Workstation Pro
    • macOS Unlocker
    • DirectX 12
    • MSI Afterburner
    • Hyper-V Server 2019
  • Others
    • Android
    • Discord
    • iOS
    • Internet
No Result
View All Result
GEEKrar
No Result
View All Result
Home Mac

How to Write NTFS Drives in macOS Catalina and Mojave

Ali by Ali
May 28, 2025
in Mac
0
How to Write NTFS Drives in macOS Catalina and Mojave

How to Write NTFS Drives in macOS Catalina and Mojave

13
SHARES
186
VIEWS
Share on TwitterShare on Facebook

macOS Catalina is formally launched and everyone loves to interact with it. Catalina has many new fantastic and surprising features but like its previous versions, Catalina also doesn’t support reading and writing USB and external Hard Drives. The same case is with macOS Mojave. macOS Mojave was rolled on WWDC 2018 and it is still popular. It has quite lots of lovers as it has one of the safest security system and fantastic features. Apple’s products including macOS have their own file system like other operating systems. They don’t support each others file system. In this post, I’ll show how to write NTFS drives in macOS Catalina and macOS Mojave.

This way, macOS doesn’t support NTFS drives which turns into a problem. Solving this problem is difficult but after lots of trying and searching, we have come up with a solution. This solution is completley free and you don’t need to pay a penny. We do not support or we are also not sponsored.

  • Related: How to Install Windows 10 on Mac with Boot Camp

Table of Contents

    • What is NTFS
    • What is The Difference Between The ExFAT File System & NTFS?
  • How to Write NTFS Drives in macOS Catalina and Mojave

What is NTFS

Microsoft has developed NTFS (New Technology File System) and doesn’t license anyone else to utilize it. According to some sources Apple has tried to buy the NTFS license but Microsoft priced it pretty expensive. Without a license Apple can’t NTFS to his macOS or other products. It would be illegal and unlawful.

NTFS is the file system that Windows has used for pretty much every Windows. For sure, it is for storing and retrieving files on a hard disk. This file system was developed by Microsoft in July 1993 and since then it has been updated many times. The purpose of the creation is to work with the Windows NT family of operating systems, Microsoft called it the NT File System, which became NTFS later. The NTFS is a pretty fast, safe, and reliable way to store, manage, organize, and do everything you’d like to do with your files and folders on Windows.

  • Related: How to Open, Read & Write a BitLocker Drive on Mac

What is The Difference Between The ExFAT File System & NTFS?

ExFAT file systems is the full form of Extended file allocation Table that. Until now, many people are using it on their regular bases. ExFAT is a lightweight file system like FAT32, but without the extra features and overhead of NTFS and without the limitations of FAT32. This is the latest file system. The biggest difference between NTFS and ExFAT is that you can have a maximum of 128 PIB file but in NTFS the maximum storage file can be 16TB. Most users use ExFAT in SD Card SDXC 32GB. You can convert files in NTFS but ExFAT support all the Windows versions.

How to Write NTFS Drives in macOS Catalina and Mojave

While a macOS or macOS Catalina can’t write NTFS Drives it doesn’t mean that they can’t read NTFS Drives. macOS can read and can transfer content from the device to another destination. Users can only write to NTFS drives in macOS Catalina by acquiring a disk format such as ExFAT or other tools that can make the action possible.

With these, transferring and moving files from macOS to Windows is better done with ExFat which works on both Windows & Mac. But if you don’t have access to make the change the format to exFAT. Here’s how to write NTFS drives in macOS Catalina and Mojave.

The process of writing NTFS can be done in a few different ways. The first one is the third-party app. With many apps out there, you can select one that most of them are premium. And write NTFS drives in macOS Catalina and Mojave.

  • Related: How to Open BitLocker Encrypted Drive on macOS

Many of them works but most likely you will need to pay for their subscription fee. Except them, some of them are also free. You can choose your third party apps according to storage space but we are going to show you how to write NTFS drives in macOS Catalina and macOS Mojave without any app.

In the first, make sure your drive has a single one-word label like my USB label.

For entering the commends: Go to Terminal, and write these commends there.

Sudo nano /etc/fstab

For the password, enter it.
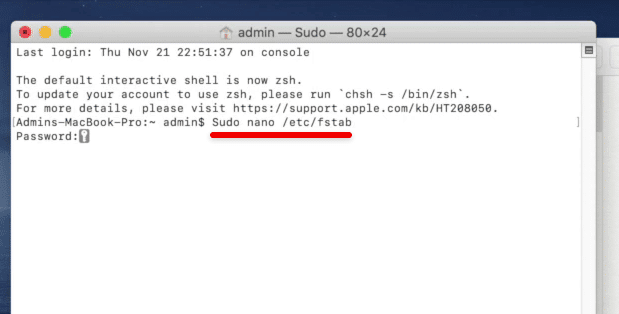
Commands
Commands

After that,  enter the next command but remember to change the NAME to your USB label. For example, my USB drive’ label is Data so I have written it but you should enter your USB drive’s name.

LABEL=NAME ntfs rw,auto, nobrowse
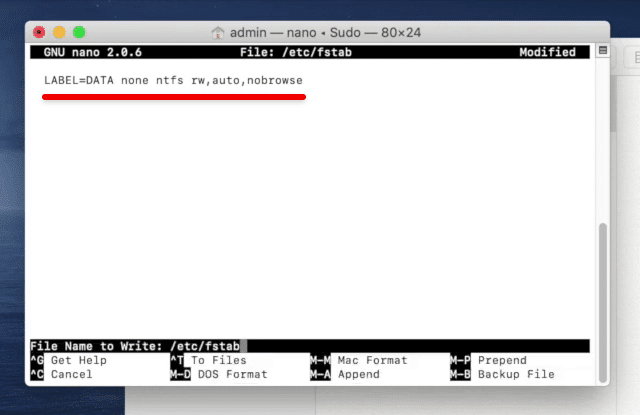
How to Write NTFS Drives in macOS Catalina and Mojave

If you have several NTFS drives which you’d like to write to, add and enter a different line for each like this.

When you’ve done that, save the file with Command + O and then press Command + X to close nano.
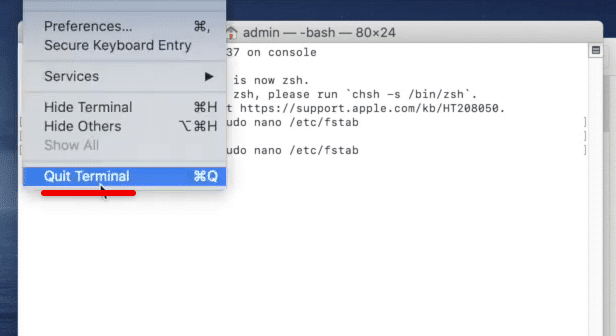
Quit
Quit

Now connect the USB and wait for a moment and then disconnect it. Reconnect it now and you should see it in the “/Volumes” directory. From Finder, click on Go > Go to Folder and navigate to “/Volumes” to see the drive.

Unlike every drive that pops up, it won’t pop up but appears on your desktop typically.

To undo this, enter the commands like the above steps to open the /etc/fstab file in nano. There, delete the particular line you added to the file and save the file and close the nano.

Speaking of writing NTFS drives, another easy and low-risk option aside from this process and the exFat option which works well on both operating system, the easiest and most reliable and safest option for not corrupting the files is the paid third-party drivers. We can’t say which one is better, but any of them will work fine.

That was all about Write NTFS Drives in macOS Catalina and Mojave. If you’ve done this, let us know how it went.
Tags: How to Write NTFS Drives in macOS CatalinaHow to Write NTFS Drives in macOS Catalina and MojaveNTFS Drives in macOS Catalina and MojaveWrite NTFS Drives in macOS CatalinaWrite NTFS Drives in macOS Catalina andWrite NTFS Drives in macOS Catalina and Mojave
Previous Post

How to Upgrade Kali Linux to Kali Linux 2023.1

Next Post

How to Install Android Q (Android 10) on Windows PC

Ali

Ali

Next Post
How to Install Android Q (Android 10) on Windows PC

How to Install Android Q (Android 10) on Windows PC

Leave a Reply Cancel reply

Your email address will not be published. Required fields are marked *

No Result
View All Result

Recent Articles

  • Download macOS Golden Gate Wallpaper (Official & High-Resolution)
  • Download macOS Golden Gate Installer: How to Install?
  • Download macOS Golden Gate ISO for VMware
  • Download macOS Golden Gate DMG for Clean Installation
  • Download Tiny11 26H1 ISO for Windows 11: Older Versions Available
  • Download VMware Workstation Pro 26H1 (Windows | Linux): Direct Downloads
  • Download macOS Unlocker for VMware Workstation Pro 26H1 | Old Versions Available
  • Best Way to Download macOS Big Sur ISO Image (Latest Version: 11.7.11)
  • Download macOS Big Sur DMG File (Latest Version: 11.7.11)
  • macOS Big Sur Download VMDK File | (Latest Version: 11.7.11)
Facebook Twitter Youtube

Browse by Category

  • Android (15)
  • Discord (3)
  • Downloads (17)
  • Featured (7)
  • Internet (50)
  • iOS (16)
  • Linux (10)
  • Mac (153)
  • Virtual Machine (31)
  • VirtualBox (81)
  • VMware (68)
  • Windows (80)

Downloads

Download macOS DMG
Download macOS ISO
Download macOS VMDK
Download Windows ISO

GEEKrar

We are a team of skilled writers, editors and tech enthusiasts that help you how to get tech into work, pros and cons, explain hows and whys, hacks, and fixes of new modern tech.

© 2026 geekRAR.com

We use cookies on our website to give you the most relevant experience by remembering your preferences and repeat visits. By clicking “Accept”, you consent to the use of ALL the cookies.
Do not sell my personal information.
Cookie settingsACCEPT
Manage consent

Privacy Overview

This website uses cookies to improve your experience while you navigate through the website. Out of these, the cookies that are categorized as necessary are stored on your browser as they are essential for the working of basic functionalities of the website. We also use third-party cookies that help us analyze and understand how you use this website. These cookies will be stored in your browser only with your consent. You also have the option to opt-out of these cookies. But opting out of some of these cookies may affect your browsing experience.
Necessary
Always Enabled
Necessary cookies are absolutely essential for the website to function properly. This category only includes cookies that ensures basic functionalities and security features of the website. These cookies do not store any personal information.
Non-necessary
Any cookies that may not be particularly necessary for the website to function and is used specifically to collect user personal data via analytics, ads, other embedded contents are termed as non-necessary cookies. It is mandatory to procure user consent prior to running these cookies on your website.
SAVE & ACCEPT
No Result
View All Result

© 2026 geekRAR.com

Go to mobile version