

All right! After you’re basically done with the virtual machine configuration, everything should work great. But things don’t go always as expected. When you switch on the machine, you’ll see a lovely screen with an error that points to “The CPU have been disabled by default. Power off or reset the virtual machine”. Here’s How to Fix The CPU has been disabled by the guest OS
While Windows computer isn’t the default system to install macOS. The important thing is, Apple doesn’t support installing macOS on non-Apple hardware and is neither willing to do. But that’s not the only one who does this. Perhaps, when we use the patch for VMware, that is because, unlike VirtualBox, VMware Workstation Player doesn’t support installing macOS by default. In this case, when you try to install macOS on VMware without the patch, you’ll end up without installing.
Since installing macOS, whatever version isn’t the supported way, there will be likely problems messing around. Whether you’ve an Intel or AMD processor, you’ll probably need to play the tricky steps. But if you’re installing Mojave on an AMD system, you’ll need to pull off a few more steps including the actual steps which are for both processors. This is a tiny change but really matters. How to Fix The CPU has been disabled by the guest OS
There are several reasons which might cause the problem. The first one is that you may have not configured the virtual machine for your AMD system. While AMD systems are different from Intel ones, we will need to use the different config key for setting up correctly. The other reason that the error can pop up is if you’ve installed the VMware or VirtualBox while the Hyper-v is installed.
While this problem usually happens when installing macOS on VMware, so we will take a look at How to Fix The CPU has been disabled by the guest OS
Table of Contents
Change The VM Hardware Compatibility to 10.x
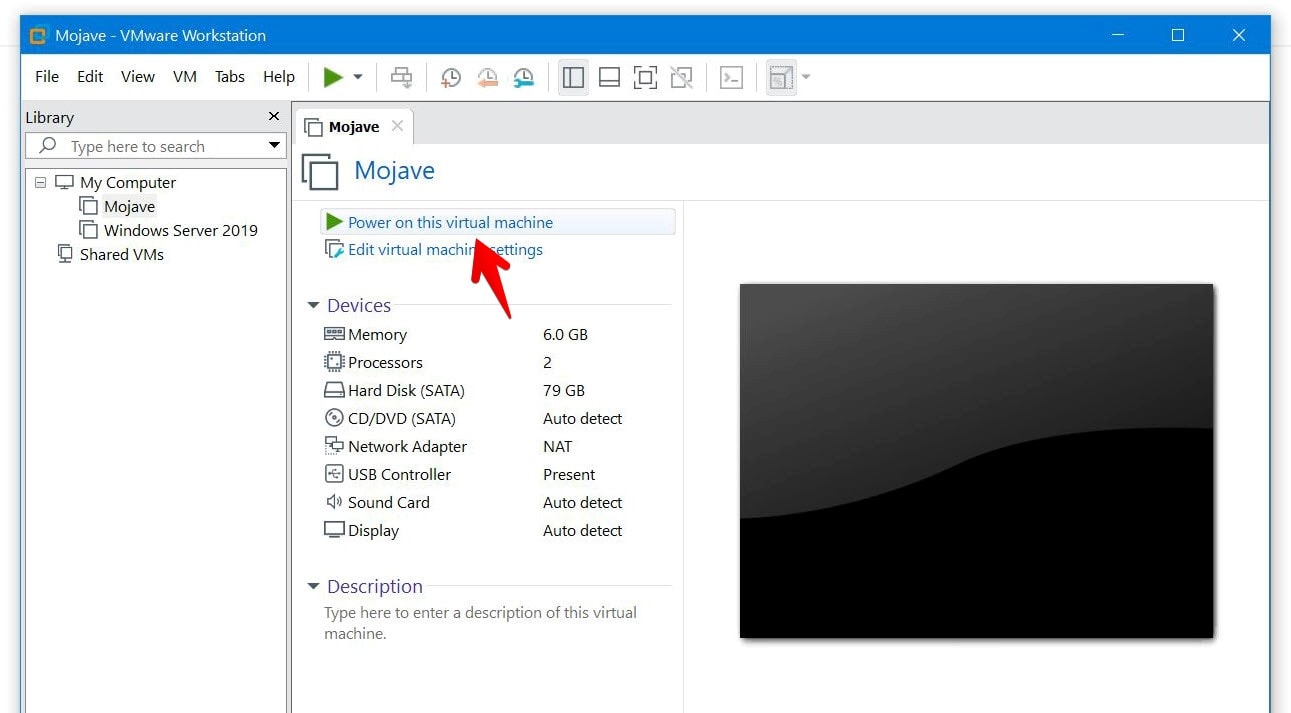
All the usual installing steps are important, but you need to perform some more steps in addition to them. The nice thing is, it’s all done from the vmx file. There are two ways you do get it done. The first way you could do it is from the VMware with the wizard. The other way you could do is from the vmx file. We’ll move with the easier one. This is simple as we have covered you with every step with shots. Here’s how to do it real quick. How to Fix The CPU has been disabled by the guest OS
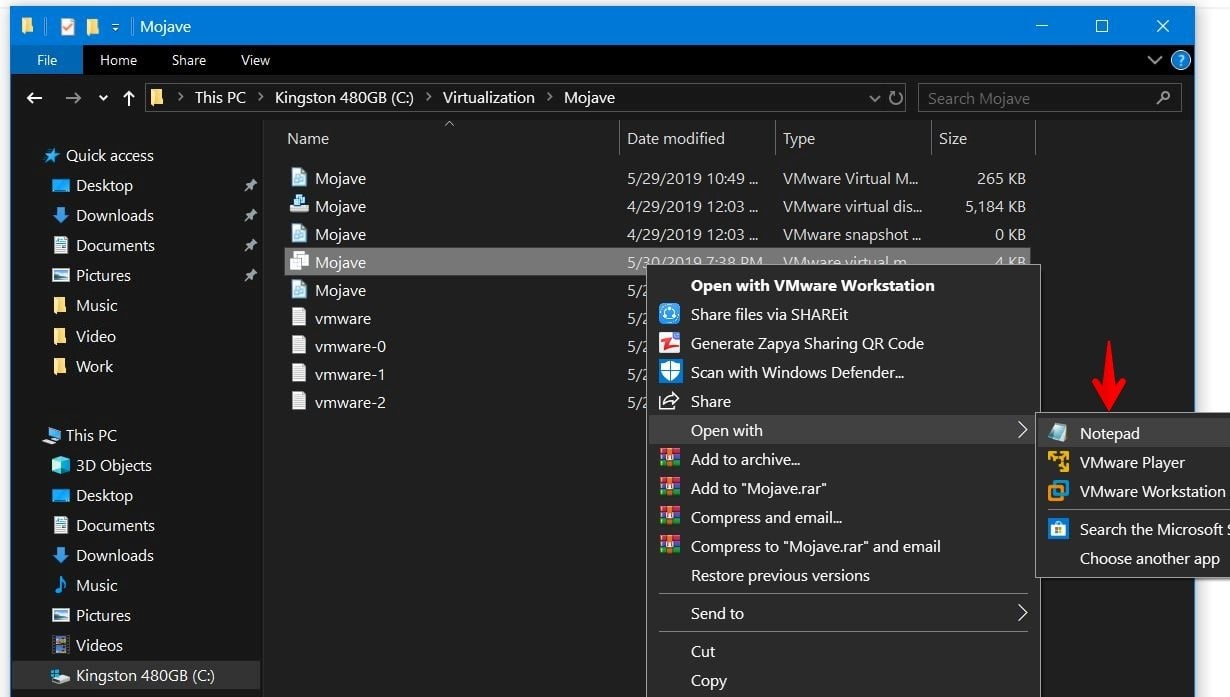
Go ahead and navigate to the virtual machine files. Now right click on the .vmx file and select Open with and choose Notepad.
When the file opened, change the version number to 10. It will change the virtual machine hardware compatibility to 10.
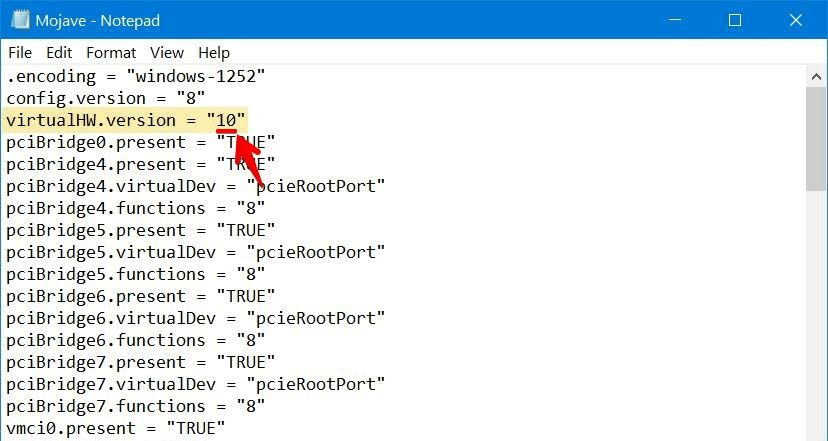
If you miss changing the hardware compatibility of the machine from VMware, you’ll likely encounter this problem.
Add The Config Key For The Virtual Machine (For AMD Systems Only)
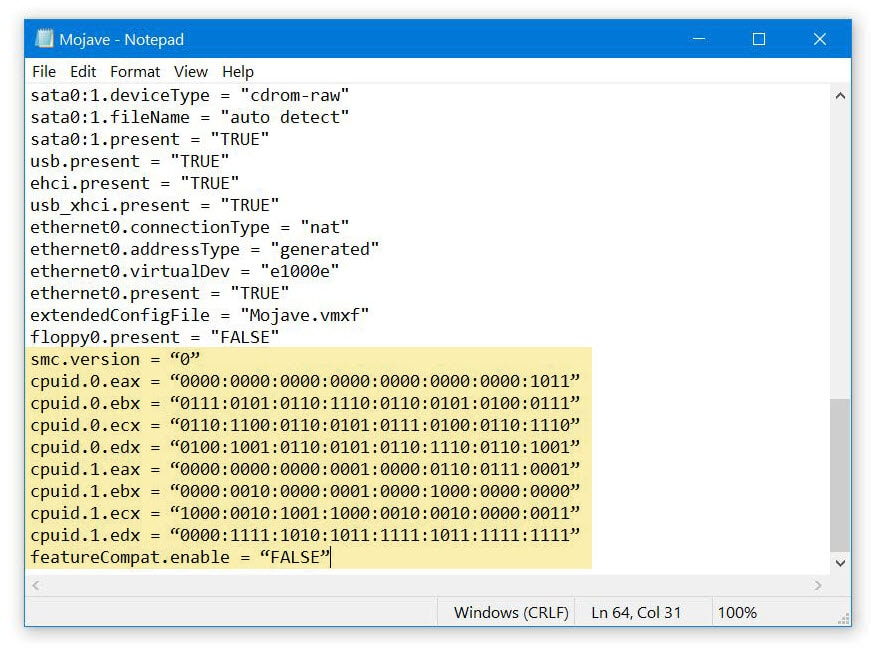
Now without closing the .vmx file, copy the following code and paste it at the end of all lines. If you’ve the config key smc.version = 0 already there, you may remove it and paste this in place of it. It should look like this.
cpuid.0.eax = “0000:0000:0000:0000:0000:0000:0000:1011”
cpuid.0.ebx = “0111:0101:0110:1110:0110:0101:0100:0111”
cpuid.0.ecx = “0110:1100:0110:0101:0111:0100:0110:1110”
cpuid.0.edx = “0100:1001:0110:0101:0110:1110:0110:1001”
cpuid.1.eax = “0000:0000:0000:0001:0000:0110:0111:0001”
cpuid.1.ebx = “0000:0010:0000:0001:0000:1000:0000:0000”
cpuid.1.ecx = “1000:0010:1001:1000:0010:0010:0000:0011”
cpuid.1.edx = “0000:1111:1010:1011:1111:1011:1111:1111”
featureCompat.enable = “FALSE”
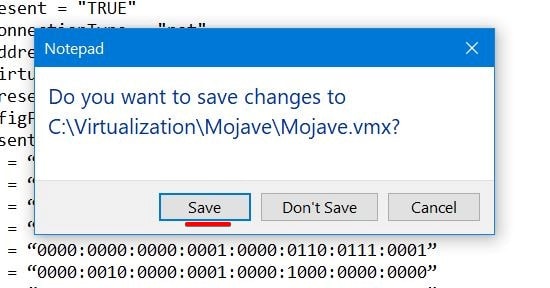
When you’re done with it, simply save it.
And you’re all set! All there’s left to do is switch the machine on and proceed with the installation.
That’s all well and good. Everything should work
Here are some important fixes given by one of our users @DOUG! Thanks man, so many people found this helpful so I have added your comment to the post for easier access…
Managed to get it working on VMWare 16.0 & a 3700X after looking at the vmware logs for a bit.
Several issues:
1) Ensure you are using normal double-quotes. When copying and pasting it’ll use pretty quotes but vmware will complain (not a valid boolean, etc.)
2) Disabling featureCompat.enable is only supported on hardware versions less than 9. Change that to TRUE (probably can just delete but haven’t tested that yet)
3) cpuid.ss & cpuid.ds are no longer supported on the cpus so need to be removed from the enabled features. Change cpuid.1.edx line to
“0000:0111:1000:1011:1111:1011:1111:1111”
4) With those changes I was then able to bump the virtualHW.version back up to 16.


I’m giving up, nothing works for me, after the loading screen I get an error “Your computer restared because of a problem”, I can’t even get to the install part…I have AMD Ryzen 9 4900H processor, any clue? or how should i set the conf. file, thank you in advance!
hello i using ryzen 5 3500x idon’t understand. why dont run my mouse and keyboard. please help me!
Help me with ryzen 5600h.
help me with Ryzen 7 7745HX
Ryzen 7 6800hs
changed Version from 21 to 20
smc.version = “0”
cpuid.0.eax = “0000:0000:0000:0000:0000:0000:0000:1011”
cpuid.0.ebx = “0111:0101:0110:1110:0110:0101:0100:0111”
cpuid.0.ecx = “0110:1100:0110:0101:0111:0100:0110:1110”
cpuid.0.edx = “0100:1001:0110:0101:0110:1110:0110:1001”
cpuid.1.eax = “0000:0000:0000:0001:0000:0110:0111:0001”
cpuid.1.ebx = “0000:0010:0000:0001:0000:1000:0000:0000”
cpuid.1.ecx = “1000:0010:1001:1000:0010:0010:0000:0011”
cpuid.1.edx = “0000:0111:1000:1011:1111:1011:1111:1111”
This worked for AMD Ryzen 7 5800H
This also worked for AMD Ryzen 7 7730U !
Thank you so much <3 :]
Also worked for Ryzen 5 2600 Six Core
Please help For Ryzen 7 1700x
I have an AMD Ryzen 5 3500U, on VMware Workstation 17 Player. I downloaded macOS Monterey and set MacOS 12 on VMware. It worked when I put in the vmx file “virtualHW.version = “16”” instead of 21 and i only added this at the end (no featureEnable.enable = “TRUE” or “FALSE”) :
“smc.version = “0”
cpuid.0.eax = “0000:0000:0000:0000:0000:0000:0000:1011”
cpuid.0.ebx = “0111:0101:0110:1110:0110:0101:0100:0111”
cpuid.0.ecx = “0110:1100:0110:0101:0111:0100:0110:1110”
cpuid.0.edx = “0100:1001:0110:0101:0110:1110:0110:1001”
cpuid.1.eax = “0000:0000:0000:0001:0000:0110:0111:0001”
cpuid.1.ebx = “0000:0010:0000:0001:0000:1000:0000:0000”
cpuid.1.ecx = “1000:0010:1001:1000:0010:0010:0000:0011”
cpuid.1.edx = “0000:0111:1000:1011:1111:1011:1111:1111″”
It didn’t work when i was trying with macOS Ventura, try macOS Monterey.
I made sure that i used normal double-quotes after copy-paste.
“virtualHW.version = “16”
only changed the version and macOS is running by the way i am using AMD Ryzen7 7700 cpu.
I would like to install on my laptop: ryzen 7 7730U with Radeon Graphic and 32 gigram
Anyone to test?
If I want to use it with a DAW like LUNA UAD or logicPro, does it work? Will it recognize my UAD sound card?
Or should I buy a MAC?
Thanks !!!
If you use an actual software don’t use VMware
ryzn 72700
smc.version = “0”
cpuid.0.eax = “0000:0000:0000:0000:0000:0000:0000:1011”
cpuid.0.ebx = “0111:0101:0110:1110:0110:0101:0100:0111”
cpuid.0.ecx = “0110:1100:0110:0101:0111:0100:0110:1110”
cpuid.0.edx = “0100:1001:0110:0101:0110:1110:0110:1001”
cpuid.1.eax = “0000:0000:0000:0001:0000:0110:0111:0001”
cpuid.1.ebx = “0000:0010:0000:0001:0000:1000:0000:0000”
cpuid.1.ecx = “1000:0010:1001:1000:0010:0010:0000:0011”
cpuid.1.edx = “0000:0111:1000:1011:1111:1011:1111:1111”
smbios.reflectHost = “TRUE”
hw.model = “MacBookPro14,3”
board-id = “Mac-551B86E5744E2388”
AMD Ryzen 9 7950X3D
and I found the solution by myself:
virtualHW.version = “10”
smc.version = “0”
cpuid.0.eax = “0000:0000:0000:0000:0000:0000:0000:1011”
cpuid.0.ebx = “0111:0101:0110:1110:0110:0101:0100:0111”
cpuid.0.ecx = “0110:1100:0110:0101:0111:0100:0110:1110”
cpuid.0.edx = “0100:1001:0110:0101:0110:1110:0110:1001”
cpuid.1.eax = “0000:0000:0000:0001:0000:0110:0111:0001”
cpuid.1.ebx = “0000:0010:0000:0001:0000:1000:0000:0000”
cpuid.1.ecx = “1000:0010:1001:1000:0010:0010:0000:0011”
cpuid.1.edx = “0000:0111:1000:1011:1111:1011:1111:1111”
Worked on 5800x3d thx
It works on AMD 7950x as well. Many Thanks
Worked on AMD Ryzen 7 7800x3D, thanks!
Also worked on 7900X
Mine is :AMD Ryzen 9 7950X3D. Could it be any workable soluiton? Thanks!
I have a Ryzen 5500U and it’s getting stuck at the Apple logo on Mac OS 10.13.
Can anyone help?
I tried to follow everything on this thread and I was able to run the full installation using the Sonoma ISO. But after the installation I get this during boot up.
“Your computer restarted because of a problem”
Windows 10. Threadripper 1900X. VMware Workstation 17
Any tips?
Here’s what I added to VMX:
virtualHW.version = “10”
featureCompat.enable = “FALSE”
smc.version = “0”
cpuid.0.eax = “0000:0000:0000:0000:0000:0000:0000:1011”
cpuid.0.ebx = “0111:0101:0110:1110:0110:0101:0100:0111”
cpuid.0.ecx = “0110:1100:0110:0101:0111:0100:0110:1110”
cpuid.0.edx = “0100:1001:0110:0101:0110:1110:0110:1001”
cpuid.1.eax = “0000:0000:0000:0001:0000:0110:0111:0001”
cpuid.1.ebx = “0000:0010:0000:0001:0000:1000:0000:0000”
cpuid.1.ecx = “1000:0010:1001:1000:0010:0010:0000:0011”
cpuid.1.edx = “0000:0111:1000:1011:1111:1011:1111:1111”
smbios.reflectHost = “TRUE”
It worked for me too, tho this is Laptop specs:
AMD Ryzen 7 5825U with Radeon Graphics
16.0 GB (15.4 GB usable) DDR4
and i am running Windows 11 Pro.
Using the settings you mentioned :
Then changed the Version from 16 to 10
Then added the following (Because i have an AMD CPU):
cpuid.0.eax = “0000:0000:0000:0000:0000:0000:0000:1011”
cpuid.0.ebx = “0111:0101:0110:1110:0110:0101:0100:0111”
cpuid.0.ecx = “0110:1100:0110:0101:0111:0100:0110:1110”
cpuid.0.edx = “0100:1001:0110:0101:0110:1110:0110:1001”
cpuid.1.eax = “0000:0000:0000:0001:0000:0110:0111:0001”
cpuid.1.ebx = “0000:0010:0000:0001:0000:1000:0000:0000”
cpuid.1.ecx = “1000:0010:1001:1000:0010:0010:0000:0011”
cpuid.1.edx = “0000:1111:1010:1011:1111:1011:1111:1111”
featureCompat.enable = “FALSE”
I will also add some additional problems i did run into before i get this to work. I’ve had problems with input, my mouse wouldn’t work as well as my keyboard, what i did is i’ve made sure in preferences where is optimize for gaming option i set this to “Never” and as well i changed my usb version from 1.1 to 2.0. This made the vm work normally, for those who have problems please do those steps.
I hope i did help some people.
For me at VMWare 17, below worked for Ryzen 5700G
virtualHW.version = “20”
…
smc.version = “0”
cpuid.0.eax = “0000:0000:0000:0000:0000:0000:0000:1011”
cpuid.0.ebx = “0111:0101:0110:1110:0110:0101:0100:0111”
cpuid.0.ecx = “0110:1100:0110:0101:0111:0100:0110:1110”
cpuid.0.edx = “0100:1001:0110:0101:0110:1110:0110:1001”
cpuid.1.eax = “0000:0000:0000:0001:0000:0110:0111:0001”
cpuid.1.ebx = “0000:0010:0000:0001:0000:1000:0000:0000”
cpuid.1.ecx = “1000:0010:1001:1000:0010:0010:0000:0011”
cpuid.1.edx = “0000:0111:1000:1011:1111:1011:1111:1111”
Ryzen 7 5800x
VirtuaHW Version From 21 to 18
virtualHW.version = „18“
smc.version = „0“
cpuid.0.eax = „0000:0000:0000:0000:0000:0000:0000:1011“
cpuid.0.ebx = „0111:0101:0110:1110:0110:0101:0100:0111“
cpuid.0.ecx = „0110:1100:0110:0101:0111:0100:0110:1110“
cpuid.0.edx = „0100:1001:0110:0101:0110:1110:0110:1001”
cpuid.1.eax = „0000:0000:0000:0001:0000:0110:0111:0001“
cpuid.1.ebx = „0000:0010:0000:0001:0000:1000:0000:0000“
cpuid.1 ecx = „1000:0010:1001:1000:0010:0010:0000:0011“
cpuid.1.edx = „0000:0111:1000:1011:1111:1011:1111:1111“
add USB 3.1 in the Setings
Hi, I used this configuration on vmware, with an AMD SIlver Athlon processor but it doesn’t work, can anyone help me?
.encoding = “windows-1252”
config.version = “8”
virtualHW.version = “10”
pciBridge0.present = “TRUE”
pciBridge4.present = “TRUE”
pciBridge4.virtualDev = “pcieRootPort”
pciBridge4.functions = “8”
pciBridge5.present = “TRUE”
pciBridge5.virtualDev = “pcieRootPort”
pciBridge5.functions = “8”
pciBridge6.present = “TRUE”
pciBridge6.virtualDev = “pcieRootPort”
pciBridge6.functions = “8”
pciBridge7.present = “TRUE”
pciBridge7.virtualDev = “pcieRootPort”
pciBridge7.functions = “8”
vmci0.present = “TRUE”
hpet0.present = “TRUE”
nvram = “macOS 13.nvram”
virtualHW.productCompatibility = “hosted”
powerType.powerOff = “soft”
powerType.powerOn = “soft”
powerType.suspend = “soft”
powerType.reset = “soft”
displayName = “macOS 13”
usb.vbluetooth.startConnected = “TRUE”
smc.present = “TRUE”
smbios.restrictSerialCharset = “TRUE”
firmware = “efi”
guestOS = “darwin22-64”
board-id.reflectHost = “TRUE”
ich7m.present = “TRUE”
tools.syncTime = “FALSE”
sound.autoDetect = “TRUE”
sound.virtualDev = “hdaudio”
sound.fileName = “-1”
sound.present = “TRUE”
numvcpus = “2”
cpuid.coresPerSocket = “2”
memsize = “12416”
sata0.present = “TRUE”
sata0:0.fileName = “macOS 13.vmdk”
sata0:0.present = “TRUE”
sata0:1.deviceType = “cdrom-image”
sata0:1.fileName = “D:\macOS Monterey by Techrechard.com.iso”
sata0:1.present = “TRUE”
usb.present = “TRUE”
ehci.present = “TRUE”
usb_xhci.present = “TRUE”
ethernet0.connectionType = “nat”
ethernet0.addressType = “generated”
ethernet0.virtualDev = “e1000e”
ethernet0.present = “TRUE”
extendedConfigFile = “macOS 13.vmxf”
floppy0.present = “FALSE”
smc.version = “0”
cpuid.0.eax = “0000:0000:0000:0000:0000:0000:0000:1011”
cpuid.0.ebx = “0111:0101:0110:1110:0110:0101:0100:0111”
cpuid.0.ecx = “0110:1100:0110:0101:0111:0100:0110:1110”
cpuid.0.edx = “0100:1001:0110:0101:0110:1110:0110:1001”
cpuid.1.eax = “0000:0000:0000:0001:0000:0110:0111:0001”
cpuid.1.ebx = “0000:0010:0000:0001:0000:1000:0000:0000”
cpuid.1.ecx = “1000:0010:1001:1000:0010:0010:0000:0011”
cpuid.1.edx = “0000:0111:1000:1011:1111:1011:1111:1111”
featureCompat.enable = “FALSE”
vmxstats.filename = “macOS 13.scoreboard”
numa.autosize.cookie = “20001”
numa.autosize.vcpu.maxPerVirtualNode = “2”
uuid.bios = “56 4d 81 a7 44 5d 5b 3a-8f 5a 2d a4 03 b4 34 9e”
uuid.location = “56 4d 81 a7 44 5d 5b 3a-8f 5a 2d a4 03 b4 34 9e”
pciBridge0.pciSlotNumber = “17”
pciBridge4.pciSlotNumber = “21”
pciBridge5.pciSlotNumber = “22”
pciBridge6.pciSlotNumber = “23”
pciBridge7.pciSlotNumber = “24”
usb.pciSlotNumber = “32”
ethernet0.pciSlotNumber = “160”
sound.pciSlotNumber = “33”
ehci.pciSlotNumber = “34”
usb_xhci.pciSlotNumber = “192”
sata0.pciSlotNumber = “35”
sata0:0.redo = “”
svga.vramSize = “134217728”
vmotion.checkpointFBSize = “134217728”
ethernet0.generatedAddress = “00:0c:29:b4:34:9e”
ethernet0.generatedAddressOffset = “0”
vmci0.id = “62141598”
monitor.phys_bits_used = “40”
cleanShutdown = “TRUE”
softPowerOff = “FALSE”
usb_xhci:1.speed = “2”
usb_xhci:1.present = “TRUE”
usb_xhci:1.deviceType = “hub”
usb_xhci:1.port = “1”
usb_xhci:1.parent = “-1”
usb_xhci:3.speed = “4”
usb_xhci:3.present = “TRUE”
usb_xhci:3.deviceType = “hub”
usb_xhci:3.port = “3”
usb_xhci:3.parent = “-1”
toolsInstallManager.updateCounter = “3”
usb_xhci:4.present = “TRUE”
usb_xhci:4.deviceType = “hid”
usb_xhci:4.port = “0”
usb_xhci:4.parent = “1”
Hi,
Using AMD Ryzen 7 PRO 4750U with Radeon Graphics 1.70 GHz. Got the vm to install until after it rebooted from the “Less than a minute remaining” phase and after that starts to boot with Apple logo and either fails a quarter of the way, or shows a strange black and white graphic of an Apple Mouse, etc.
Here is the .vmx being used:
.encoding = “windows-1252”
config.version = “8”
virtualHW.version = “10”
pciBridge0.present = “TRUE”
pciBridge4.present = “TRUE”
pciBridge4.virtualDev = “pcieRootPort”
pciBridge4.functions = “8”
pciBridge5.present = “TRUE”
pciBridge5.virtualDev = “pcieRootPort”
pciBridge5.functions = “8”
pciBridge6.present = “TRUE”
pciBridge6.virtualDev = “pcieRootPort”
pciBridge6.functions = “8”
pciBridge7.present = “TRUE”
pciBridge7.virtualDev = “pcieRootPort”
pciBridge7.functions = “8”
vmci0.present = “TRUE”
hpet0.present = “TRUE”
nvram = “macOS 14 Sonoma.nvram”
virtualHW.productCompatibility = “hosted”
gui.exitOnCLIHLT = “FALSE”
powerType.powerOff = “soft”
powerType.powerOn = “soft”
powerType.suspend = “soft”
powerType.reset = “soft”
displayName = “macOS 14 Sonoma”
usb.vbluetooth.startConnected = “TRUE”
smc.present = “TRUE”
smbios.restrictSerialCharset = “TRUE”
firmware = “efi”
guestOS = “darwin23-64”
board-id.reflectHost = “TRUE”
ich7m.present = “TRUE”
tools.syncTime = “FALSE”
sound.autoDetect = “TRUE”
sound.virtualDev = “hdaudio”
sound.fileName = “-1”
sound.present = “TRUE”
numvcpus = “2”
cpuid.coresPerSocket = “2”
memsize = “8192”
sata0.present = “TRUE”
sata0:0.fileName = “macOS 14 Sonoma.vmdk”
sata0:0.present = “TRUE”
sata0:1.deviceType = “cdrom-image”
sata0:1.fileName = “C:\Users\XXXXXX\Downloads\macOS Sonoma ISO by GEEKRAR.iso”
sata0:1.present = “TRUE”
usb.present = “TRUE”
ehci.present = “TRUE”
usb_xhci.present = “TRUE”
ethernet0.connectionType = “nat”
ethernet0.addressType = “generated”
ethernet0.virtualDev = “vmxnet3”
ethernet0.present = “TRUE”
extendedConfigFile = “macOS 14 Sonoma.vmxf”
floppy0.present = “FALSE”
smc.version = “0”
cpuid.0.eax = “0000:0000:0000:0000:0000:0000:0000:1011”
cpuid.0.ebx = “0111:0101:0110:1110:0110:0101:0100:0111”
cpuid.0.ecx = “0110:1100:0110:0101:0111:0100:0110:1110”
cpuid.0.edx = “0100:1001:0110:0101:0110:1110:0110:1001”
cpuid.1.eax = “0000:0000:0000:0001:0000:0110:0111:0001”
cpuid.1.ebx = “0000:0010:0000:0001:0000:1000:0000:0000”
cpuid.1.ecx = “1000:0010:1001:1000:0010:0010:0000:0011”
cpuid.1.edx = “0000:0111:1000:1011:1111:1011:1111:1111”
smbios.reflectHost = “TRUE”
hw.model = “MacBookPro 14,3”
board-id = “Mac-551B86E5744E2388”
vmxstats.filename = “macOS 14 Sonoma.scoreboard”
numa.autosize.cookie = “20001”
numa.autosize.vcpu.maxPerVirtualNode = “2”
uuid.bios = “56 4d cf fe 6f 3a ee 73-54 7d aa 35 ef 91 54 b0”
uuid.location = “56 4d cf fe 6f 3a ee 73-54 7d aa 35 ef 91 54 b0”
pciBridge0.pciSlotNumber = “17”
pciBridge4.pciSlotNumber = “18”
pciBridge5.pciSlotNumber = “19”
pciBridge6.pciSlotNumber = “20”
pciBridge7.pciSlotNumber = “32”
sound.pciSlotNumber = “33”
ehci.pciSlotNumber = “34”
vmci0.pciSlotNumber = “35”
sata0.pciSlotNumber = “36”
usb.pciSlotNumber = “35”
ethernet0.pciSlotNumber = “160”
usb_xhci.pciSlotNumber = “192”
sata0:0.redo = “”
svga.vramSize = “134217728”
vmotion.checkpointFBSize = “134217728”
ethernet0.generatedAddress = “00:0c:29:91:54:b0”
ethernet0.generatedAddressOffset = “0”
vmci0.id = “-275688272”
monitor.phys_bits_used = “40”
cleanShutdown = “TRUE”
softPowerOff = “FALSE”
usb_xhci:1.speed = “2”
usb_xhci:1.present = “TRUE”
usb_xhci:1.deviceType = “hub”
usb_xhci:1.port = “1”
usb_xhci:1.parent = “-1”
usb_xhci:3.speed = “4”
usb_xhci:3.present = “TRUE”
usb_xhci:3.deviceType = “hub”
usb_xhci:3.port = “3”
usb_xhci:3.parent = “-1”
usb:1.speed = “2”
usb:1.present = “TRUE”
usb:1.deviceType = “hub”
usb:1.port = “1”
usb:1.parent = “-1”
toolsInstallManager.updateCounter = “53”
usb_xhci:4.present = “TRUE”
usb_xhci:4.deviceType = “hid”
usb_xhci:4.port = “0”
usb_xhci:4.parent = “1”
Any ideas? What is missing?
Thanks!
Anyone? Could really use some suggestions…
Thanks!
Hi Darren, you forgot to read the article 😄. Copy these lines and paste them inside your vmx:
cpuid.0.eax = “0000:0000:0000:0000:0000:0000:0000:1011”
cpuid.0.ebx = “0111:0101:0110:1110:0110:0101:0100:0111”
cpuid.0.ecx = “0110:1100:0110:0101:0111:0100:0110:1110”
cpuid.0.edx = “0100:1001:0110:0101:0110:1110:0110:1001”
cpuid.1.eax = “0000:0000:0000:0001:0000:0110:0111:0001”
cpuid.1.ebx = “0000:0010:0000:0001:0000:1000:0000:0000”
cpuid.1.ecx = “1000:0010:1001:1000:0010:0010:0000:0011”
cpuid.1.edx = “0000:0111:1000:1011:1111:1011:1111:1111”
facing the same problem, its stuck on less than a minute remaining and after that the memory and CPU usage is very low
How fix this problem “Your computer restart because of a problem”. Amd 5 4500U, virtualHW.version = “16”, 10gb 6 cores for MasOs 14 sonoma
I have tried all the combinations above but still fails after getting the apple logo and about 1/4 way up the line under the logo.
AMD Ryzen 7
Thank you so much bro this helped me a lot, now, my macOS X Catalina machine just work great on my ryzen desktop !!!!
Just, the instalation process didn’t work directly on my desktop so i used an intel laptop but it has less performances.
for AMD cpus MACOS ventura will not work,https://github.com/paolo-projects/auto-unlocker/issues/92 see this ventura will not work
This was an old post and it still helped me heaps very thankful for the real work you guys do to help people in the community thanks again
Hi, thanks for this Lifesaver post. I got it Up & running in vmWare 17.0.1, keeping the HV version in 20:
AMD Ryzen 5900X
Steps:
– Kept virtualHW.version = “20”
– Replace copy pastes quotes
– Change USB version from 1.1 to 2.0 in VMWare VM settings (it started to boot, but gave me this two screens after initial apple logo: https://i.stack.imgur.com/B6vzNm.jpg , https://i.stack.imgur.com/YTsC8m.jpg)
– EOF settings:
smc.version = “0”
cpuid.0.eax = “0000:0000:0000:0000:0000:0000:0000:1011”
cpuid.0.ebx = “0111:0101:0110:1110:0110:0101:0100:0111”
cpuid.0.ecx = “0110:1100:0110:0101:0111:0100:0110:1110”
cpuid.0.edx = “0100:1001:0110:0101:0110:1110:0110:1001”
cpuid.1.eax = “0000:0000:0000:0001:0000:0110:0111:0001”
cpuid.1.ebx = “0000:0010:0000:0001:0000:1000:0000:0000”
cpuid.1.ecx = “1000:0010:1001:1000:0010:0010:0000:0011”
cpuid.1.edx = “0000:0111:1000:1011:1111:1011:1111:1111”
Good luck!
Tysm for this, worked great for me
thanks
Thanks this worked for me as well
thanks man
hi did u get past that mice screen i got the same issue
has any one found a solution to this?
on my computer (r5-2600), that only work like that :
change 16 to 10 :
virtualHW.version = “10”
add :
smc.version = “0”
cpuid.0.eax = “0000:0000:0000:0000:0000:0000:0000:1011”
cpuid.0.ebx = “0111:0101:0110:1110:0110:0101:0100:0111”
cpuid.0.ecx = “0110:1100:0110:0101:0111:0100:0110:1110”
cpuid.0.edx = “0100:1001:0110:0101:0110:1110:0110:1001”
cpuid.1.eax = “0000:0000:0000:0001:0000:0110:0111:0001”
cpuid.1.ebx = “0000:0010:0000:0001:0000:1000:0000:0000”
cpuid.1.ecx = “1000:0010:1001:1000:0010:0010:0000:0011”
cpuid.1.edx = “0000:0111:1000:1011:1111:1011:1111:1111”
that’s all
bro this worked one go thanks weeks i was tryna get this to work and that right there work like a charm
This worked for my r7-5800H too! Thanks!
this?
change 16 to 10 :
virtualHW.version = “10”
add :
smc.version = “0”
cpuid.0.eax = “0000:0000:0000:0000:0000:0000:0000:1011”
cpuid.0.ebx = “0111:0101:0110:1110:0110:0101:0100:0111”
cpuid.0.ecx = “0110:1100:0110:0101:0111:0100:0110:1110”
cpuid.0.edx = “0100:1001:0110:0101:0110:1110:0110:1001”
cpuid.1.eax = “0000:0000:0000:0001:0000:0110:0111:0001”
cpuid.1.ebx = “0000:0010:0000:0001:0000:1000:0000:0000”
cpuid.1.ecx = “1000:0010:1001:1000:0010:0010:0000:0011”
cpuid.1.edx = “0000:0111:1000:1011:1111:1011:1111:1111”
That works for me as well. Thank you.
Processor: AMD Ryzen 5 3500X 6-Core Processor
This is the gold man, worked like a charm, much thanks!
thank you so much dude, this worked (vmware 17)
Nice! Worked on 5800x
thanks dude, works on my Ryzen 7 5700g
Thanks
This got the installation under way for me, on a Ryzen 5 2500U. Many thanks! On the first attempt it got as far as selecting the disk to install on, but no disk was shown. On the second attempt I went into Disk Utility and found that it wasn’t formatted. After doing that, it was available for the installation which went ahead smoothly.
how to do it please share
Worked on r5-4600H – 6Core – Thank you Jumlka
Thank you.
Worked for me Vmware Workstation 17Pro
Ryzen5 5600x
Thank you Thank you.
ryzen 5 5600g worked , thank you man
This worked for my Ryzen 5 5500U as well
Thanks ! I was having the same error with MacOs Ventura, this fix all my problems
You’re amaziing. thank you
You absolute legend.
For anyone that has a mouse issue i just enabled USB 2.0 port in VM options
you are fucking good man 🙂 Work the ventura 13
For anyone that has a mouse that doesn’t work, what I did was left the version as 10 and I could use the mouse. Good luck!
I am having issues with mouse and keyboard, I am not able to use any of it when the installation starts. Is there any fix to this? Thanks
Even if the post is outdated, combined with the DOUG tips and comment section I managed to boot MacOs 12
Here’s my end of file, I didnt swap the VmwareHW version, let it to 19.
cpuid.0.eax = “0000:0000:0000:0000:0000:0000:0000:1011”
cpuid.0.ebx = “0111:0101:0110:1110:0110:0101:0100:0111”
cpuid.0.ecx = “0110:1100:0110:0101:0111:0100:0110:1110”
cpuid.0.edx = “0100:1001:0110:0101:0110:1110:0110:1001”
cpuid.1.eax = “0000:0000:0000:0001:0000:0110:0111:0001”
cpuid.1.ebx = “0000:0010:0000:0001:0000:1000:0000:0000”
cpuid.1.ecx = “1000:0010:1001:1000:0010:0010:0000:0011”
cpuid.1.edx = “0000:0111:1000:1011:1111:1011:1111:1111”
featureCompat.enable = “TRUE”
I have a Ryzen 7
Hi,
can you or anyone else please help me with a config for
Device name DESKTOP-8O7EQC1
Processor AMD A9-9420e RADEON R5, 5 COMPUTE CORES 2C+3G 1.80 GHz
Installed RAM 4.00 GB (3.83 GB usable)
Device ID A33F8BEC-F33C-42B7-BA40-22021F6EA1C8
Product ID 00330-80000-00000-AA751
System type 64-bit operating system, x64-based processor
Pen and touch No pen or touch input is available for this display
Many thanks!
Razvan
That worked for me Thank you!
Thank you so much mate, one solution is this 🙂
thanks man i tried everything finally ur config helped me out of this
oh my god your a life saver
it work to me. macos 13. vmware 17
downgrade the version of the VM to v10x
now manually edit the .VMX VM cnfiguration file (use notepad)
now find and change the line from false to true
featureCompat.enable = “TRUE”
then add this
smc.version = “0”
cpuid.0.eax = “0000:0000:0000:0000:0000:0000:0000:1011”
cpuid.0.ebx = “0111:0101:0110:1110:0110:0101:0100:0111”
cpuid.0.ecx = “0110:1100:0110:0101:0111:0100:0110:1110”
cpuid.0.edx = “0100:1001:0110:0101:0110:1110:0110:1001”
cpuid.1.eax = “0000:0000:0000:0001:0000:0110:0111:0001”
cpuid.1.ebx = “0000:0010:0000:0001:0000:1000:0000:0000”
cpuid.1.ecx = “1000:0010:1001:1000:0010:0010:0000:0011”
cpuid.1.edx = “0000:0111:1000:1011:1111:1011:1111:1111”
smbios.reflectHost = “TRUE”
hw.model = “MacBookPro14,3”
board-id = “Mac-551B86E5744E2388”
this worked on me for
AMD FX 6300 CPU
VMWARE Workstation 16.1
Unlocker 4.13 (yes is already out!)
PD: dont change virtual cpu count, keep 1 core and 2 threads.
Good luck and spread da word :3
YOU man did a great job after many attempt finally i can run thank you very much
after so many guides that was the solution for me!
i have am 5900x
after i add this to my config file it worked
thank you
For my AMD Ryzen 7 5700U
Ofcourse DOUG’s insights helped, so thank you.
My end of VMX file-
cpuid.0.eax = “0000:0000:0000:0000:0000:0000:0000:1011”
cpuid.0.ebx = “0111:0101:0110:1110:0110:0101:0100:0111”
cpuid.0.ecx = “0110:1100:0110:0101:0111:0100:0110:1110”
cpuid.0.edx = “0100:1001:0110:0101:0110:1110:0110:1001”
cpuid.1.eax = “0000:0000:0000:0001:0000:0110:0111:0001”
cpuid.1.ebx = “0000:0010:0000:0001:0000:1000:0000:0000”
cpuid.1.ecx = “1000:0010:1001:1000:0010:0010:0000:0011”
cpuid.1.edx = “0000:0111:1000:1011:1111:1011:1111:1111”
REMOVED featureCompat.enable = “FALSE”
Bumped the virtualHW.version back up to 16.
And macOS Big Sur Beta fired up.
Wanted to share what worked for me so it helps others.
Thank you.
Soul
Works adding this lines on vmx file!!
My cpu: AMD Ryzen 5 4500U
Thanks!
Doug’s settings didn’t quite work for me, but these ones did. VM HW version is 19. Thanks.
Running macOS 11.1 on 3.19 GHz Ryzen 7 5800H – Asus ROG Strix G17 gaming laptop (2021)
Ryzen 5900x here, it worked, delted featureCompat as well. and keep virtualHW.version = “18”, with guest os Mac OS X Sierra
Thanks man! That worked for me for MacOS Monterey already!
ryzen 7 4800h Worked for me!! thank you LEGEND
You are right!
REMOVE featureCompat.enable = “FALSE” works!
The macOS installer start successfully!
Thank you man it worked for Ryzen 5 5500u
this worked on my ryzen 5 7600X tysm
Thanks, that worked from ryzen 5 7600X
my vmx conf:
virtualHW.version = “16”
…
cpuid.0.eax = “0000:0000:0000:0000:0000:0000:0000:1011”
cpuid.0.ebx = “0111:0101:0110:1110:0110:0101:0100:0111”
cpuid.0.ecx = “0110:1100:0110:0101:0111:0100:0110:1110”
cpuid.0.edx = “0100:1001:0110:0101:0110:1110:0110:1001”
cpuid.1.eax = “0000:0000:0000:0001:0000:0110:0111:0001”
cpuid.1.ebx = “0000:0010:0000:0001:0000:1000:0000:0000”
cpuid.1.ecx = “1000:0010:1001:1000:0010:0010:0000:0011”
cpuid.1.edx = “0000:0111:1000:1011:1111:1011:1111:1111”
8GB RAM
2 num processors
4 cores per processors
read the detailed fix for AMD Ryzen 7 5800X:
https://stackoverflow.com/a/70764448/11192062
maybe solve problems for other AMD Ryzen 5xxx series CPUs as well.
Thanks for sharing the link
It works for me, thanks! AMD 5600G
AMD Ryzen 7 5800X
needs to be change the cpuid.1.edx
from: cpuid.1.edx = “0000:1111:1010:1011:1111:1011:1111:1111”
to: cpuid.1.edx = “0000:0111:1000:1011:1111:1011:1111:1111”
Full vmx modification:
smc.version = “0”
cpuid.0.eax = “0000:0000:0000:0000:0000:0000:0000:1011”
cpuid.0.ebx = “0111:0101:0110:1110:0110:0101:0100:0111”
cpuid.0.ecx = “0110:1100:0110:0101:0111:0100:0110:1110”
cpuid.0.edx = “0100:1001:0110:0101:0110:1110:0110:1001”
cpuid.1.eax = “0000:0000:0000:0001:0000:0110:0111:0001”
cpuid.1.ebx = “0000:0010:0000:0001:0000:1000:0000:0000”
cpuid.1.ecx = “1000:0010:1001:1000:0010:0010:0000:0011”
cpuid.1.edx = “0000:0111:1000:1011:1111:1011:1111:1111”
smbios.reflectHost = “TRUE”
hw.model = “MacBookPro14,3”
board-id = “Mac-551B86E5744E2388”
VM hardware: 15.X
VM host sw config:
VMWARE Workstation PRO 16.2.1 and unlocker 3.0.2
GREAT JOB! It works for me finally! Thanks 😀
VMWare 16.2.0 / Auto-Unlocker 1.13 / macOS 12 // AMD 5900X
Thank you so much. working on the ryzen 5 3600 Vmware WorkStation 17: MAC Ventures
till which line i need to copy the code
i tell you what worked for me ryzen 5 3600
i just pressed enter at the very end of code and pasted this as it is(no line gap) (everything below) :-
smc.version = “0”
cpuid.0.eax = “0000:0000:0000:0000:0000:0000:0000:1011”
cpuid.0.ebx = “0111:0101:0110:1110:0110:0101:0100:0111”
cpuid.0.ecx = “0110:1100:0110:0101:0111:0100:0110:1110”
cpuid.0.edx = “0100:1001:0110:0101:0110:1110:0110:1001”
cpuid.1.eax = “0000:0000:0000:0001:0000:0110:0111:0001”
cpuid.1.ebx = “0000:0010:0000:0001:0000:1000:0000:0000”
cpuid.1.ecx = “1000:0010:1001:1000:0010:0010:0000:0011”
cpuid.1.edx = “0000:0111:1000:1011:1111:1011:1111:1111”
smbios.reflectHost = “TRUE”
hw.model = “MacBookPro14,3”
board-id = “Mac-551B86E5744E2388”
i used this code on my amd ryzen 3 3200G (all of this code) but it keeps boot looping when i try to install macos 13 on vmware workstation 17 player what does i need to fix
Hello Ali, This was really helpful. I just installed it on Ryzen 5 3600 🙂 Thanks
thats great! thanks for letting me know
Mine doesn’t work. The error was:
Feature ‘cpuid.ds’ was absent, but must be present.
Feature ‘cpuid.ss’ was absent, but must be present.
Module ‘FeatureCompatLate’ power on failed.
Value ““FALSE”” for variable “featureCompat.enable” is not a valid boolean value. Using value “TRUE”.
Failed to start the virtual machine.
Virtualization is turnt on and other virtual machines were running well.
The last comment really did the trick for me, VMWare Workstation Pro 16 running Big Sur on
virtualHW.version = 19 (default setting)
Awesome it worked! Thank you so much
On Ryzen 3900x / win 10 with vmware WS and player I had to delete featureCompat.enable = “TRUE” – then it finally worked. Thanks!
Great! thanks for your notes
I am using VMWare Workstation 16.1 it loads half way and starts again and again
tried all the changes below I am using a 3900x / Win 10 Pro I am getting this error
Value aeoe0ae cant do it exactly but says for variable “smc.version” is not a valid integer value. x using value “-1”.
Thanks for your Help !!!! Don
I think you can try change the Hardware Version to Version 10 and don´t fill in the line “smc.version = “0”
Got IOS loaded and starts up but now I cant get the mouse to work so l cant proceed with the install when l try to hit next after it picks the country the mouse is gone and l have to do Ctrl Alt Del to get out of the windows Stuck here
sorry for the late reply, i saw your post in the forum. let me know if you are still having mouse issues
Thanks All Up and Running this would not be possible without this Forum !!!
awesome man!
ABSOLUTELY AMAZING
awesome!
Thanks a million Doug, finally a working Sierra VM after adding your suggested lines and realising I had to change the double quotes, modify cpuid.1.edx = “0000:0111:1000:1011:1111:1011:1111:1111” and changing featureCompat.enable = “TRUE”
VM running well on a Ryzen 3 3200G. You did great work researching this so we don’t have to, much appreciated.
Ah I see my thanks should go to Ali too! Sorry.
Thanks man, used up 8 hours grinding to solve the problem, what you did saved me :). Thanks a lot
I love you Doug. Finally got High Sierra to install after many hours of trying in both VirtualBox and VMWare…
Thank You! Your suggestions worked!
What the heck the DOUG solution did WORK!
Thanks man!!
I followed the steps and it didn’t work for meat first. what i will say is the steps resolve most of my issues. I got stuck at the “How to Fix This virtual machine requires AVX2 but AVX is not present” I resolve that by click the link above that talks about the issues. The resolution for that was change virtual hardware version to 10.
thank you!
Thank you Doug! Your suggestions worked!
Thanks a lot :))
Started with trouble with my Linux Journey….this promises nothing good for me as windows administrator.
You need to restrict the VM to two cores 1 cpu for this to work
Thanks for noting this
You might want to check that. I’m running 2 processors x 4 cores and MacOS sees them fine.
[~] sysctl -a | grep hw\..*cpu:
hw.ncpu: 8
hw.activecpu: 8
hw.physicalcpu: 8
hw.logicalcpu: 8
Hi Doug,
Thank you thank you thank you!!!!
This is what worked for me:
smc.version = “0”
cpuid.0.eax = “0000:0000:0000:0000:0000:0000:0000:1011”
cpuid.0.ebx = “0111:0101:0110:1110:0110:0101:0100:0111”
cpuid.0.ecx = “0110:1100:0110:0101:0111:0100:0110:1110”
cpuid.0.edx = “0100:1001:0110:0101:0110:1110:0110:1001″
cpuid.1.eax = “0000:0000:0000:0001:0000:0110:1010:0101”
cpuid.1.ebx = “0000:0010:0000:0001:0000:1000:0000:0000”
cpuid.1.ecx = “1000:0010:1001:1000:0010:0010:0000:0011”
cpuid.1.edx = “0000:0111:1000:1011:1111:1011:1111:1111”
featureCompat.enable = “TRUE”
nothing else nothing more I have lost hope after trying for days to get big sur on vmware, i even read that it won’t happen if I have an APU, low and behold I couldn’t believe it when I saw the installation going on!
Quick question: I noticed that the sound while playing a youtube video is choppy, having never dealt with a mac before is there a driver fix perhaps for this?
Also I tried to create an Apple ID but it seems to be stuck and not following through.
Peace
Steve
Hey Steveo, Yeah Doug is awesome with that fix, and has help a lot of us out. I will check around and see if there is any known issues with audio or drive updates. We’re launching a forum to help users find solutions to these issues. Sign up whenever you can! forum.geekrar.com, we’ll start opening up the discussion board next month
Just did, thank you Ali 🙂
I have no idea on the audio, only use the VM for Xcode and don’t have an audio device configured.
I didn’t create an Apple ID in MacOS, however am successfully using ones that I had created previously, if that helps.
You are awesome. Thank you.
Thank you so much !!!!!!!!
Working on Big Sur on AMD Ryzen 9
Worked for me to emulate Mojave in VMWare Player 16 in Windows 11
My specs is Ryzen 3550H
Steveo,
These worked for my ryzen 9 5950. Where did you come up with them?
Worked for Ryzen 9 5900HX.
-Update to my previous comment-
The following line: cpuid.1.ecx = “1000:0010:1001:1000:0010:0010:0000:0011”
gives me the following error (shortened it for ease):
“Feature ‘cpuid.pclmulqdq, *ssse3 *sse41 *sse42 *aes’ was absent but must be present
Module FeatureCompatLate power on failed.”
FYI my Workshop is 16.
These changes are primary for AMD users to fool MacOS into thinking that an AMD CPU is an Intel CPU.
In particular, the cpuid.0.eax line specifices a Nehalem-based processor, and other the cpuid.0.* lines spell out ‘GenuineIntel’. The cpuid.1.* lines are used to specify particular features. In your case, you’ve turned on the bits that tell the VM your CPU supports pclmulqdq, ssse3, sse41, sse42 & aes but when VMWare tries to validate that it determines that your physical CPU doesn’t actually support those features.
Most likely your CPU is too old to support running the newer MacOS versions. Sorry.
Doesn’t. Even. Work. Person with an Intel CPU coming through.
I guess i’m one of those unlucky chosen ones that will never ever have these damn fancy things to work.
I feel the same way, I’ve had plenty of issues with intel. which os are you installing?
I own a Ryzen 9 3900X, and I made all the recommended changes to the vmx file (including those from Doug), but when I try to start the VM I get the below errors:
Feature ‘cpuid.ds’ was absent, but must be present.
Feature ‘cpuid.ss’ was absent, but must be present.
Module ‘FeatureCompatLate’ power on failed.
Failed to start the virtual machine.
I checked and all the quotation marks are correct.
Change featureCompat.enable = “False” to “True
FINALLY It works on my Ryzen 7
Thank you 😭😭😭
You saved my day 🙂
AMD Ryzen 3950x, 32GB, Windows 10, VMWARE Workstation 16, guest MacOS 10.13.6
Point 2) and 3) are the tricks.
You Glorious Bastard, Thank you Doug. You fixed everything with one post.
Thanks for the fix!
this saved my bacon on an AMD EPYC processor! thank you!
This is the working solution for my AMD Ryzen 7 4700U
Thank you… save my day.
Thanks
you save me!
important #2 and #3.
I got the same issue
You are fucking legend
Thank you – this sorted it out for me!
Doug, you are a freakin genious!
Thank you so much. I wasted so many hours getting a macOS VM to work and this finally solved the problem (Ryzen 3700X)
How did you do? I use AMD RYZEN 7 4000 Series, Could help me please!
Thank you so much for your contribution.
I had the same issue and followed your instructions to resolve the issue.
It is working fine now.
great to hear
Legend Doug
Agreed
Managed to get it working on VMWare 16.0 & a 3700X after looking at the vmware logs for a bit.
Several issues:
1) Ensure you are using normal double-quotes. When copying and pasting it’ll use pretty quotes but vmware will complain (not a valid boolean, etc.)
2) Disabling featureCompat.enable is only supported on hardware versions less than 9. Change that to TRUE (probably can just delete but haven’t tested that yet)
3) cpuid.ss & cpuid.ds are no longer supported on the cpus so need to be removed from the enabled features. Change cpuid.1.edx line to
“0000:0111:1000:1011:1111:1011:1111:1111”
4) With those changes I was then able to bump the virtualHW.version back up to 16.
Thanks for your findings. This will be helpful to the community.
It worked like a charm. thanks, doug.
This worked for me on Ryzen 3950x, using the same CPU id keys.
Seconding, if you’re copy/pasting to notepad, make sure you edit the quotes, as their character string on this website is not a regular quote. Delete them and re-enter the proper keyboard quote key for each one.
Thank you so much ,after changing the foll0wing it starts working
1)featureCompat.enable = “TRUE”
2)cpuid.1.edx line to “0000:0111:1000:1011:1111:1011:1111:1111”
(I am using Ryzen-5 3500U).Thank you again
I was able to run the VM on 3950X Processor with the following VMX details :
.encoding = “windows-1252”
config.version = “8”
virtualHW.version = “10”
pciBridge0.present = “TRUE”
pciBridge4.present = “TRUE”
pciBridge4.virtualDev = “pcieRootPort”
pciBridge4.functions = “8”
pciBridge5.present = “TRUE”
pciBridge5.virtualDev = “pcieRootPort”
pciBridge5.functions = “8”
pciBridge6.present = “TRUE”
pciBridge6.virtualDev = “pcieRootPort”
pciBridge6.functions = “8”
pciBridge7.present = “TRUE”
pciBridge7.virtualDev = “pcieRootPort”
pciBridge7.functions = “8”
vmci0.present = “TRUE”
hpet0.present = “TRUE”
ich7m.present = “TRUE”
board-id.reflectHost = “TRUE”
displayName = “macOS Catalina”
guestOS = “darwin19-64”
nvram = “macOS Catalina.nvram”
virtualHW.productCompatibility = “hosted”
gui.exitOnCLIHLT = “FALSE”
powerType.powerOff = “soft”
powerType.powerOn = “soft”
powerType.suspend = “soft”
powerType.reset = “soft”
usb.vbluetooth.startConnected = “TRUE”
smc.present = “TRUE”
smbios.restrictSerialCharset = “TRUE”
firmware = “efi”
tools.syncTime = “FALSE”
sound.autoDetect = “TRUE”
sound.virtualDev = “hdaudio”
sound.fileName = “-1”
sound.present = “TRUE”
numvcpus = “8”
cpuid.coresPerSocket = “8”
memsize = “32000”
sata0.present = “TRUE”
sata0:0.fileName = “macOS Catalina.vmdk”
sata0:0.present = “TRUE”
sata0:1.deviceType = “cdrom-image”
sata0:1.fileName = “C:\Users\Leon\Downloads\macOS Catalina ISO by Geekrar\macOS Catalina ISO by Geekrar\macOS Catalina Final [Geekrar].iso”
sata0:1.present = “TRUE”
usb.present = “TRUE”
ehci.present = “TRUE”
usb_xhci.present = “TRUE”
ethernet0.connectionType = “nat”
ethernet0.addressType = “generated”
ethernet0.virtualDev = “e1000e”
ethernet0.present = “TRUE”
extendedConfigFile = “macOS Catalina.vmxf”
floppy0.present = “FALSE”
smc.version = “0”
vhv.enable = “TRUE”
numa.autosize.cookie = “80001”
numa.autosize.vcpu.maxPerVirtualNode = “8”
uuid.bios = “56 4d be 15 17 2a 61 bb-54 bc 19 ea 20 f5 a1 5f”
uuid.location = “56 4d be 15 17 2a 61 bb-54 bc 19 ea 20 f5 a1 5f”
sata0:0.redo = “”
pciBridge0.pciSlotNumber = “17”
pciBridge4.pciSlotNumber = “21”
pciBridge5.pciSlotNumber = “22”
pciBridge6.pciSlotNumber = “23”
pciBridge7.pciSlotNumber = “24”
usb.pciSlotNumber = “32”
ethernet0.pciSlotNumber = “160”
sound.pciSlotNumber = “33”
ehci.pciSlotNumber = “34”
usb_xhci.pciSlotNumber = “192”
vmci0.pciSlotNumber = “35”
sata0.pciSlotNumber = “36”
svga.vramSize = “134217728”
vmotion.checkpointFBSize = “134217728”
vmotion.checkpointSVGAPrimarySize = “268435456”
ethernet0.generatedAddress = “00:0c:29:f5:a1:5f”
ethernet0.generatedAddressOffset = “0”
vmci0.id = “552968543”
monitor.phys_bits_used = “40”
cleanShutdown = “TRUE”
softPowerOff = “FALSE”
usb_xhci:6.speed = “2”
usb_xhci:6.present = “TRUE”
usb_xhci:6.deviceType = “hub”
usb_xhci:6.port = “6”
usb_xhci:6.parent = “-1”
usb_xhci:7.speed = “4”
usb_xhci:7.present = “TRUE”
usb_xhci:7.deviceType = “hub”
usb_xhci:7.port = “7”
usb_xhci:7.parent = “-1”
toolsInstallManager.updateCounter = “4”
usb:1.speed = “2”
usb:1.present = “TRUE”
usb:1.deviceType = “hub”
usb:1.port = “1”
usb:1.parent = “-1”
usb_xhci:4.present = “TRUE”
usb_xhci:4.deviceType = “hid”
usb_xhci:4.port = “4”
usb_xhci:4.parent = “-1”
sata0:1.startConnected = “TRUE”
toolsInstallManager.lastInstallError = “21004”
tools.remindInstall = “TRUE”
cpuid.0.eax = “0000:0000:0000:0000:0000:0000:0000:1011”
cpuid.0.ebx = “0111:0101:0110:1110:0110:0101:0100:0111”
cpuid.0.ecx = “0110:1100:0110:0101:0111:0100:0110:1110”
cpuid.0.edx = “0100:1001:0110:0101:0110:1110:0110:1001”
cpuid.1.eax = “0000:0000:0000:0001:0000:0110:0111:0001”
cpuid.1.ebx = “0000:0010:0000:0001:0000:1000:0000:0000”
cpuid.1.ecx = “1000:0010:1001:1000:0010:0010:0000:0011”
cpuid.1.edx = “0000:1111:1010:1011:1111:1011:1111:1111”
featureCompat.enable = “FALSE”
I’m using RYZEN 7 4800H, Could you help me please!
Using Ryzen 5 3550H below worked for me
config.version = “8”
virtualHW.version = “9”
smbios.reflectHost = “TRUE”
hw.model = “MacBookPro14,3”
board-id = “Mac-551B86E5744E2388”
cpuid.0.eax = “0000:0000:0000:0000:0000:0000:0000:1011”
cpuid.0.ebx = “0111:0101:0110:1110:0110:0101:0100:0111”
cpuid.0.ecx = “0110:1100:0110:0101:0111:0100:0110:1110”
cpuid.0.edx = “0100:1001:0110:0101:0110:1110:0110:1001”
cpuid.1.eax = “0000:0000:0000:0001:0000:0110:0111:0001”
cpuid.1.ebx = “0000:0010:0000:0001:0000:1000:0000:0000”
cpuid.1.ecx = “1000:0010:1001:1000:0010:0010:0000:0011”
cpuid.1.edx = “0000:0111:1000:1011:1111:1011:1111:1111”
featureCompat.enable = “TRUE”
Thanks for sharing this
I also get:”
Error while powering on : feature ‘cpuid.ds’ was absent, but must be present.
feature cpuid.ss was absent, but must be present
feature cpuid.intel was abset but must be present
module featurecompatlate power on failed
value (random unreadable text) for variable featurecompat.enable is not a valid boolean value
using value TRUE
failed to start virtual machine”
Same here with a Ryzen 3800X: “Failed to start the virtual machine.”
Using Ryzen 5 3550H below worked for me
config.version = “8”
virtualHW.version = “9”
smbios.reflectHost = “TRUE”
hw.model = “MacBookPro14,3”
board-id = “Mac-551B86E5744E2388”
cpuid.0.eax = “0000:0000:0000:0000:0000:0000:0000:1011”
cpuid.0.ebx = “0111:0101:0110:1110:0110:0101:0100:0111”
cpuid.0.ecx = “0110:1100:0110:0101:0111:0100:0110:1110”
cpuid.0.edx = “0100:1001:0110:0101:0110:1110:0110:1001”
cpuid.1.eax = “0000:0000:0000:0001:0000:0110:0111:0001”
cpuid.1.ebx = “0000:0010:0000:0001:0000:1000:0000:0000”
cpuid.1.ecx = “1000:0010:1001:1000:0010:0010:0000:0011”
cpuid.1.edx = “0000:0111:1000:1011:1111:1011:1111:1111”
featureCompat.enable = “TRUE”
Worked for me, you are a god !
Mine also prompts “Failed to start Virtual Machine“
Ryzen 2600
This is exactly what happens to me. I use AMD Ryzen 7 3700X
Anyone figure this out for 15.5 with AMD? New error appears regarding feature cpuids
I had the same issue. Did you find a solution to this?
What/???
I have done all this steps. I still cant rund mac mojave, I use AMD ryzen 7, 2700
no.. mac Catalina
That’s a few us with amd CPUs following all the fixes and ending up with “Failed to start the virtual machine” any ideas?
At first inserted:
smc.version = “0”
Getting the Message that Guest turned off CPU.
Then changed the Version from 16 to 10
Then added the following (Because i have an AMD CPU):
cpuid.0.eax = “0000:0000:0000:0000:0000:0000:0000:1011”
cpuid.0.ebx = “0111:0101:0110:1110:0110:0101:0100:0111”
cpuid.0.ecx = “0110:1100:0110:0101:0111:0100:0110:1110”
cpuid.0.edx = “0100:1001:0110:0101:0110:1110:0110:1001”
cpuid.1.eax = “0000:0000:0000:0001:0000:0110:0111:0001”
cpuid.1.ebx = “0000:0010:0000:0001:0000:1000:0000:0000”
cpuid.1.ecx = “1000:0010:1001:1000:0010:0010:0000:0011”
cpuid.1.edx = “0000:1111:1010:1011:1111:1011:1111:1111”
featureCompat.enable = “FALSE”
Now i get the following error:
Failed to start the virtual machine
Thanks for pointing this out!
“Failed to start the virtual machine.” error message for me as well, any ideas?
“Failed to start the virtual machine.” (no more explanation). What can I do?
Regarding “feature cpuid.ss was absent” and the like, beware that the lines that you have to add have the wrong quotations. For example:
featureCompat.enable = “FALSE”
Should be:
featureCompat.enable = “FALSE”
Same goes for CPUID lines, although they wont give you errors.
Error while powering on : feature ‘cpuid.ds’ was absent, but must be present.
feature cpuid.ss was absent, but must be present
feature cpuid.intel was abset but must be present
module featurecompatlate power on failed
value (random unreadable text) for variable featurecompat.enable is not a valid boolean value
using value TRUE
failed to start virtual machine
this is the error i got from following this. Im using amd processor what should i do?
Error while powering on : feature ‘cpuid.ds’ was absent, but must be present.
feature cpuid.ss was absent, but must be present
feature cpuid.intel was abset but must be present
module featurecompatlate power on failed
value (random unreadable text) for variable featurecompat.enable is not a valid boolean value
using value TRUE
failed to start virtual machine
this is the error i got from following this. Im using ryzen 7 2700. please help.
I can install vmware tool after this step