

Out of all the Apple operating systems, macOS High Sierra is the most manageable and straightforward macOS installation on VirtualBox. Using the VMDK formatted file, we take a very intentional path to run the operating system in a virtualization environment.
Like our other guides, we will try to provide simple steps to install macOS High Sierra on VirtualBox on Windows PC. We’ve included screenshots for all the steps to help you through the steps outlined below and have included a detailed video to lead you through the installation visually. You will find the link at the bottom of the page.
Table of Contents
What is VirtualBox?
VirtualBox, created by Oracle, is a comprehensive virtual machine app similar to VMware Workstation but packed with the essentials and provided for free. This virtual machine application forms a sandboxed setting that can install another operating system separately from the existing one. This application makes the virtualization process relatively easy. While installing macOS High Sierra, we will need minor modifications to ensure we get the maximum use and the ability to use all its features.
macOS High Sierra – Highlights and Features
Like Mojave, Apple builds on a solid platform to advance itself to include more practical features. These new features allow users to work more efficiently, manage their time better, and stay on task. Here are just a few of the highlighted features.
Photos
- Photos app started as a tool to maintain your photo library and sync pictures across devices through the cloud. It’s now a powerful editing software. A persistent sidebar shows your library, Memories, Live Photos, and albums.
- Progressive organization – here’s a new filtering drop-down in the list view, so you can drag and drop photos into an album or even to the desktop to export it.
Safari
- Block auto-playing videos – set preferences for individual websites or block all autoplay altogether.
- Automatic Reader mode – Set Safari to Reader mode, blank out the page and show just article content.
- Blocks advert – Set preferences for individual websites or block all autoplay altogether.
- Split-screen – Split View in Mail and reply to an email while searching your inbox.
- Top Hits- Search much more accurately and how recently you’ve read a message
Notes
- Highlighted search words – Easily locate a word in the results.
Siri
- Natural voice – more natural voice is similar to iOS 11.
Music playback
- Get a personalized playlist and ask it to play something based on a mood.
iCloud
- Improved family sharing – Everyone can use up storage from the same storage plan. Up to 200GB of iCloud storage at $2.99 per or 2TB is $9.99 monthly.
- Improved file sharing – iCloud Drive enables collaboration.
FaceTime
- Capture a Live Photo – capture a Live Photo using the other person’s camera and mic on their Mac or iOS device. Users are notified whenever a Live Photo is taken. Look for the new shutter button.
Install macOS High Sierra on VirtualBox
Please Note: All images and files are created only for educational purposes. We aren’t usually the ones that handle any misuse of any files.
What you need for this installation:
- – 6 GB RAM (recommend 8 GB)
- – 25 GB HDD (recommend 50 GB)
- – At least a dual-core CPU (recommend Quad Core CPU)
- – VirtualBox Windows and Expansion Pack (found here)
- – macOS High Sierra VMDK image file (found here)
- – Command file (download here)
- – Screen Resolution File (download here)
Install macOS High Sierra on VirtualBox
Please Note: All images and files are created only for educational purposes. Any misuse of any files is not our responsibility.
What you need for this installation:
– 6 GB RAM (recommend 8 GB)
– 25 GB HDD (recommend 50 GB)
– At least a dual-core CPU (recommend Quad Core CPU)
– VirtualBox Windows and Expansion Pack (found here)
– macOS High Sierra VMDK image file (found here)
– Command file (download here)
– Screen Resolution File (download here)
Before we begin, we assume you already have VirtualBox installed on your Windows 10 PC, with the Extension Pack installed. If you have not already done this, you can follow this guide or this video to you ready.
Part 1 – Download macOS High Sierra
- To get the most updated copy of macOS High Sierra, you can head over to Apple’s support website and download the image. These image files are in the DMG format and must be converted to either an ISO file format or a VMDK file format to be used to install a virtual machine. This tutorial will be using the VMDK file format because it allows for an easy installation with VirtualBox. You can get a copy of the VMDK file here. Once downloaded, keep the file in an easily accessible location.
Part 2 – Create Virtual Machine
- Open the Oracle VM Virtual Box Manager. At the main screen, select the ‘New’ icon at the top

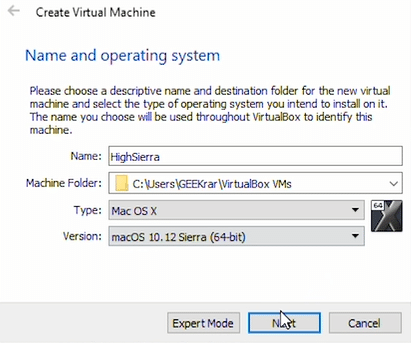
2. In the first window, under the ‘Name’ field, type in “HighSierra”. Machine folder can remain as default. In the ‘Type’ drop-down menu, select “Mac OS X”. In the ‘Version’ drop-down menu, select “macOS 10.12 Sierra (64-bit)”. Click ‘Next’
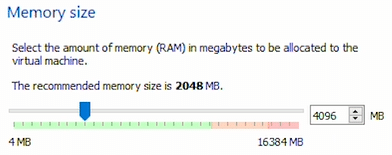
3. In ‘Memory size’, increase the available memory to for 4GB (4096 MB). Click ‘Next’
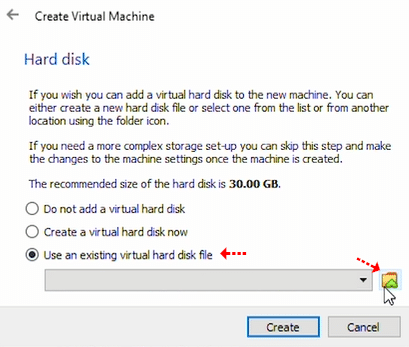
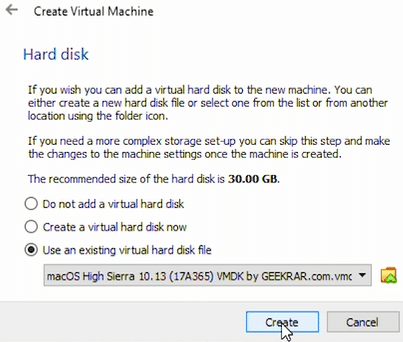
4. In ‘Hard disk’ select the third option, “Use an existing virtual hard disk file”. Click on the folder icon, and find the High Sierra VMDK image file you downloaded in Part 1.
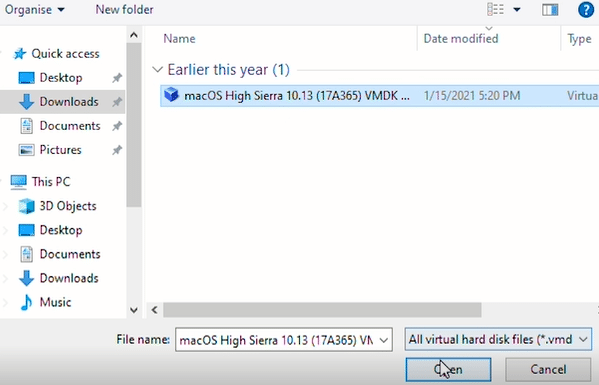
5. Once located, select the file, and click the ‘Open’ button.
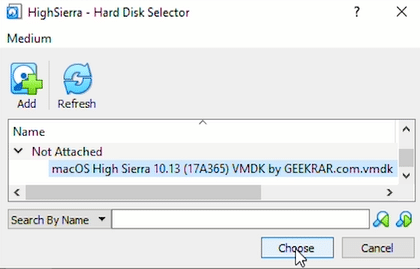
6. In the Hard Disk Selector, ensure you files is selected and click on ‘Choose’
7. Back at the Create Virtual Machine window, click on ‘Create’ button at the bottom.
Part 3 – Run Commands
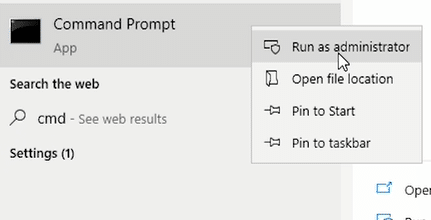
Now we need to modify the VirtualBox Manager to allow us to run the macOS High Sierra smoothly without errors. Open your command prompt window by click on the Start button and type in ‘cmd’. Right-click on it and select ‘Run as administrator.
- In the command prompt, run the first line to change the directory to VirtualBox’s default location.
cd "C:\Program Files\Oracle\VirtualBox\"
2. Next, assuming you named your virtual machine in Part 1 StepX “HighSierra” you can copy and paste the below lines in the command window and hit enter. If you have a name, change “HighSierra” with whatever you called it, but leaving the quotation marks.
VBoxManage.exe modifyvm "HighSierra" --cpuidset 00000001 000106e5 00100800 0098e3fd bfebfbff
VBoxManage setextradata "HighSierra" "VBoxInternal/Devices/efi/0/Config/DmiSystemProduct" "iMac11,3"
VBoxManage setextradata "HighSierra" "VBoxInternal/Devices/efi/0/Config/DmiSystemVersion" "1.0"
VBoxManage setextradata "HighSierra" "VBoxInternal/Devices/efi/0/Config/DmiBoardProduct" "Iloveapple"
VBoxManage setextradata "HighSierra" "VBoxInternal/Devices/smc/0/Config/DeviceKey" "ourhardworkbythesewordsguardedpleasedontsteal(c)AppleComputerInc"
VBoxManage setextradata "HighSierra" "VBoxInternal/Devices/smc/0/Config/GetKeyFromRealSMC" 1
It will look similar to the below.
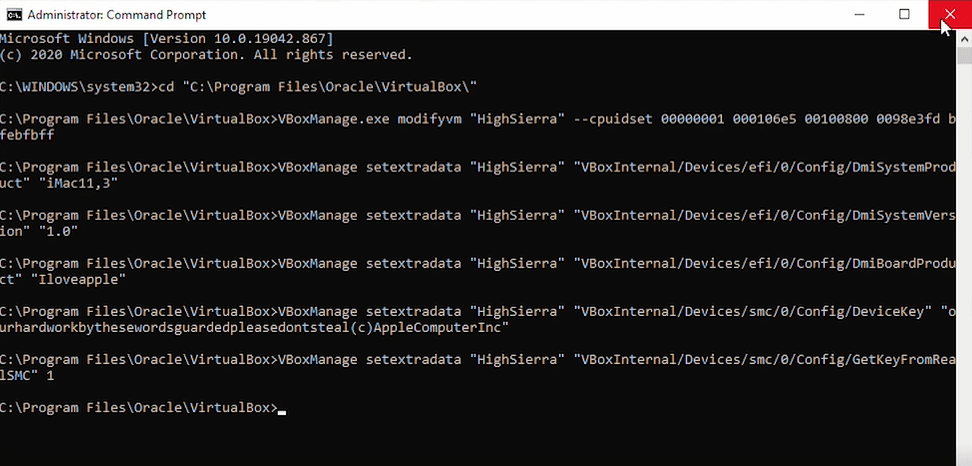
You can now close out of the command prompt and head back to your VirtualBox Manager.
Part 4 – Modify Virtual Machine Settings
We need to open the VirtualBox Manager and modify a couple of settings as the last steps before installing macOS High Sierra.
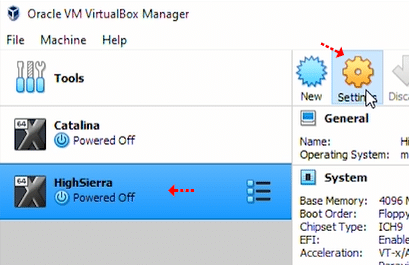
- Select the newly created ‘HighSierra’ virtual machine on the left side, then click on the orange settings button at the top.
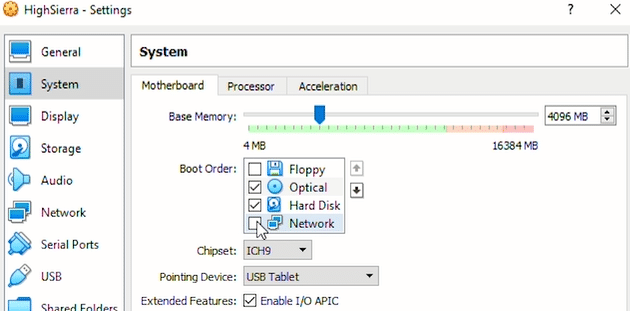
In the menu on the left, select ‘System’, then click on the ‘Motherboard’ tab and ensure we have at least 4096 MB (4GB) of memory. Below we can uncheck the ‘floopy’ for Boot Order.
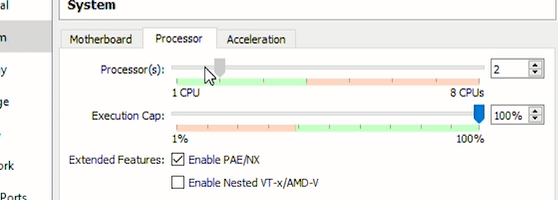
Click the next tab ‘Processor’. Below increase the available processors to atleast 2.
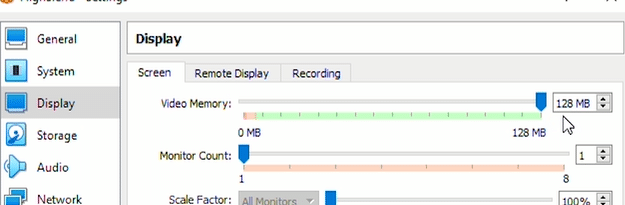
In the left side menu, select Display. Under the first tab ‘Screen’ increase the available memory to the max available amount.
Once complete, click the ‘OK’ to close the window.
Part 5 – macOS High Sierra Setup
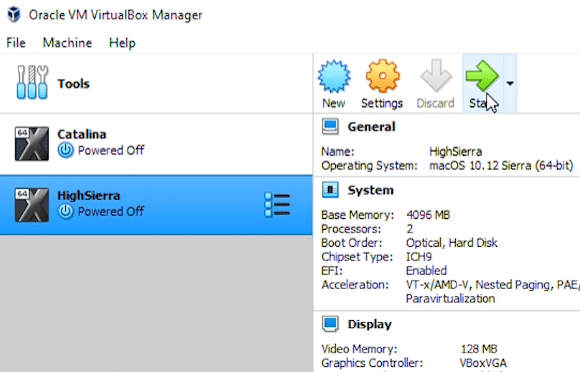
At the main VirtualBox Manager window, select the macOS High Sierra virtual machine on the left side, and click the green ‘Start’ button to boot up the machine.
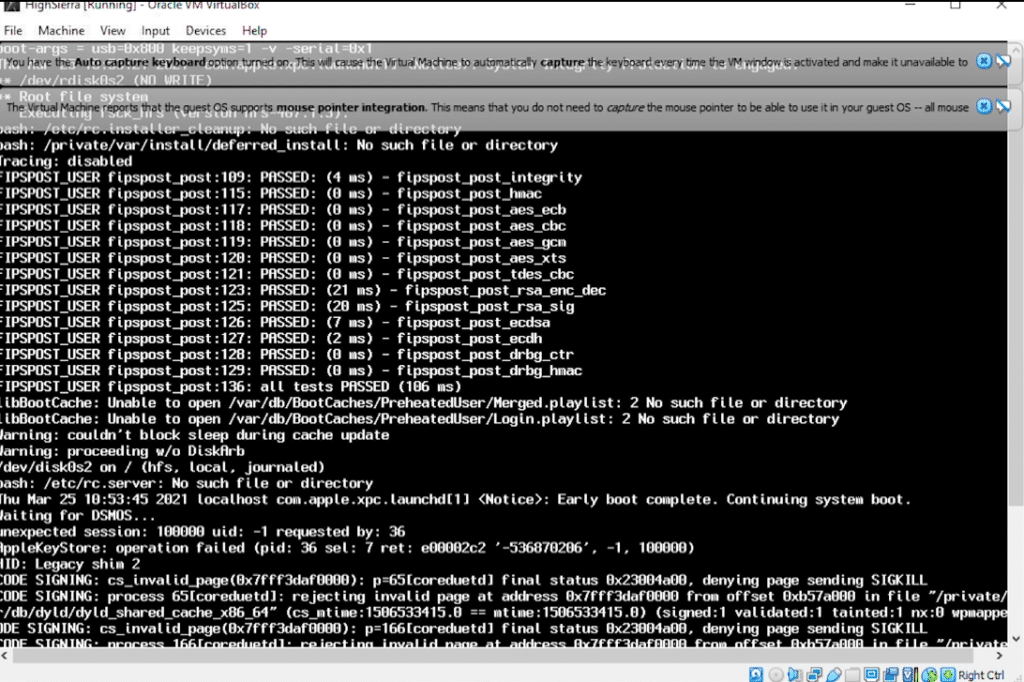
As the operating system boots up and loads the setup files, you will have a terminal window pop up, like below. This is entirely normal and will take a few minutes as it begins.
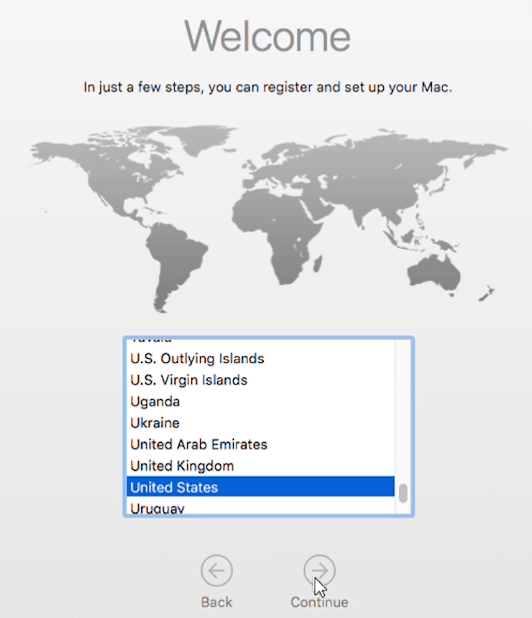
Once loaded, the first screen will ask you to select your region. In this guide, we will be using the United States, but you can use your preference region. Click continue.
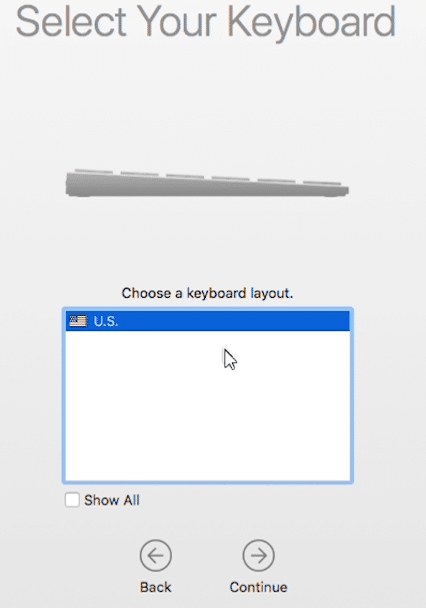
Next is the Keyboard layout. You can leave this as the default unless you require something different. Click continue.
<017>
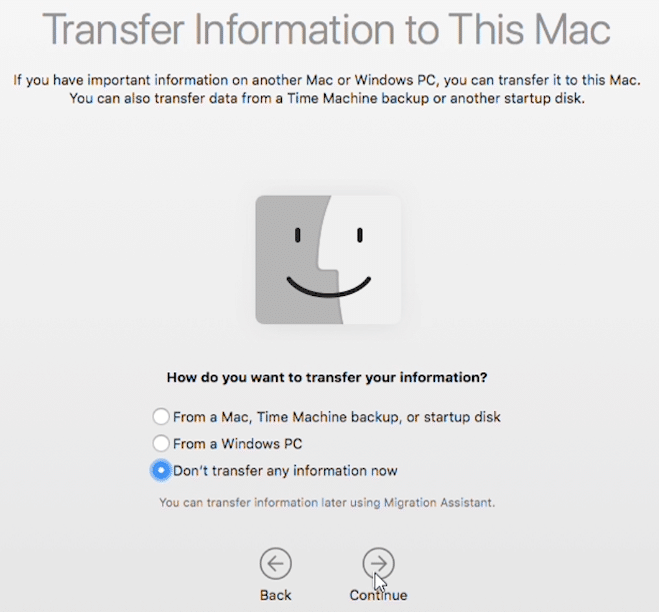
At the ‘Transfer Information to this Mac’ window, select the third option, ‘Don’t transfer any information now.’ Click ‘Continue’.
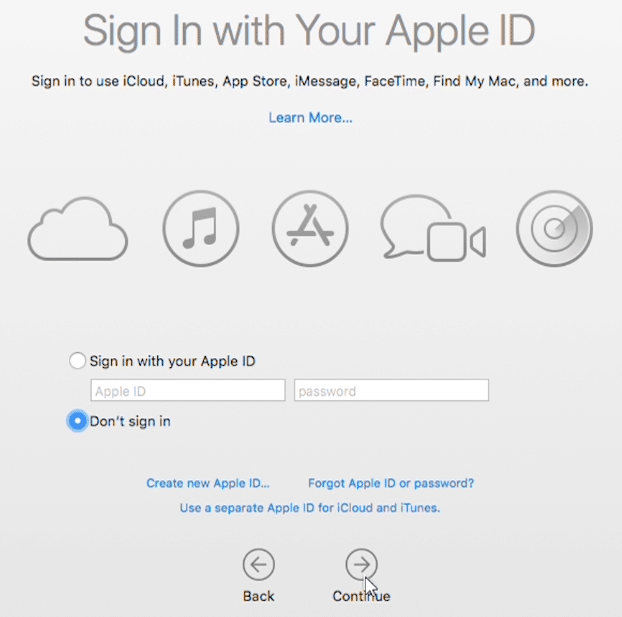
For the ‘Sign In With Your Apple ID’, select ‘Don’t sign in’ and click on ‘Continue.’
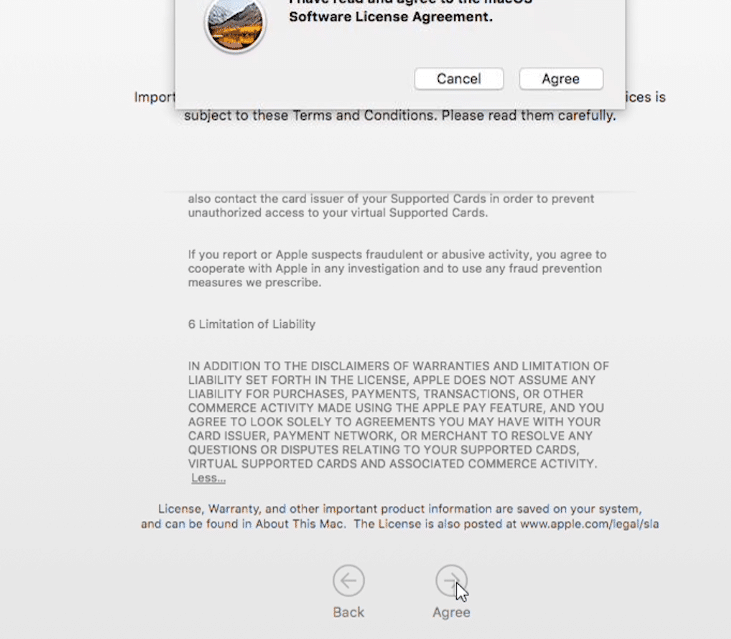
You will need to select the ‘Agree’ option on both windows at the ‘Terms and Conditions’ window to proceed with the installation.
<020>
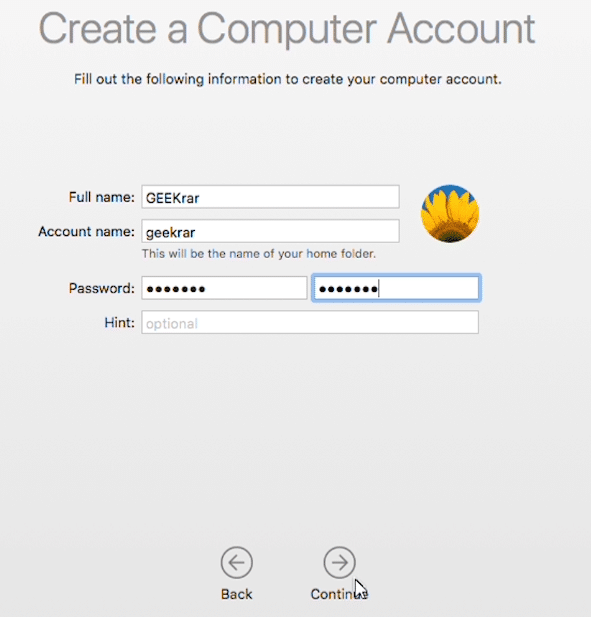
At the ‘Create a Computer Account’ window, you will be creating your user account and password. The user information here will be the main account for this operating system. Fill out the fields and click on ‘Continue.’
<021>
In ‘Express Setup’, leave the default selection and click on ‘Continue.’
<022>

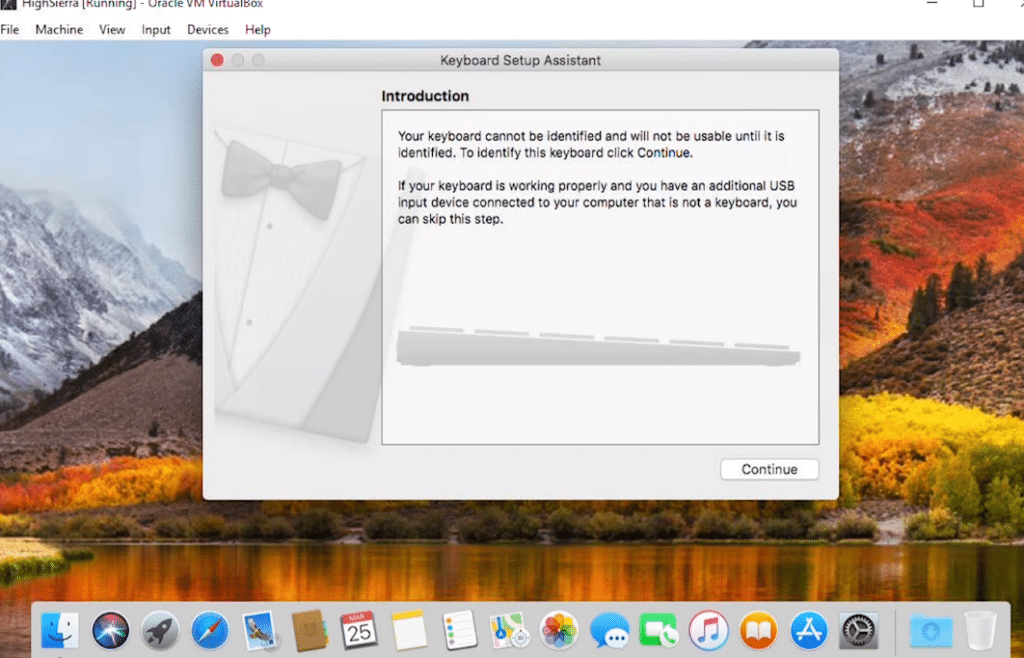
One last dialog box will pop up as an introduction. Click on ‘Continue’ to close out the box, and now you are at the desktop of macOS High Sierra. This concludes the installation of the operating system.
<023>
At this point, you can start using the macOS High Sierra as you please. You may notice that if you expand the window, it will not fill the screen. You may want to take an extra step and change the screen resolution with the below method.
Part 6 – Set Screen Resolution
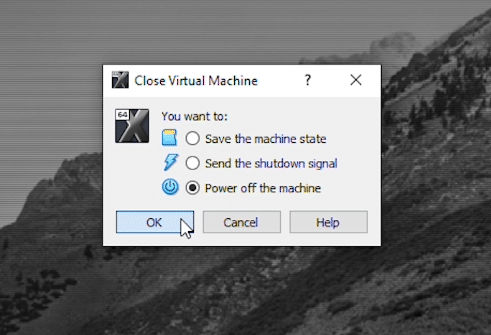
Before changing the screen resolution to the virtual machine, exit out of the virtual machine by going to the File menu and selecting Close at the prompt, select ‘Power off the machine’.
<025>
To get the best results, you will want to know the native resolution of your screen (i.e. 1080p is 1920×1080 or 720p is 1280×720) .
At the Windows desktop, click on the Start button and type in ‘cmd’. Right-click on it and select ‘Run as administrator .’
In the command prompt, run the first line to change the directory to VirtualBox’s default location.
cd "C:\Program Files\Oracle\VirtualBox\"
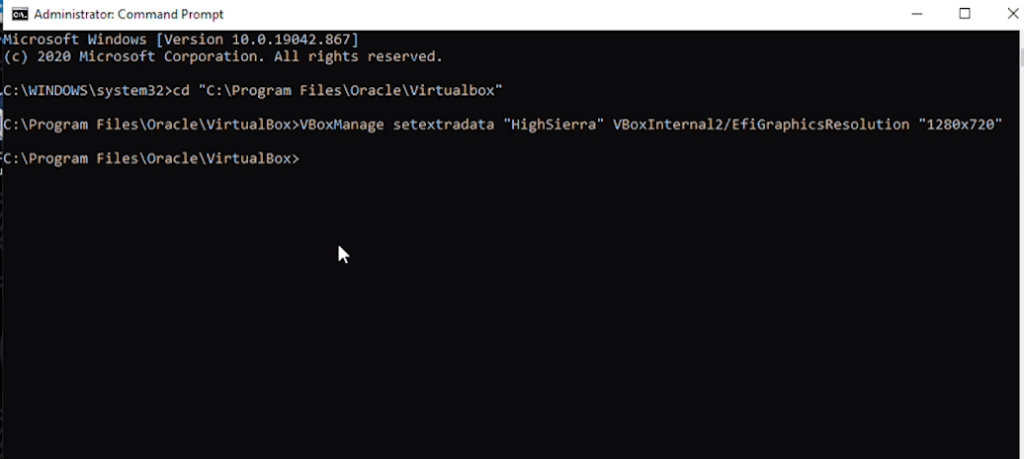
Now you want to modify the below line to fit your needs. “HighSierra” is the name of our virtual machine and can be left as is. Where “x” is, replace it with your screen size.
VBoxManage setextradata "HighSierra" VBoxInternal2/EfiGraphicsResolution "x"
The monitor we’re using in this example is 720p, so it will look like this.
Once you have, it typed in, hit enter and close out of the command prompt.
Go back into the VirtualBox Manager, and start your virtual machine.
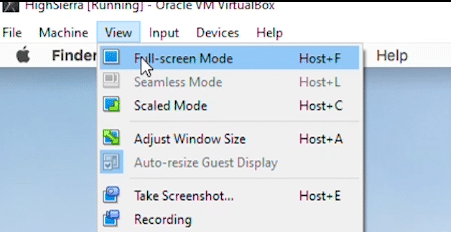
As it loads up, the appearance should change. Once you have logged in, you can go the the ‘View’ menu at the top and select ‘Full Screen Mode’.
You have now entered full-screen mode and have complete the full installation of macOS High Sierra on VirtualBox on Windows PC.
VIDEO – macOS High Sierra on VirtualBox on Windows PC
Here is a visual guide to walk you through all the steps that we just covered. If you need any help with the installation or have any issues, you can put it in the comments below or put it in the forum.


When the virtual machine starts, the boot starts with white letters, then the boot starts again and so on, the machine restarts at the boot stage
For me the “Spaghetti” script that ali mentioned worked like charm (nearly – one BIOS setting was needed), because it gives you a lot of hints what to do. In the end I got a quite performant Catalina MacOS which I even could upgrate to Big Sur (that’s what I needed to install FinalCut). The latest OS Ventura did end in an endless loop…
https://github.com/myspaghetti/macos-virtualbox
I’m trying to setup HighSierra on my new iMac running Ventura 13.2.1 and am stuck…
I can’t find where to modify the virtualBox Manager in “Part 3 – Run Commands”
I end up with a “ shell>” prompt in the “High Sierra (Running)” window.
When I try to input anything I get “you have clicked the mouse inside the Virtual Machine display…”
And it won’t allow me to any typing or cutting and pasteing….
What am I doing wrong?
This is the installation guide for VirtualBox. It seems to me that you are trying to install it on a real machine, in which case, these steps will not work, you will need to refer to other sources.
Problem: – failed to load boot0001
Fix: – To all AMD users : – Run this in cmd
VBoxManage modifyvm “VM Name” –cpu-profile “Intel Core i7-6700K”
Note that if you copy-paste, the cpu-profile double dash has been formatted, so should be changed to two dashes.
What commands do I run on a linux system? Please help.
Failed to query SMC value from the host (VERR_INVALID_HANDL
And i have done all the steps accordingly , what is wrong. I am on windows 10
Run this command:
VBoxManage.exe setextradata “Your macOS VM Name Here!!!” “VBoxInternal/Devices/smc/0/Config/GetKeyFromRealSMC” 0
IS there a way to get multiple resolutions with the vboxmanage commands?
VBoxManage setextradata “VM Name” VBoxInternal2/EfiGraphicsResolution 1920×1080 (set your resolution here)
failed to load Boot0001 “UEFT VBOX CD-ROM VB1-1a2b3c4d
hey, i’v download the file frome MegaNz but the format is _ .ios_ so Vbox dosent find the file when i search for it; any help pleeeeas i’m stuck whith this 5Gb file
So how does one use the vboxmanage commands for setting the video resolution when installing all of this on a VM Machine hosted on a mac. i have got everything working except the video resolution which is set to 1024×768.
And for some reason i didn’t have to run the first set of commands at all cause it just worked. would i use TERMINAL to get the commands entered for the video resolution? any help would be appreciated…
Failed to open a session for the virtual machine HighSierra.
Failed to query SMC value from the host (VERR_INVALID_HANDLE).
Result Code: E_FAIL (0x80004005)
Component: ConsoleWrap
Interface: IConsole {872da645-4a9b-1727-bee2-5585105b9eed}
Hello,
Nice tutoriel !
I’m french and my english is very bad so i will try my best.
Internet connection is good so the sheet google on safari don’t working.
I have message erreur : there is a recurring problem with “https://www.google.fr”
However, during 1s the page was displayed.
would you have a solution please ?
Franck
have you tried to installing Google Chrome? I think you will have a better chance of it working since its designed for the ecosystem.
Hello,
I found your tutorial on Youtube and was really amazing. I followed your steps about setting up my VM. I launch the VM and all I get is the boot screen without any further loading. Do I have to type any command?
Thanks in advance
the vm gets stuck on the boot process; saying it’s launching from the hard drive but stuck there after many minutes waiting
my vm says “press esc in 5 seconds to skip startup.nsh or any other key to continue.”.
Hello I have a computer with i7 2600 3.4 Ghz processor when I try to run MacOS High Sierra operating system using vbox it writes me such a message:
ACPI_SMC_PlatformPlugin::start – waitForService(resourceMatching(ApplelntelCPUPowerManagement)
timed out
AppleLPC::notifyPlatformASPM – registering with plugin with ASPM Support false
my vm keeps saying pciroot (0x0) /pci (ox1f,0x12/sata(0x1,0xffff.0x0) : not found
2 things here, did you install the VirtualBox image? did you spoof the CPU (https://youtu.be/r2mboo9Xsvw)?
see this, its a similar fix for catalina that works with high sierra: https://www.geekrar.com/fix-macos-catalina-install-nsh-isnt-recognized-as-an-internal-error/
So ive been following this article on how to download HIgh sierra os and i keep getting the same error:
“VBoxManage.exe’ is not recognized as an internal or external command,
operable program or batch file.” What should I do?
you may not be in the correct directory. by defaults its.. C:\Program Files\Oracle\VirtualBox
the vm gets stuck on the boot process; saying it’s launching from the hard drive but stuck there after many minutes waiting
Hi,
Thanks for the guide. I managed to get the Mac OS onto the VM and seems to be running fine.
The only issue I have is the App Store, I can’t seem to login are you able to help? Even when trying to log into iCloud, it gives me the “Preference Error”.
using the apple app store and icloud wont work because we’re not installing on apple hardware. you can try using a tool like spaghetti (Github) to attempt to get apple services to work. some people have had success.
How to configure an USB PreSonus AudioBox iTwo [0120] digital interface?? I cannot make it work
have you already selected this device in the audio settings for this VM in virtualbox?
if you get stuck in uefi shell. type exit. and than go to the boot options and boot from file. select the HD(second one for me) with macos. go to the directory, system>library>coreservices and select boot.efi
great response!
in the newest version on VBox, you just need to select the Drive, no need to do boot from file(as it doesn’t exist anymore)
Thanks for noting that Eli
Please add network setup. Internet not working.
Will this can used for AMD Cpu ?
yes but you might have to spoof the CPU with a command. the below have been tested, the last one has had the most success.
VBoxManage modifyvm “” –cpu-profile “Intel Xeon X5482 3.20GHz”
VBoxManage modifyvm “” –cpu-profile “Intel Core i7-2635QM”
VBoxManage modifyvm “” –cpu-profile “Intel Core i7-3960X”
VBoxManage modifyvm “” –cpu-profile “Intel Core i5-3570”
VBoxManage modifyvm “” –cpu-profile “Intel Core i7-5600U”
VBoxManage modifyvm “” –cpu-profile “Intel Core i7-6700K”
My machine was working without mouse and kept hanging out. Fix: i had to end task throught ctrl+alt+del, restart installation, (!) pause (!) machine, go to menu -> devices -> insert guest additions CD, wait, and then my mouse worked and i was able to install. Hope this saves some time for people (earlier on it took few days for me and i had to switch to VMware!).
Thanks for providing your notes
the virtual machine still reboot Avery time
are you receiving any error messages?
Mine too. It gets to the boot screen and displays all the booting messages and after some time it reboots and starts over