
Apple announced macOS Big Sur 11.0 at WWDC 2020, the successor of the macOS Catalina, which might be released later this year. But the beta is released already macOS Big Sur is Apple’s operating system for computers such as MacBooks, iMac, Mac Pro tower and more. The idea of Big Sur is taken from the coastal region of Big Sur in California’s central coast. It’s the first time since 2000, the macOS’s version is upgraded from 10.0 to 11.0.
Below are some of the interesting features of Apple’s new macOS Big Sur.
Table of Contents
The macOS Big Sur features
Safari
The Safari browser comes with major upgrades in macOS Big Sur, plenty of new features are added in macOS 11.0 that include importing passwords from Google chrome to safari, privacy report, customizable start page, password monitoring, built-in webpage translation which is one of the major upgrades. Safari is now modern and better than the previous version in macOS Catalina and Mojave.
Control centre
After the great experience of the control centre in devices like the iPhone, iPad, iPod, Apple has decided to bring the same in the macOS as well. The new macOS Big Sur 11.0 supports the control centre that you can use to make a lot of customizations for quick access such as accessing Wifi, Bluetooth, music, dark mode and so on like you do in your iPhone or iPad.
Notification centre
We all know that apple’s products are 10/10 when it comes to the products’ designs and engineering. Apple did the same in notification centre in macOS 11.0, Apple has completely redesigned the notification centre in Big Sur. Now it comes with a transparent display, you can make more customizations than the previous version. Moreover, there is the same widget feature is added as in the new iOS 14 through which you can have more important information at one place in the notification centre.
Compatibility
Talking about the new features of macOS Big Sur, it’s important to let you know about its compatibility. The Big Sur won’t support macs versions 2013 and older, as you may know, macOS Mojave and Catalina support all previous macs but this time, in WWDC 2020, Apple dropped the support for various mac versions for this new Big Sur. Below is the list of compatible macs that support this version 11.0.
- Mac Pro 2013;
- MacBook 2015;
- MacBook Air 2013;
- MacBook Pro 2013;
- Mac Mini 2014;
- iMac 2014;
- iMac Pro 2017
Below is the step by step process to install macOS Big Sur 11.0.
How to install macOS Big Sur 11.0
Step #1: Take a backup
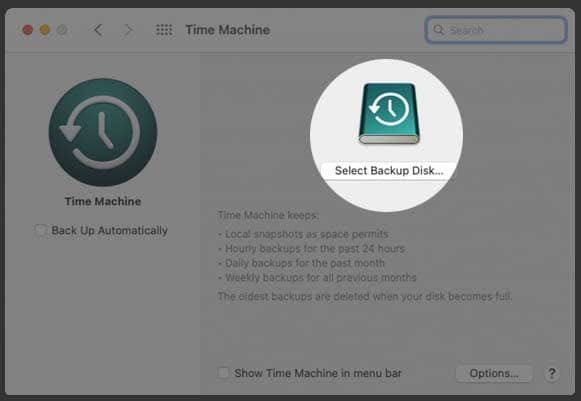
First of all, you need to take the backup of all your data just to avoid any trouble because the process to install Big Sur will remove all the data in mac drive. You can use Time Machine to take the backup, as it’s the builtin feature in macOS, all you need is an external drive to store the data. Connect the external storage device to the computer and select the appropriate backup settings. The Time Machine is capable to take backup daily, weekly, monthly for all the previous months.
Step #2: Download macOS Big Sur 11.0 file from official Apple’s website
After the backup is done and all of your data is secured, you need to download the Big Sur OS file.
- Go to official apple’s developer website in safari browser.
- There you’ll see discover tab in main tabs at the top, select macOS there and click on the download option. It’ll ask you to put in the credentials, login if you already have an account to create a new one.
- After you are logged in, click on the install profile for Big Sur 11.0, new macOS file will start downloading on your computer.
Step #3: Create macOS Big Sur bootable USB with terminal

- Go to Applications -> Utilities and click on Disk utility, there you’ll see the connected external drives. Select the one you want to make bootable Big Sur, and format it selecting the Mac OS Extended (Journaled), it’s the recommended option, you may choose the Master Boot Record as well.
- Now open the terminal from Applications folder, now we’ll make macOS Big Sur bootable USB. Copy and paste the following command in the terminal, but replace the Untitled with the name of the attached USB, and press the return key to start the bootable process.
-
sudo /Applications/Install\ macOS\ Beta.app/Contents/Resources/createinstallmedia --volume /Volumes/Untitled
- Once the bootable process is done for mac Big Sur, you’ll see Done on the terminal, after that you can use this to install macOS Big Sur on your computer.

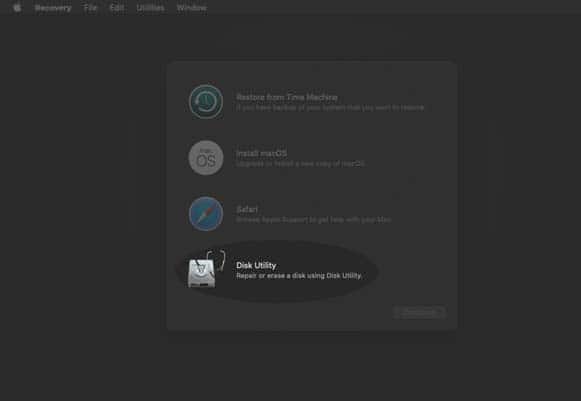
Step #4: Installing mac Big Sur 11.0 beta
- Keep connected the bootable USB with the computer and restart it, press and hold the option key on the keyboard when the system is rebooting.
- The boot menu will pop up on the screen, select the USB installer drive, then select the Disk Utility from macOS Utilities.
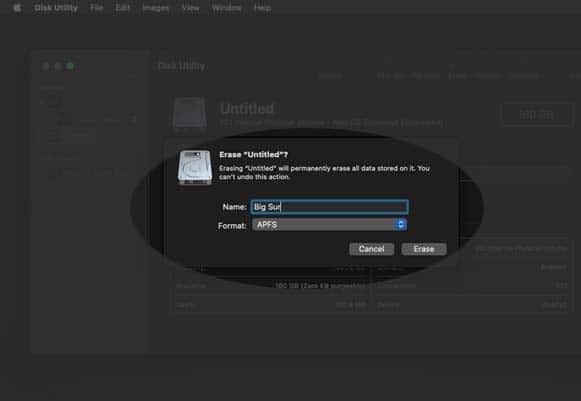
- Select the Erase tab option from Disk Utility and select your startup volume which is usually labelled as Macintosh HD. Click the Erase option and it will completely remove the data and return to the macOS utility screen.
- From the utility screen, you need to select Install macOS and click on the Continue button. Choose the appropriate destination for the installation. Select the drive your just formatted and the process to install mac Big Sur will start.
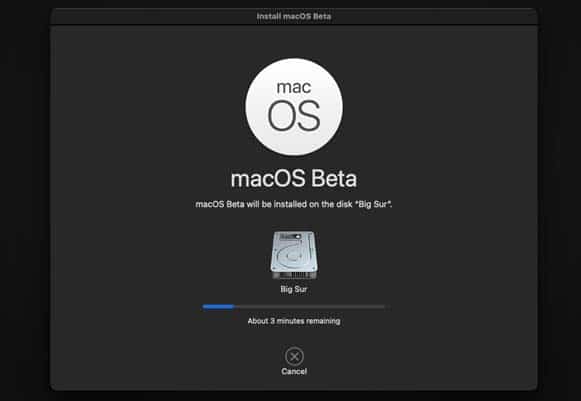
Once the installation process is completed, your computer will restart and you’ll be able to use the new macOS Big Sur 11.0 beta on your computer.
Conclusion
Above we have discussed the new Apple macOS Big Sur version that is currently in beta stage and will be released this year. We have talked about macOS Big Sur 11.0 new exciting features which makes it far better than Catalina and Mojave. We have demonstrated a step by step process to install macOS Big Sur as well. If you have any questions, feel free to leave a comment below.


In the copy and paste code; terminal could find no command, what does that mean?
Hi.
Cna you please make a page of how to install macos big sur on virtualbox (windows) with ISO?
It will be a big help!
Belli.
working on it!