Apple products and software are superb especially Apple computers which are used in most businesses and celebrities and top people. Apple’s computer are so popular and so viral and everyone wants to have one. Out of every two Youtubers at least one of them use Mac and that’s the same with other popular people. Not only Apple computers are so popular but also Apple’s software and particularly Apple’s Mac operating system. Most users who would like to have a Mac are most likely due to its operating system which is macOS. Now if you like obtaining macOS, the only way to catch Apple’s operating system is to typically pick up a Mac from Apple Store. That’s the same for everyone doesn’t matters whether you’re a Windows or Linux user. Let’s see how to Install macOS Mojave On PC – Hackintosh.
While picking a Mac is only the typical way but also it’s more comfortable and supported way to do it. But as everyone knows, Apple’s product aren’t cheap and they aren’t expensive either, means they are extremely expensive. Every time Apple launches a new product, they rise up the price to all-time high that most heavy Apple users and non-Apple users also can’t afford. This is the only solid problem every single Apple and non Apple user has.
Though Apple knows about this, despite that, they continue to raise up the prices and they ignore those things. With that though, Apple doesn’t care and it’s getting more and more difficult to buy a Mac and even though those who have bought now for a while, Apple is cutting support for its older Macs. If you’ve an older Mac which is now in the unsupported list of macOS, here’s how to install macOS Catalina on unsupported Mac.
With these much problems that are for Mac users, Windows users might not even think of getting Mac or MacOS somehow. But that’s not true. With all those problems, there’s still some workaround in the underground to make it work. That is install macOS Mojave on Windows. We’ll head to how to Install macOS Mojave On PC – Hackintosh.
That’s right. You can install macOS Mojave on PC or on Windows PC and there are various ways to do it. Back then, I’ve described three solid and working ways to install macOS Mojave and other versions on Windows PC. Those are the only possible ways to adapt it and they are still working but there are some things to consider and accept before. They are accepting the risk if you’re installing it via Hackintosh as Dual Boot macOS & Windows.
macOS Mojave is an amazing constant OS. It’s super fast and super useful that you could do a 10 min task in half of that time, or maybe even less than that. Including it, Mojave is definitely not an ignorable update and everyone talks about.
Not to rush, I’ll briefly break down the most highlighted features of macOS Mojave and describe what’s new in it. The top most demanded feature that almost every Mac user asked for in macOS High Sierra but Apple delayed it until macOS Mojave. In this update, Apple poped out the demand features and some ease for use that were as Dark Mode. Just move to how to Install macOS Mojave On PC – Hackintosh.
It’s been really an enormous update because Apple has made most of the features of users and particularly Dark Mode. There’s nothing more pleasing at night when your screen is dark not due to low brightness but due to its dark background. Particularly, developers that spends most of their time building apps and coding day and night. So when its dark at night even though lights are on, it still distracting and inconvenient when the screen is spreading bright light even though you’ve turn the brightness level to the lowest. That’s where Dark Mode comes in. It turns automatically from light into dark when it’s night. Means, it’s dynamic and changes according to the time.
There are more features except this, I’ll name some. They are Dynamic Desktop, Stacks, Screenshot Markup, Screenshot Utility, Improved App Store and more. However, here’s how to Install macOS Mojave On PC – Hackintosh.
Table of Contents
How to Install macOS Mojave on PC – Hackintosh
Installing a Mac operating system on Apple’s Mac computer is certainly easy because they are supported by each other but installing Mac operating system on another computer is definitely pretty difficult. Because they are different and are made for different softwares and operating system so obviously we need to do more than typically a Mac user would do to install macOS on Mac. That’s how it is like if you’ve installed macOS Mojave on VMware or VirtualBox, you know how easy or difficult it is to accomplish. But not to worry, it’s isn’t extremely difficult and it’s not even very difficult as well.
Before stepping for the installation, check the compatibility of your system’s CPU, Memory, GPU and Motherboard. What I mean by compatibility is that make sure it has enough resources to install and run Mojave without interruption. To be noted, there’s no particular compatibility list or information which should define whether your system is compatible or not. The primary and basic supported hardware is a minimum Dual Core CPU 2nd Gen, with Nvidia Graphics Card. When you’ve these, you can start with how to Install macOS Mojave on PC – Hackintosh.
- How to Install macOS High Sierra on VMware on Windows PC
- How to Install macOS High Sierra on VirtualBox on Windows PC
Step One – Create Bootable USB Installer for macOS Mojave on Windows
Going ahead, we need to create bootable USB installer for macOS Mojave. Creating a bootable USB for macOS Mojave can be done in various ways. One of those methods is to do via Unibeast. You can also do it via Clover Bootloader but it’s a little bit complicated. Instead, Unibeast way is the very simple and straightforward way. I’ve shown it step by step in the tutorial below. Here’s how to do it.
The bootable USB process is so important that if anything is missed or done wrong, it may lead to unsuccessful installation or even corrupt your system so take care. Now step to the next procedure of how to Install macOS Mojave On PC – Hackintosh.
Step Two – Setting up BIOS Settings
When the macOS Mojave bootable USB flash drive created and also the required EFI files have been copied to USB. We are ready to install macOS Mojave but before it, there’s a little thing more to do. That is setting up the BIOS settings for the particular installation.
Restart your PC. Press delete key or another key which is the BIOS key. Head to the BIOS and from the menu, navigate to the Save and Exit tab. Now from the option select Load Optimized Defaults then click Yes.
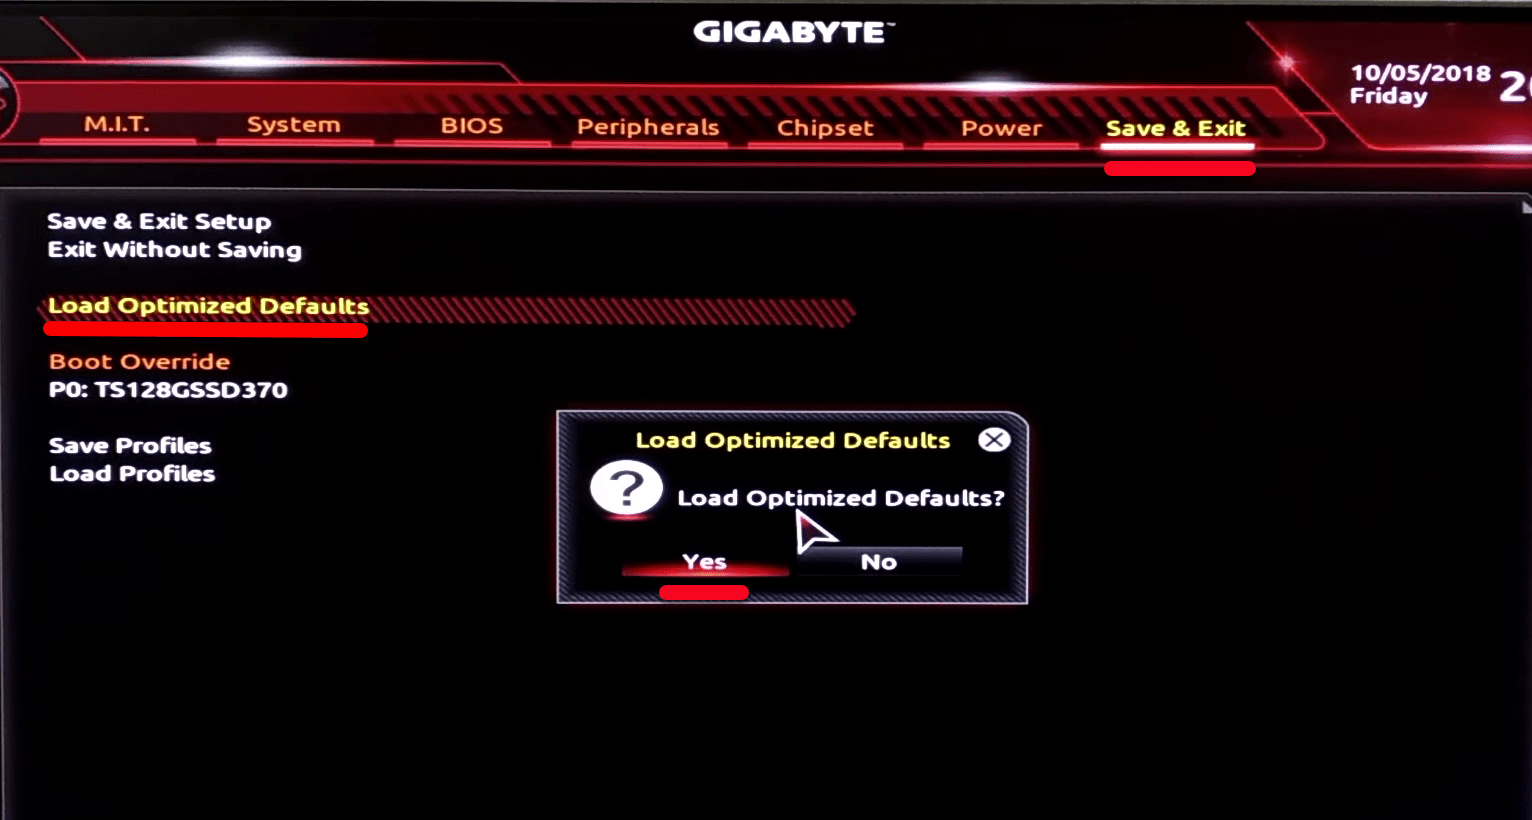
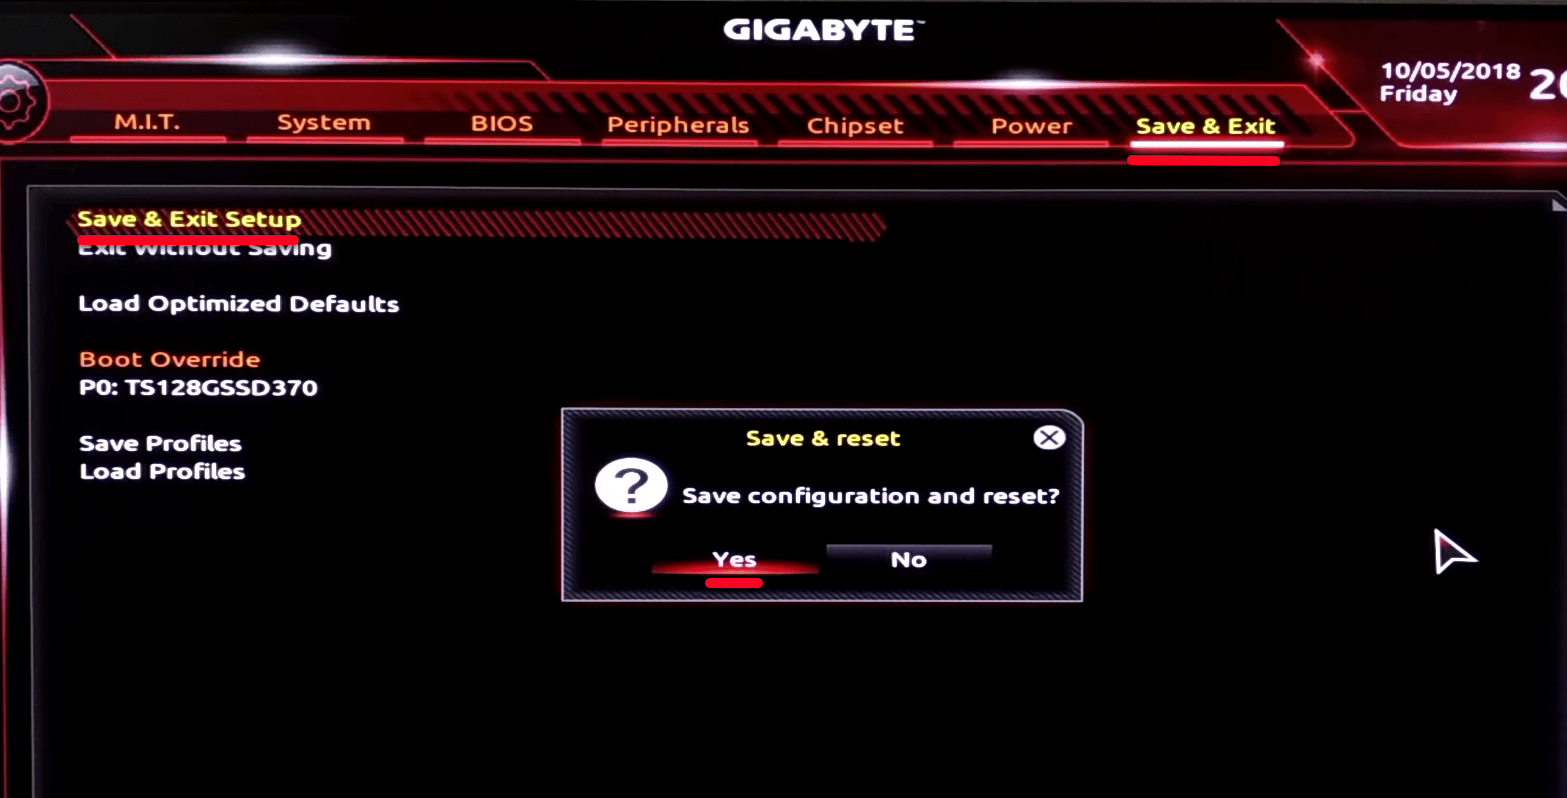
Again from Save and Exit page click on Save & Exit Setup and click Yes option.
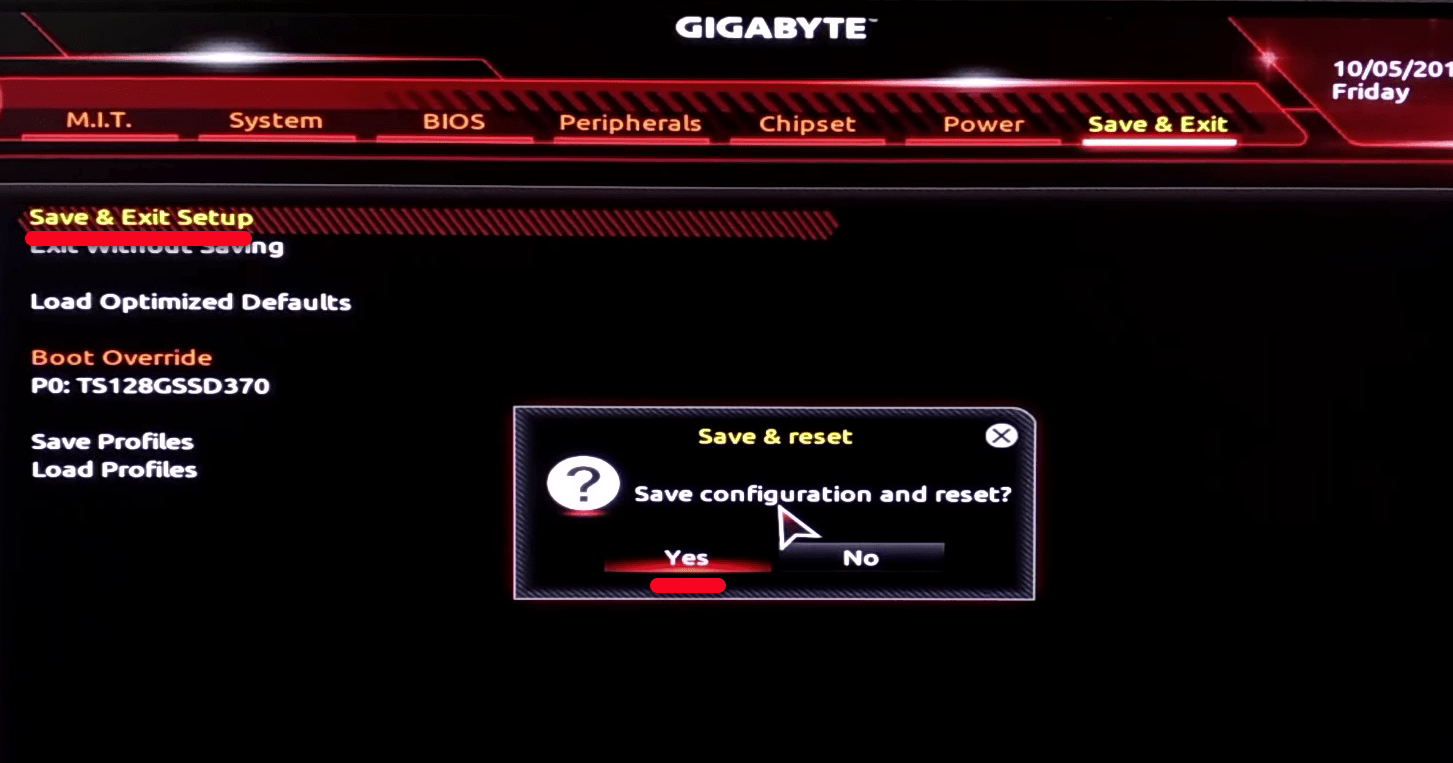
The system will restart so after restart head to the BIOS tab from the menu.
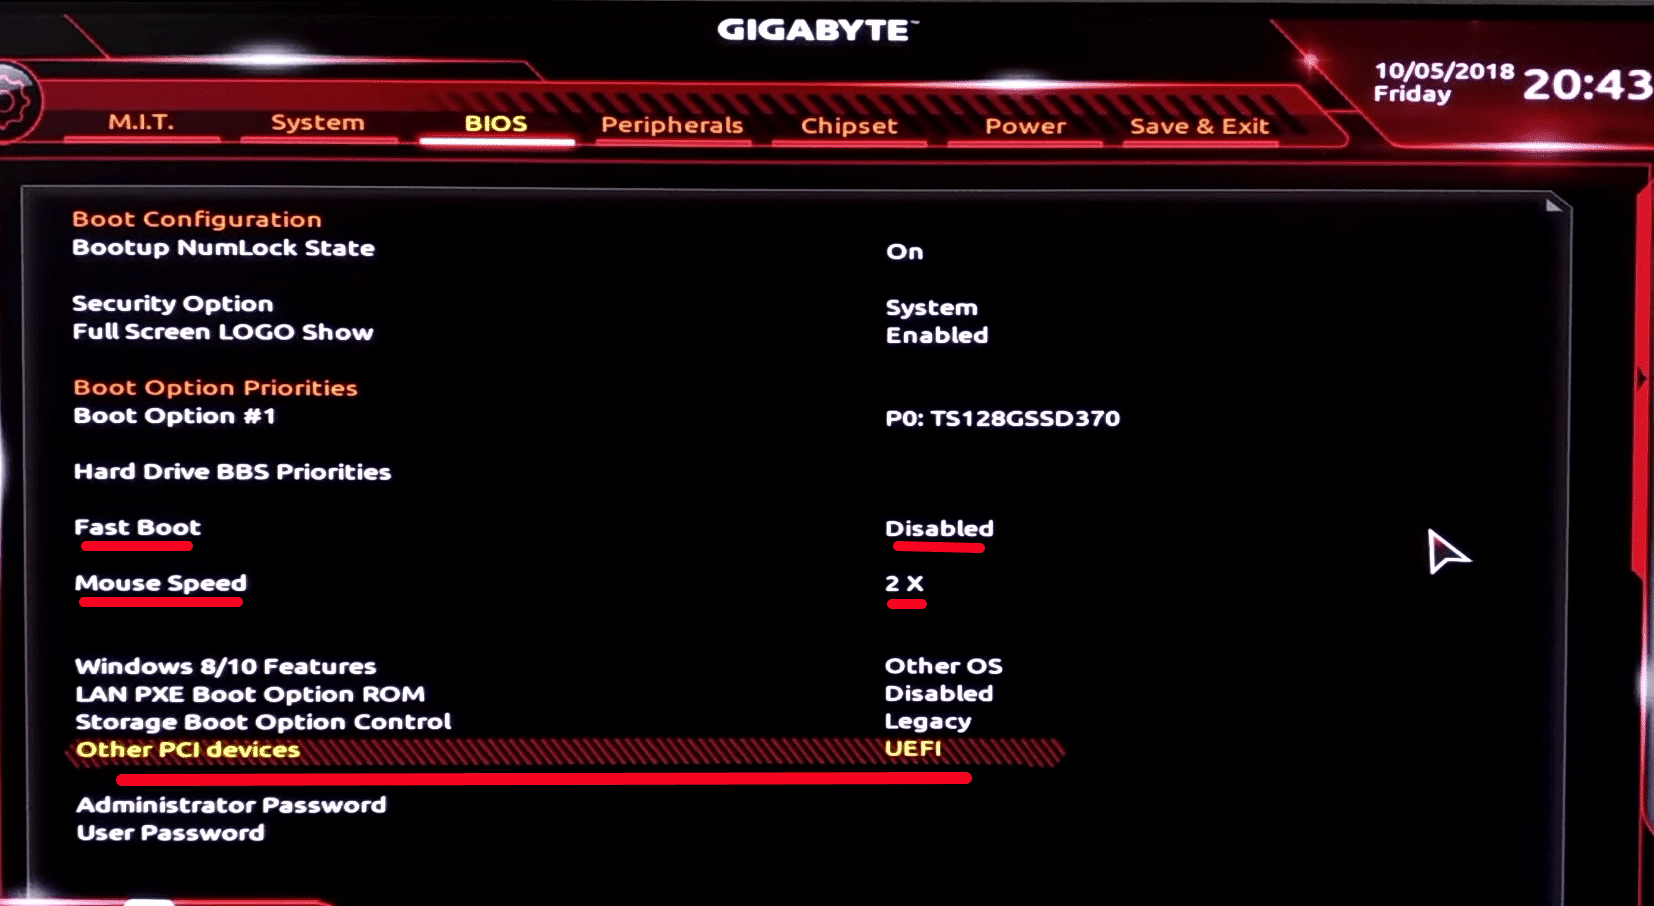
In this step, step down to the Fast Boot and Disable it. Then set the mouse speed to 2x.
Next, change the Windows 8/10 Features to other OS.
At last, make sure that the Storage Boot Option Control Option control is set to Legacy and the Other PCI devices to UEFI. It should look like my one.
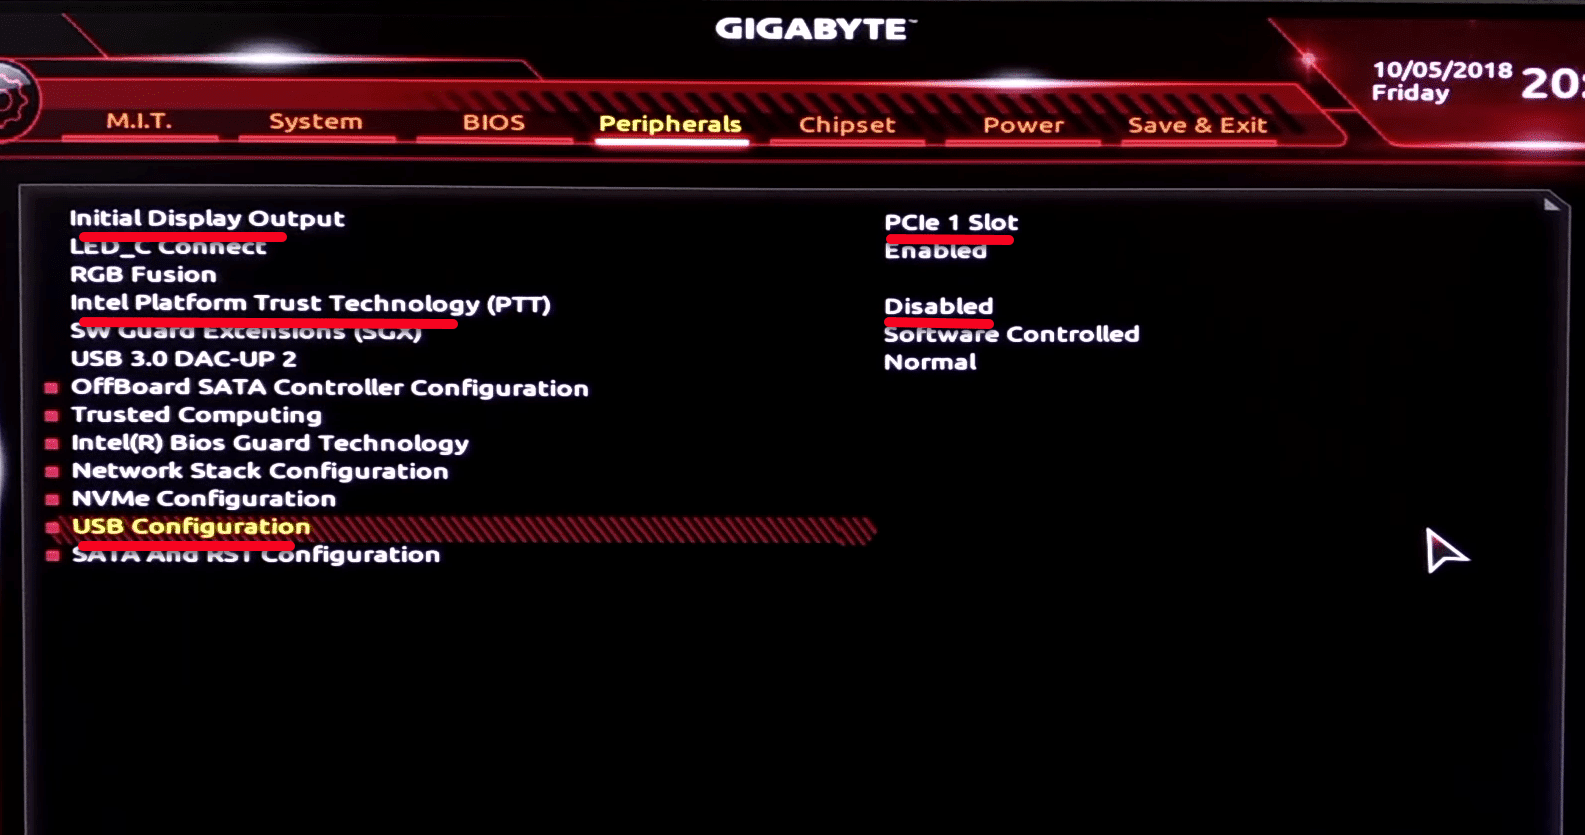
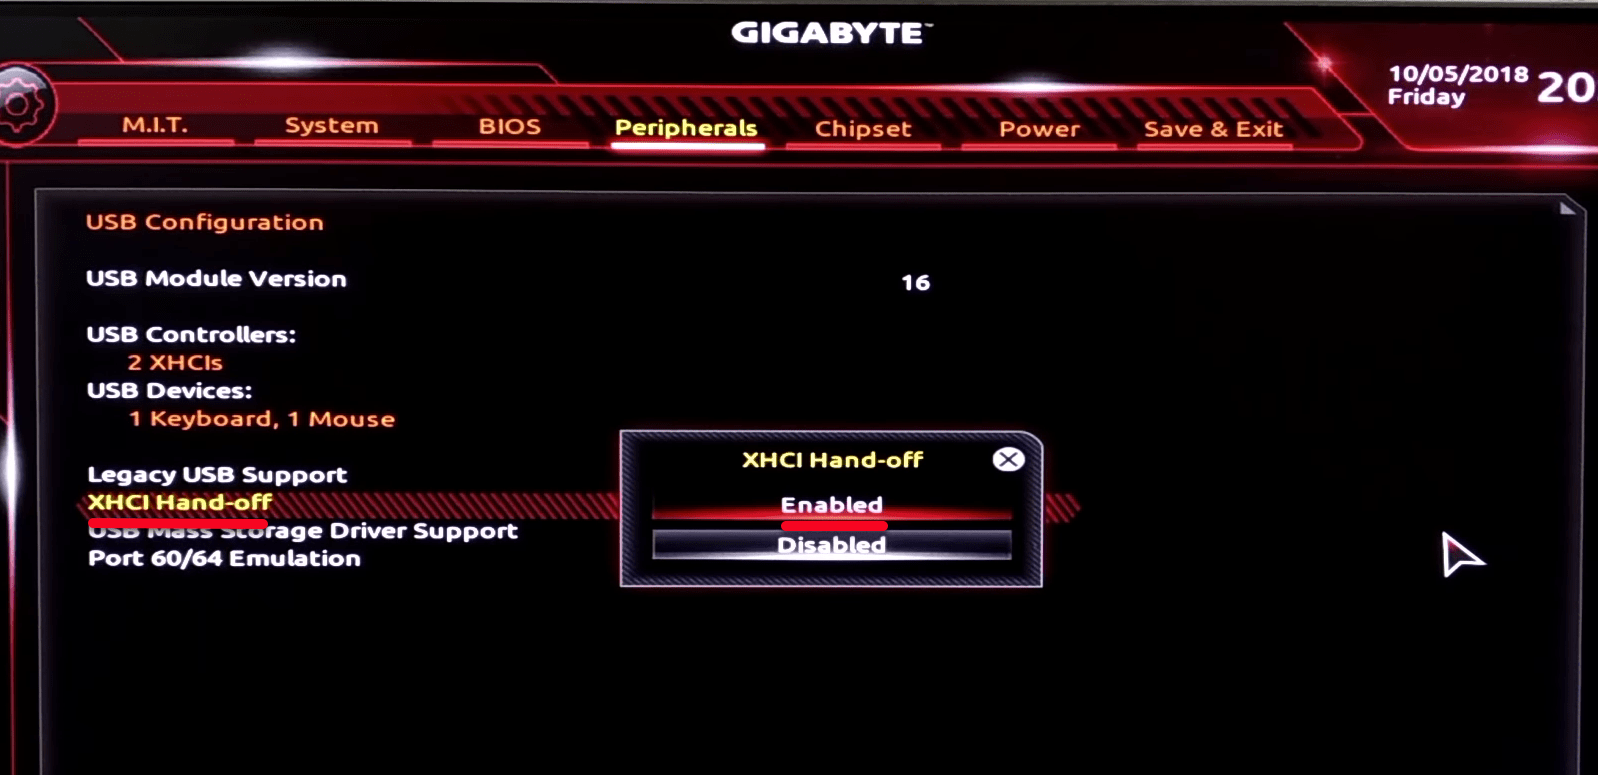
Go to Peripherals set the Initial Display Output to PCI 1 slot then click on Intel Platform Trust Technology, disable this. Now select the USB Configuration and from there, set XHCI Hand-off to Enabled.
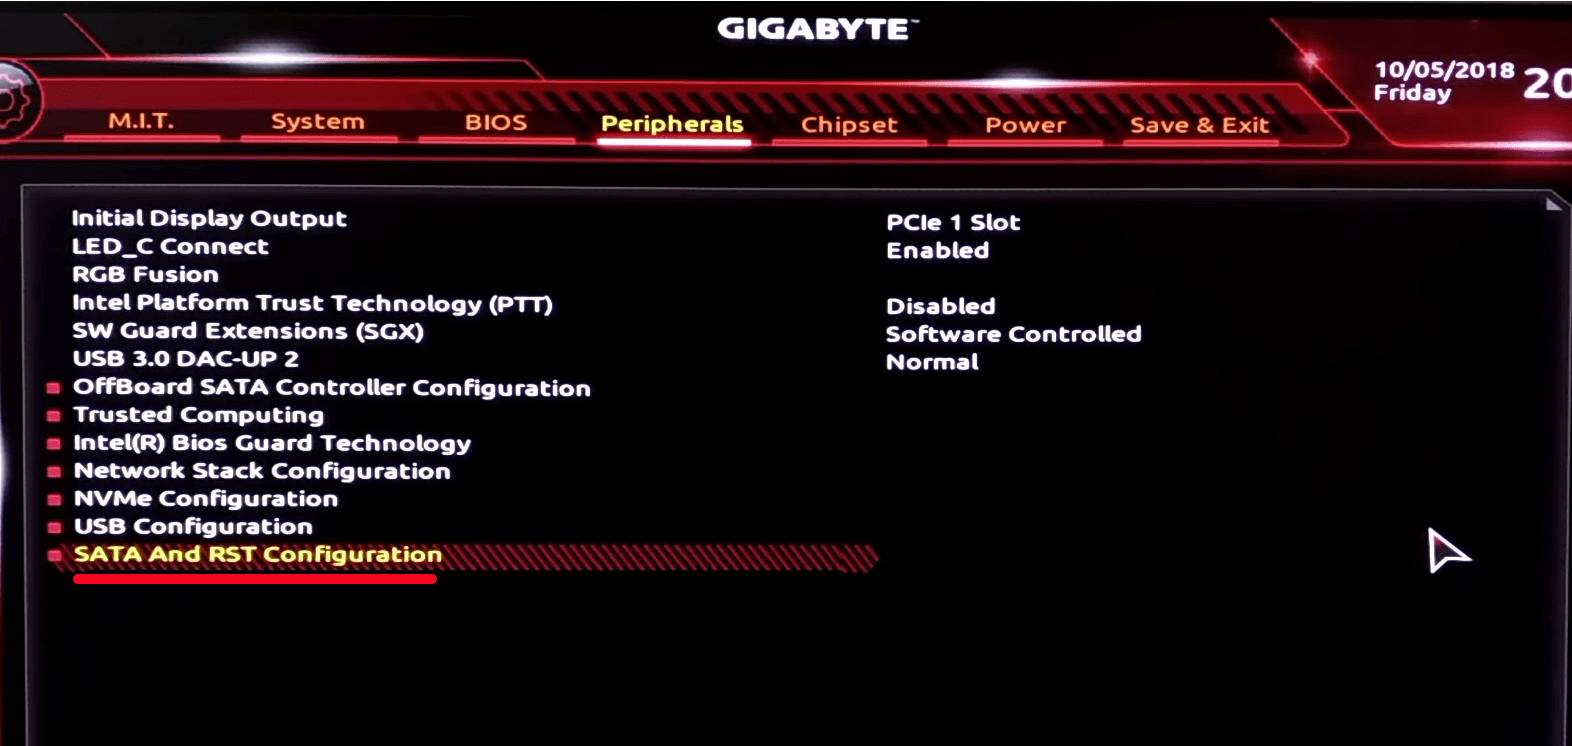
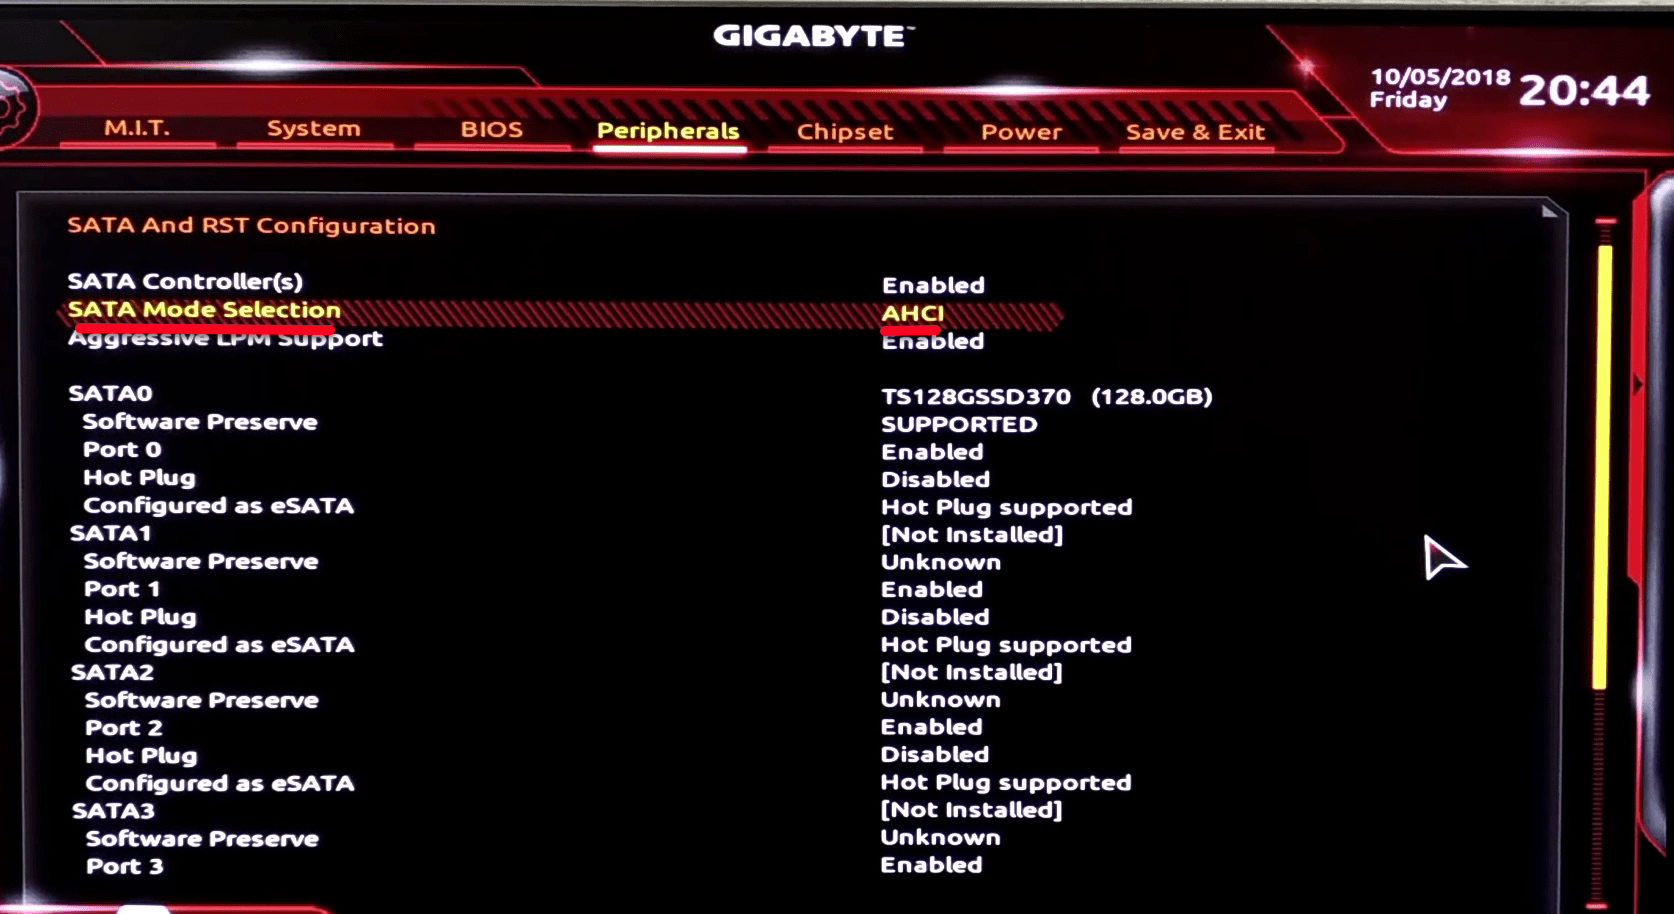
In Peripherals, click in the Sata And RST Configuration then set the SATA mode selection to AHCl.
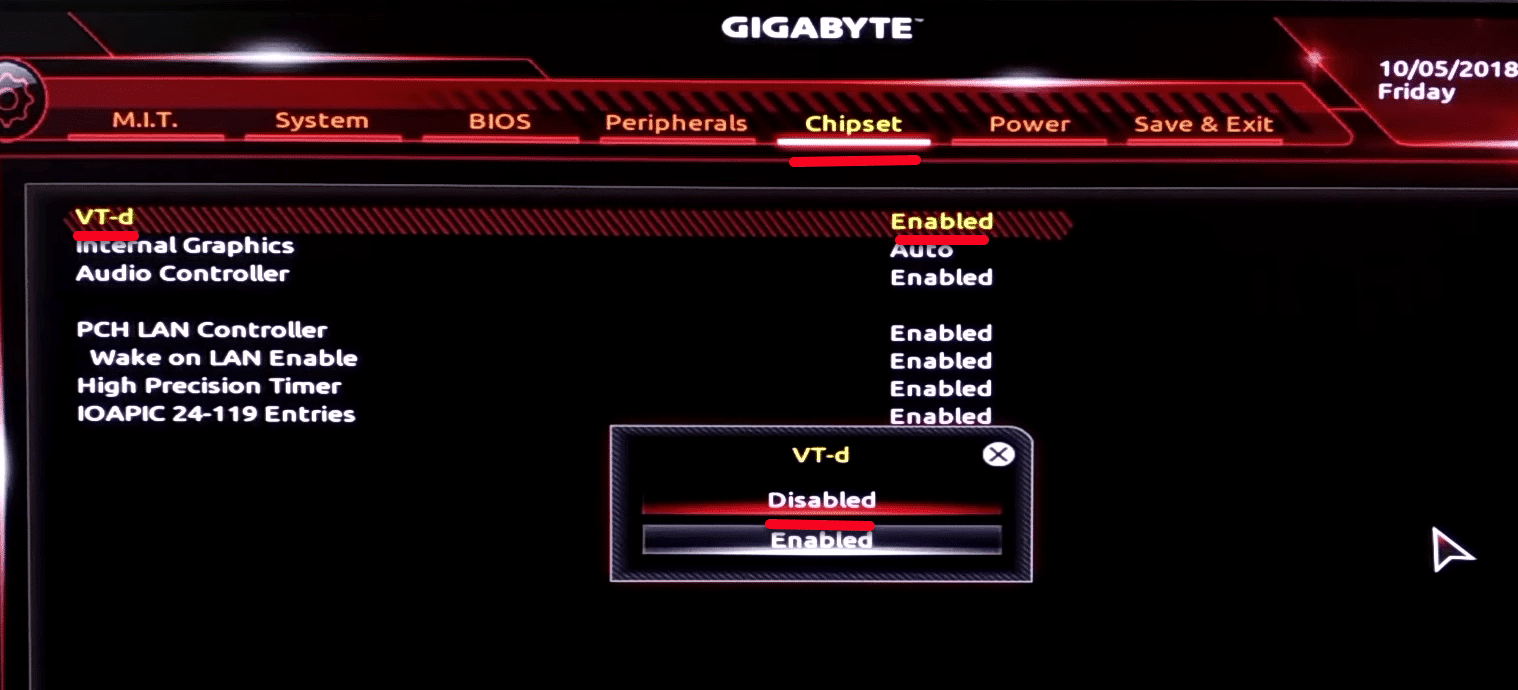
Go to the Chipset tab set VT-d to Disabled then move to Save and Edit tab, click on Save and Exit Setup then click Yes.
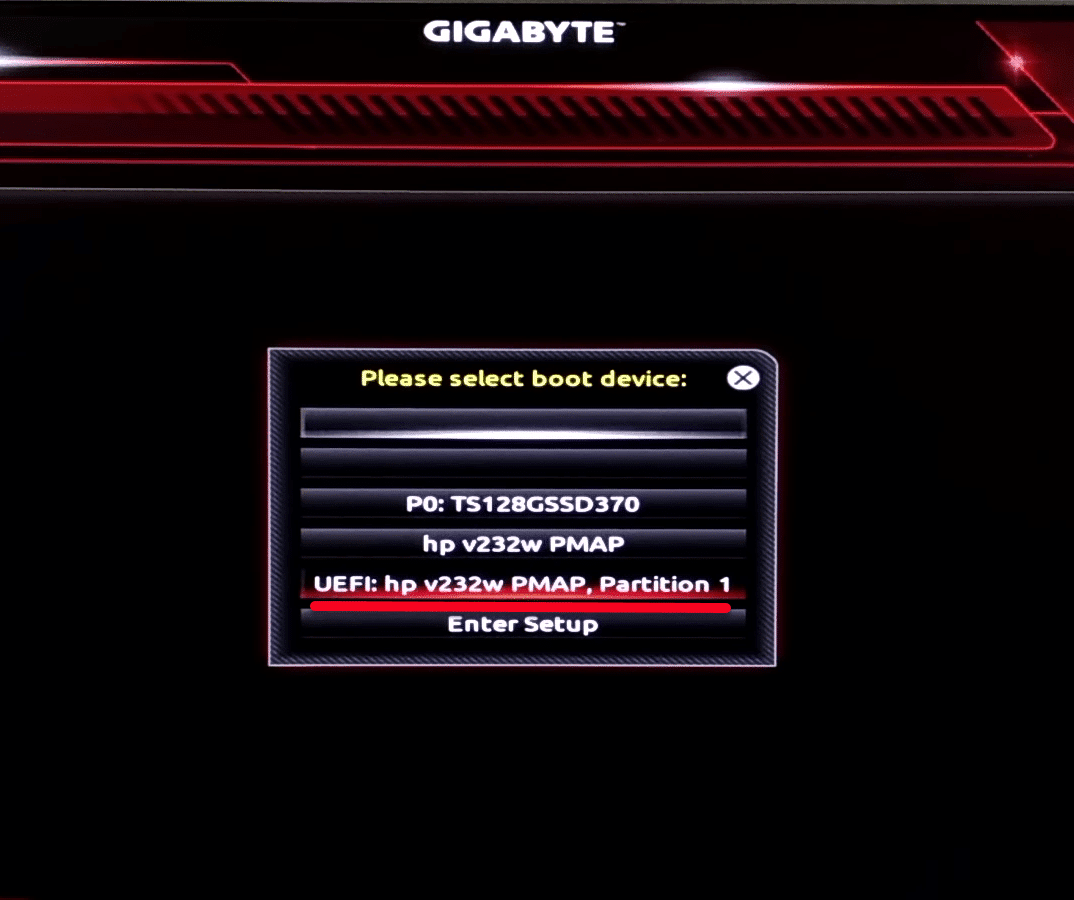
Now your system will reboot. On the first screen, press F12 key to enter to boot menu. On the boot menu select the Bootable USB flash drive. Now select the third option which is UEFI: HPv232w PMAP, Partition 1.
Step Three – Configure Boot Options
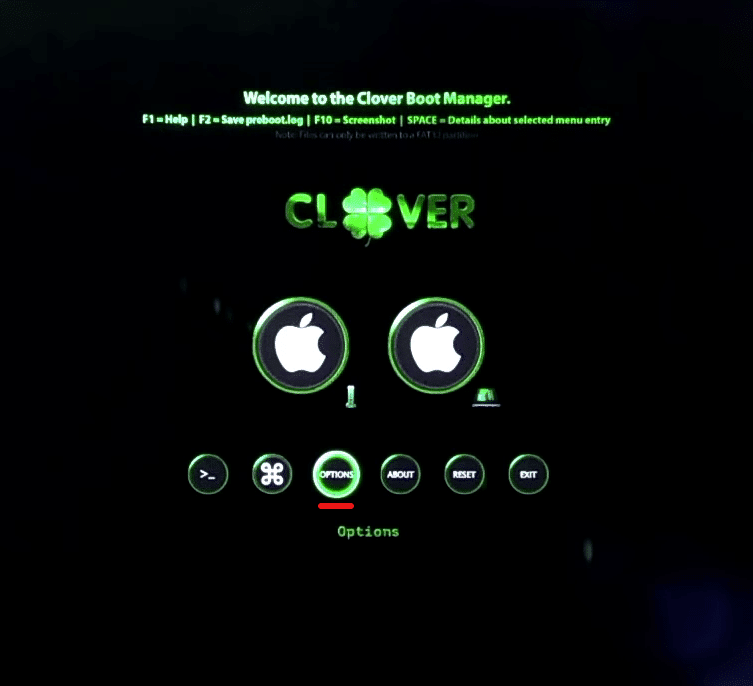
The welcome screen is on the window, so go to the options section.
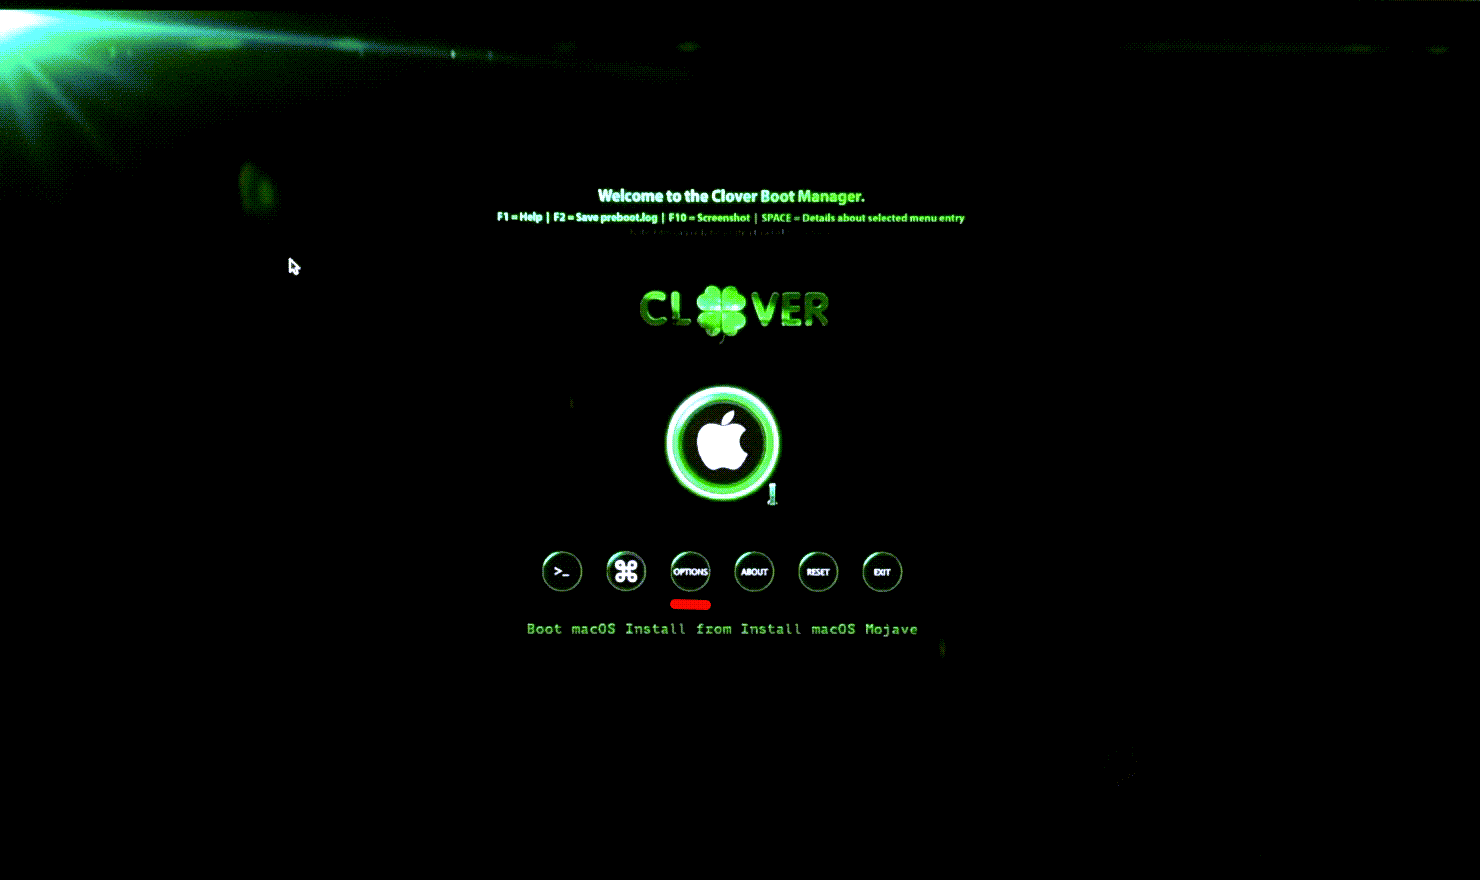
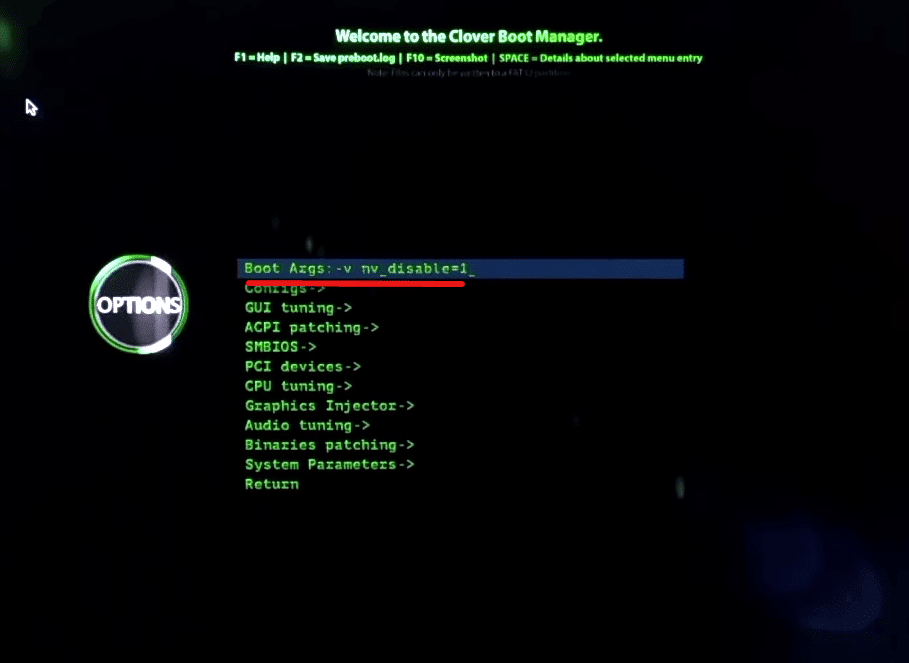
In the options window, in front of Boot Args type (-v nv_disable=1). This will disable the Nvidia graphics card, don’t worry, we will enable the graphics later on. When it’s done, Return to the previous window.
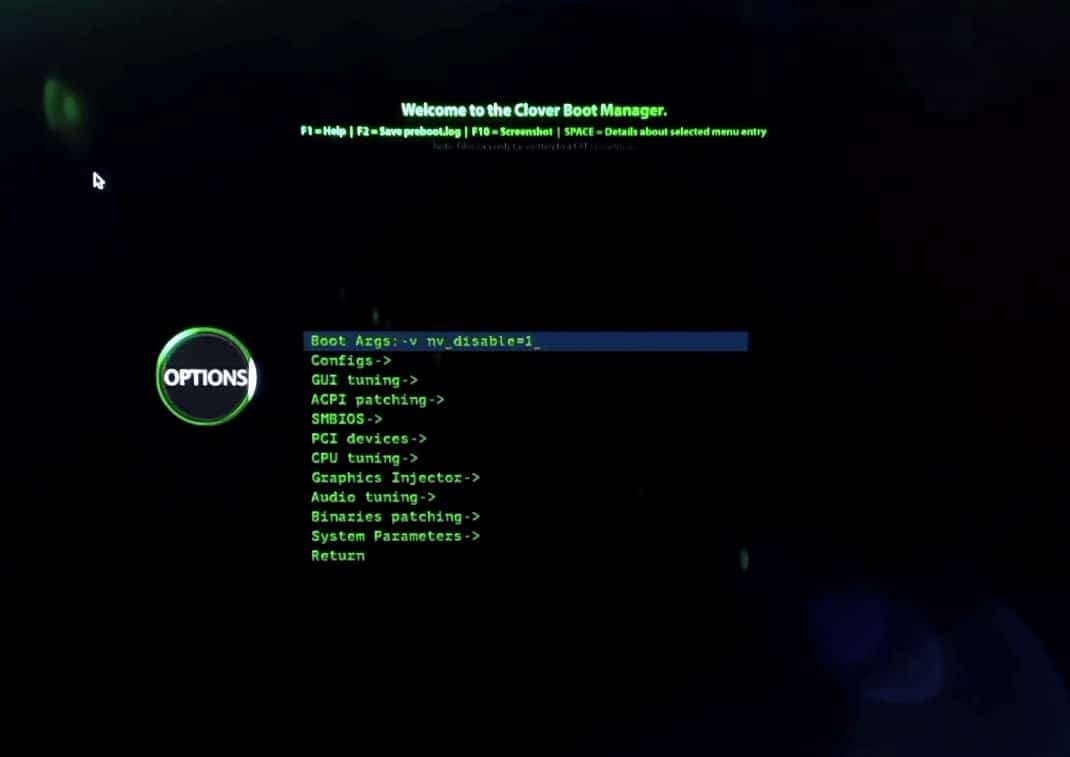
Now select boot macOS installed from installed MacOS Mojave and press Enter to boot.
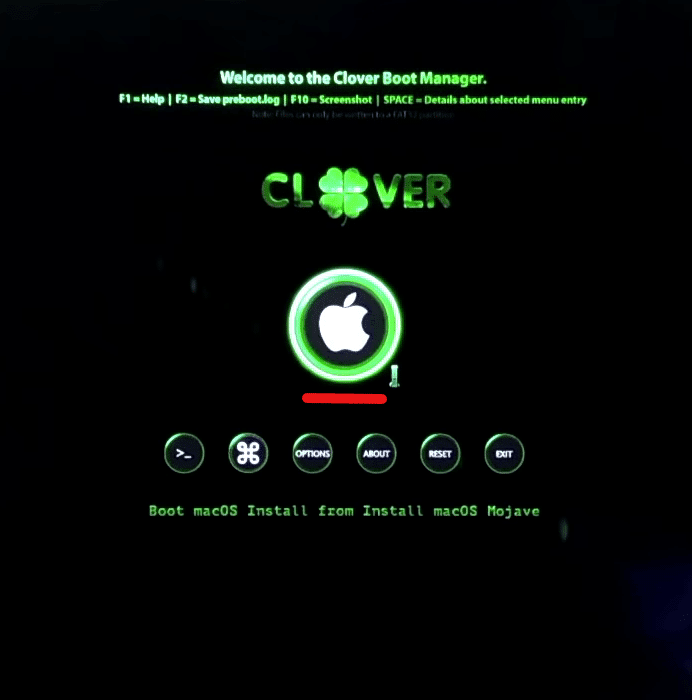
Step Four – Erase The Appropriate Disk
Now select your language and Continue. Then select Disk Utility and click on Continue.
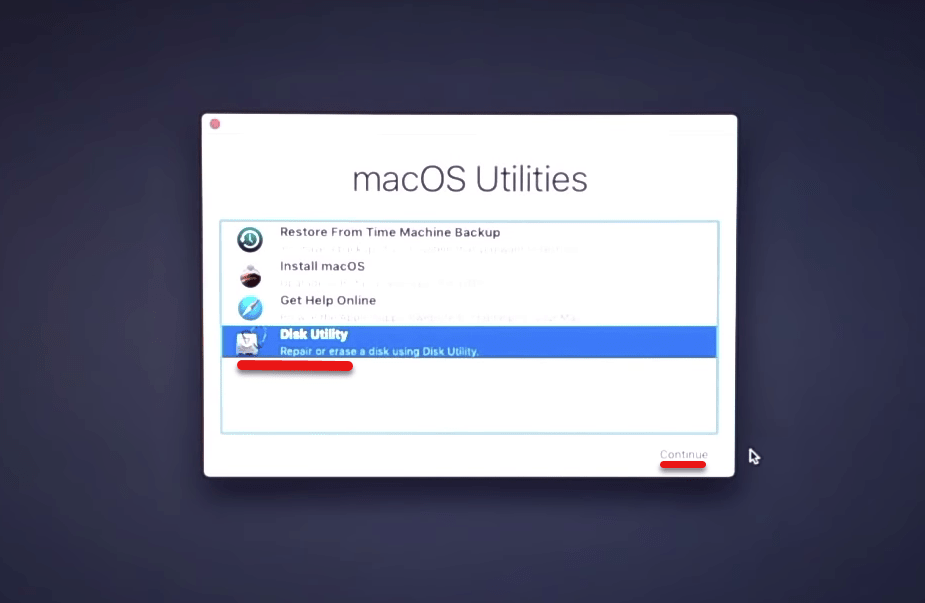
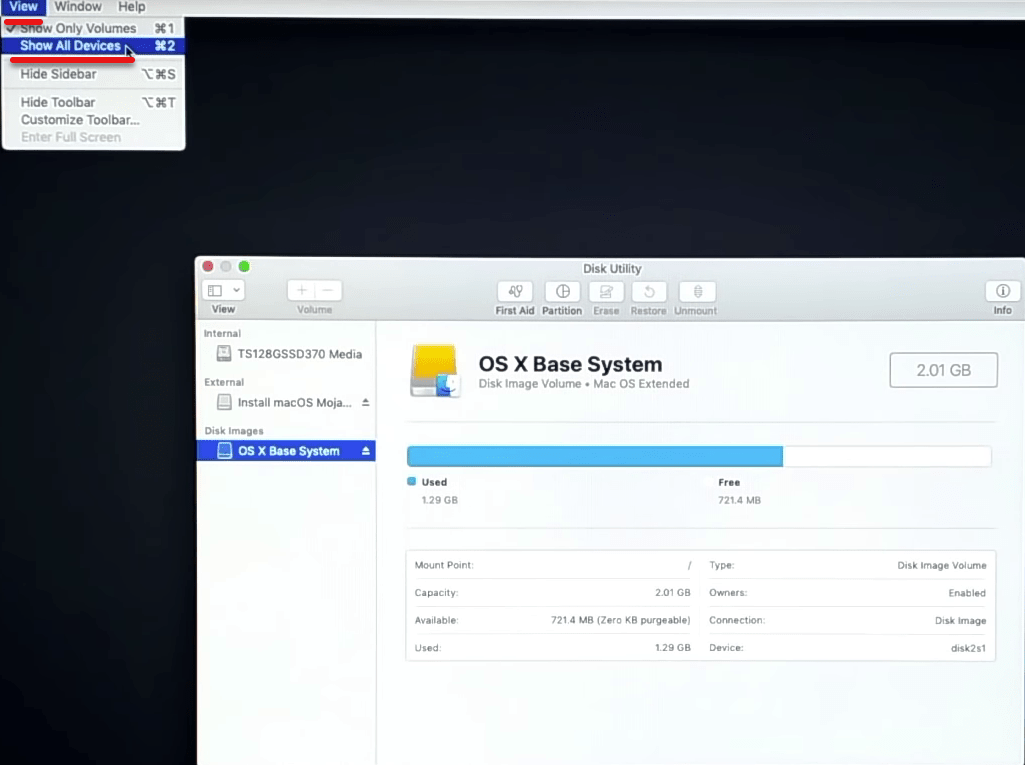
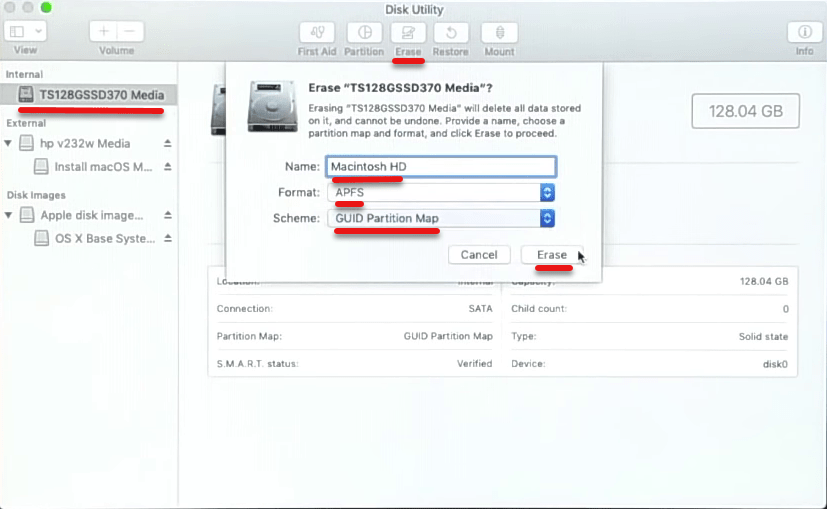
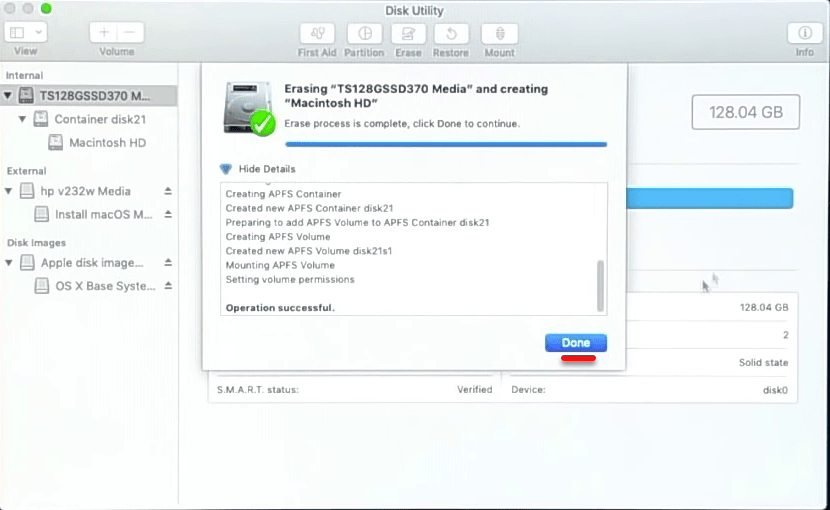
In this window, select show all devices. Then select your hard drive or SSD on which you want to install macOS Mojave on then press the Erase button. Name the drive and click Erase.
When it’s finished, click on Done and close Disk Utility.
Step Five – How to Install macOS Mojave On PC – Hackintosh
The Disk Utility screen will appear. So select Install Mac OS and click on Continue.
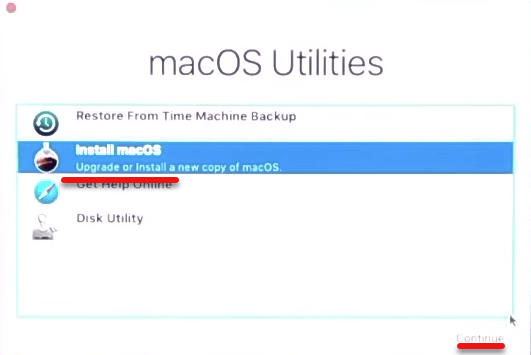
Click on continue
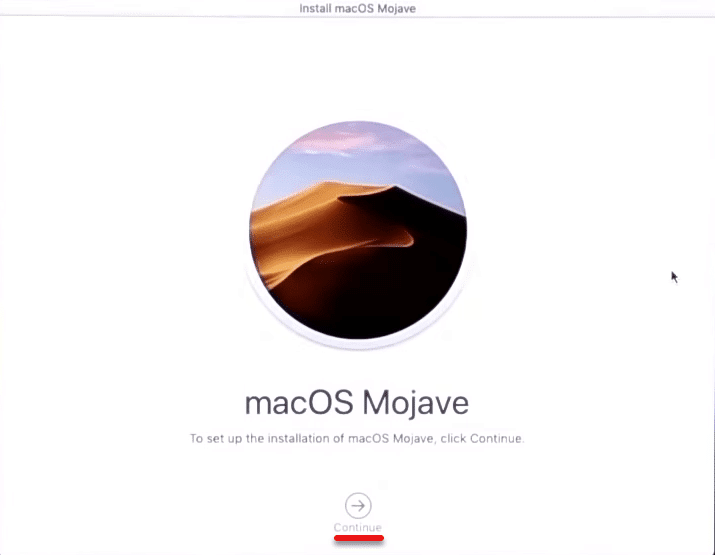
Click on Agree click on Agree from the top.
Then Select Hackintosh drive and click on Install.
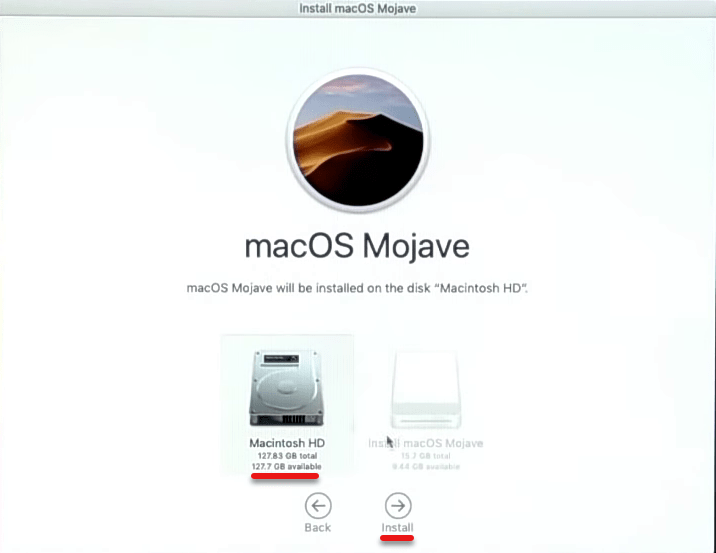
Once it’s installed, it will reboot. On the boot, press F12 and select the USB flash drive which is UEFI: Hpv232w PMAP, Partition 1 and press Enter to boot.

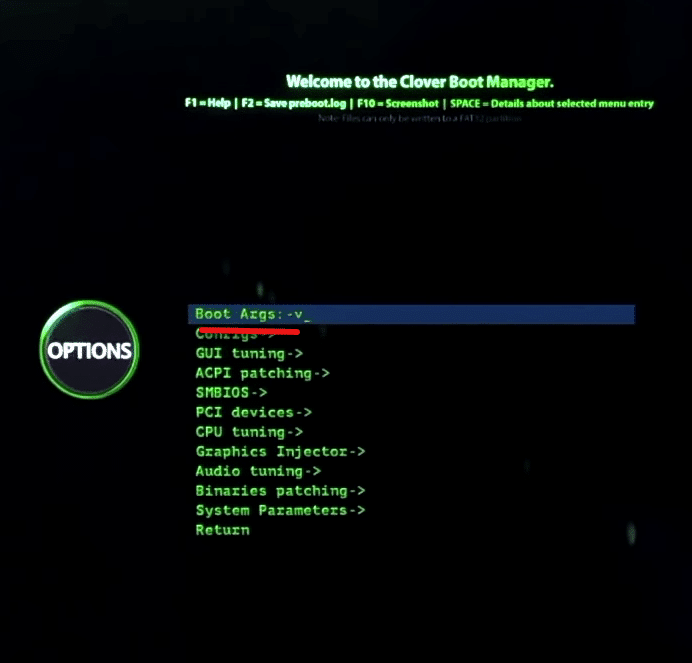
When this welcome window appeared, head to the options tab and in front of Boot Args type (-v nv_disable=1). When done, select boot macOS installed from installed MacOS Mojave and press Enter to boot.
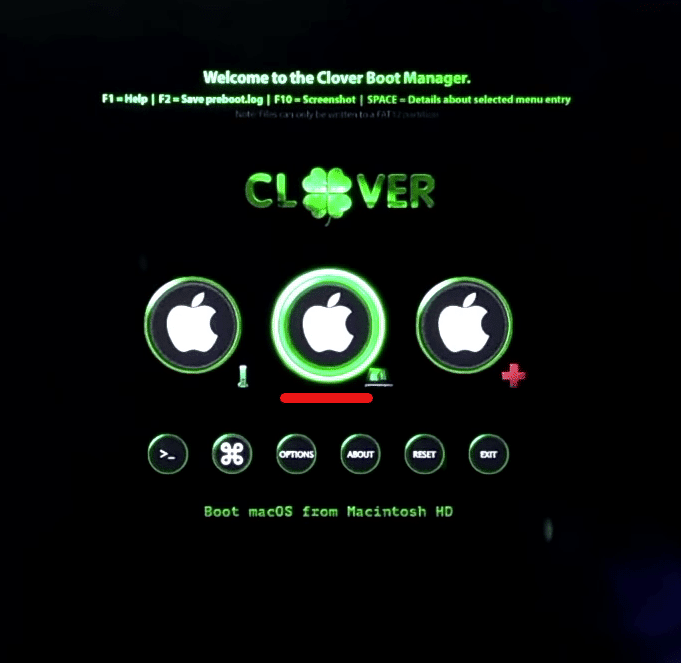
That done, select the second Apple icon which is Boot Install From Macintosh HD. We choose this because we’ve installed macOS.
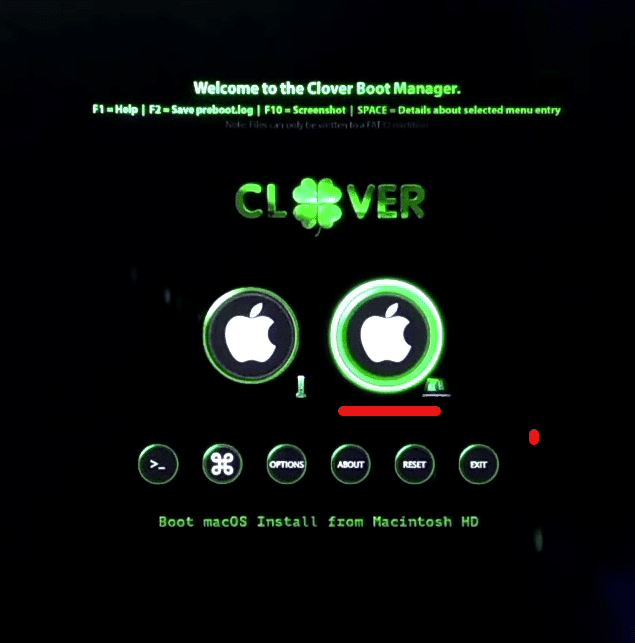
The macOS is now installing on your PC so wait. It takes 10-15 minutes.
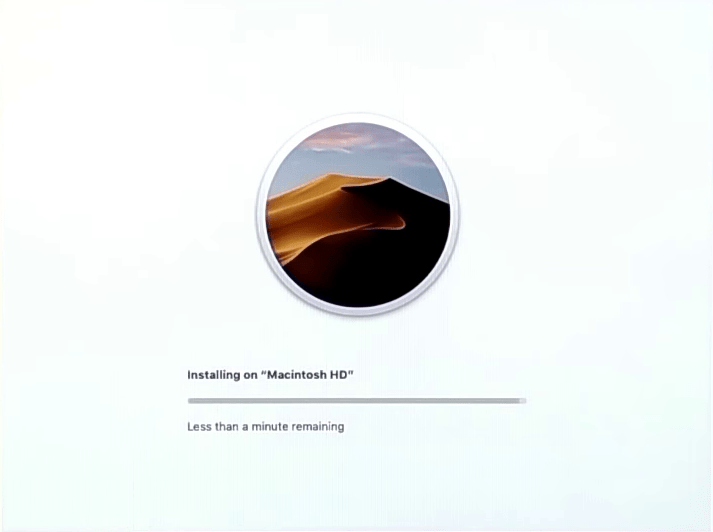
Now your system will restart. Now, Press F12 to enter in your boot menu. Once again Select a USB flash drive. Once the welcome screen is there, go to Options tab and press Enter. Then Type -v no need to disable the Nvidia drivers and press Enter key, and then press Skip key.
This time select the Boot macOS from Macintosh HD and press Enter.
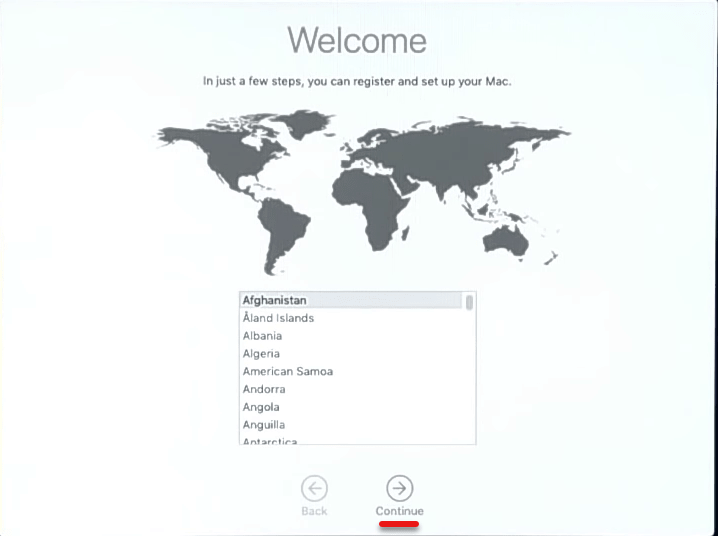
The welcome screen shows the macOS has been successfully installed so select your country and click on Continue.
Select your keyboard layout and click on continue.
Then Select my computer does not connect to the internet and Continue.
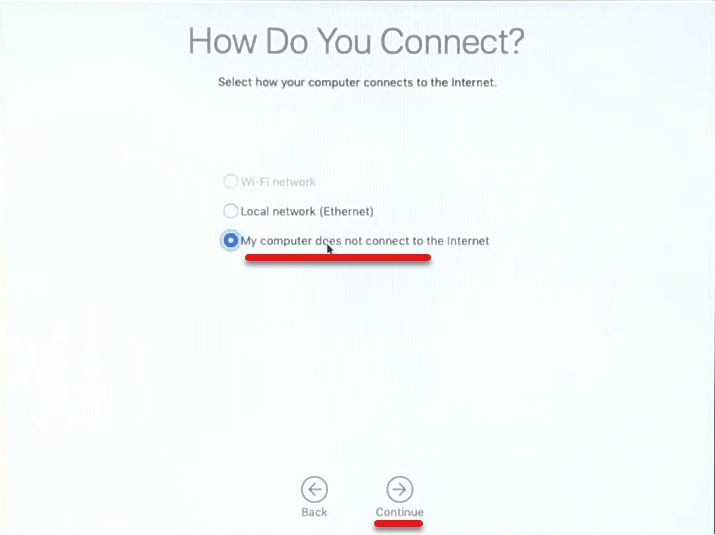
Now click Continue to Data and Privacy.
On the next page, select Don’t transfer any information now and then click Continue.
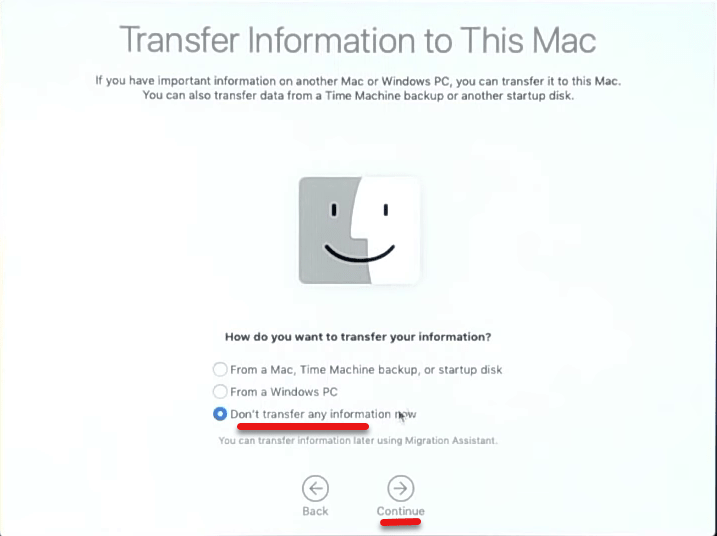
Click Agree and Continue.
It’s time to create a computer account so type in your name then type the account name and type your password then click Continue.
Here is the Express setting Just click continue. Then select the theme light or dark then Continue.
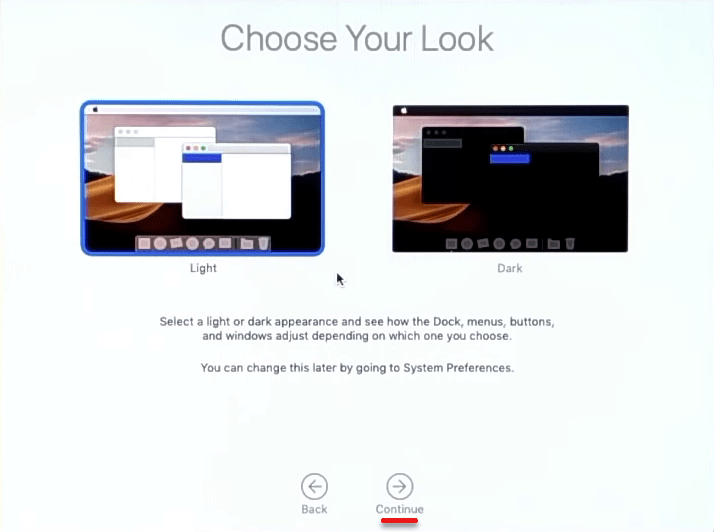
The setting up your account and entire Mac will take a moment to start so simply wait.
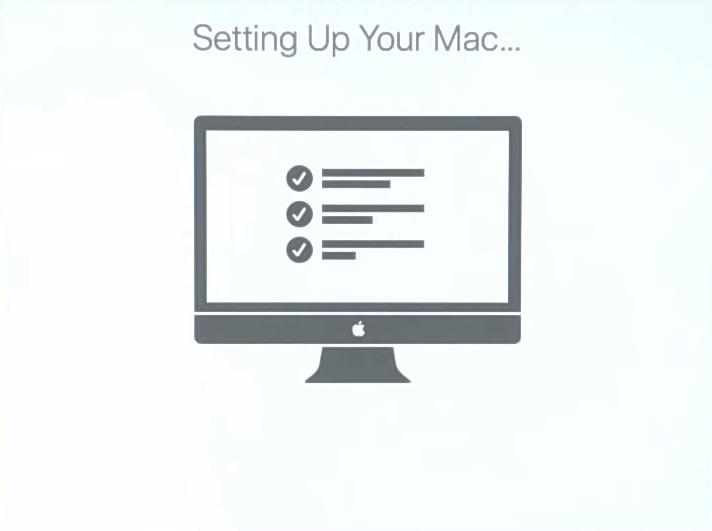
Congrats running macOS Mojave on your PC. Just chill around and there’s nothing more remained.
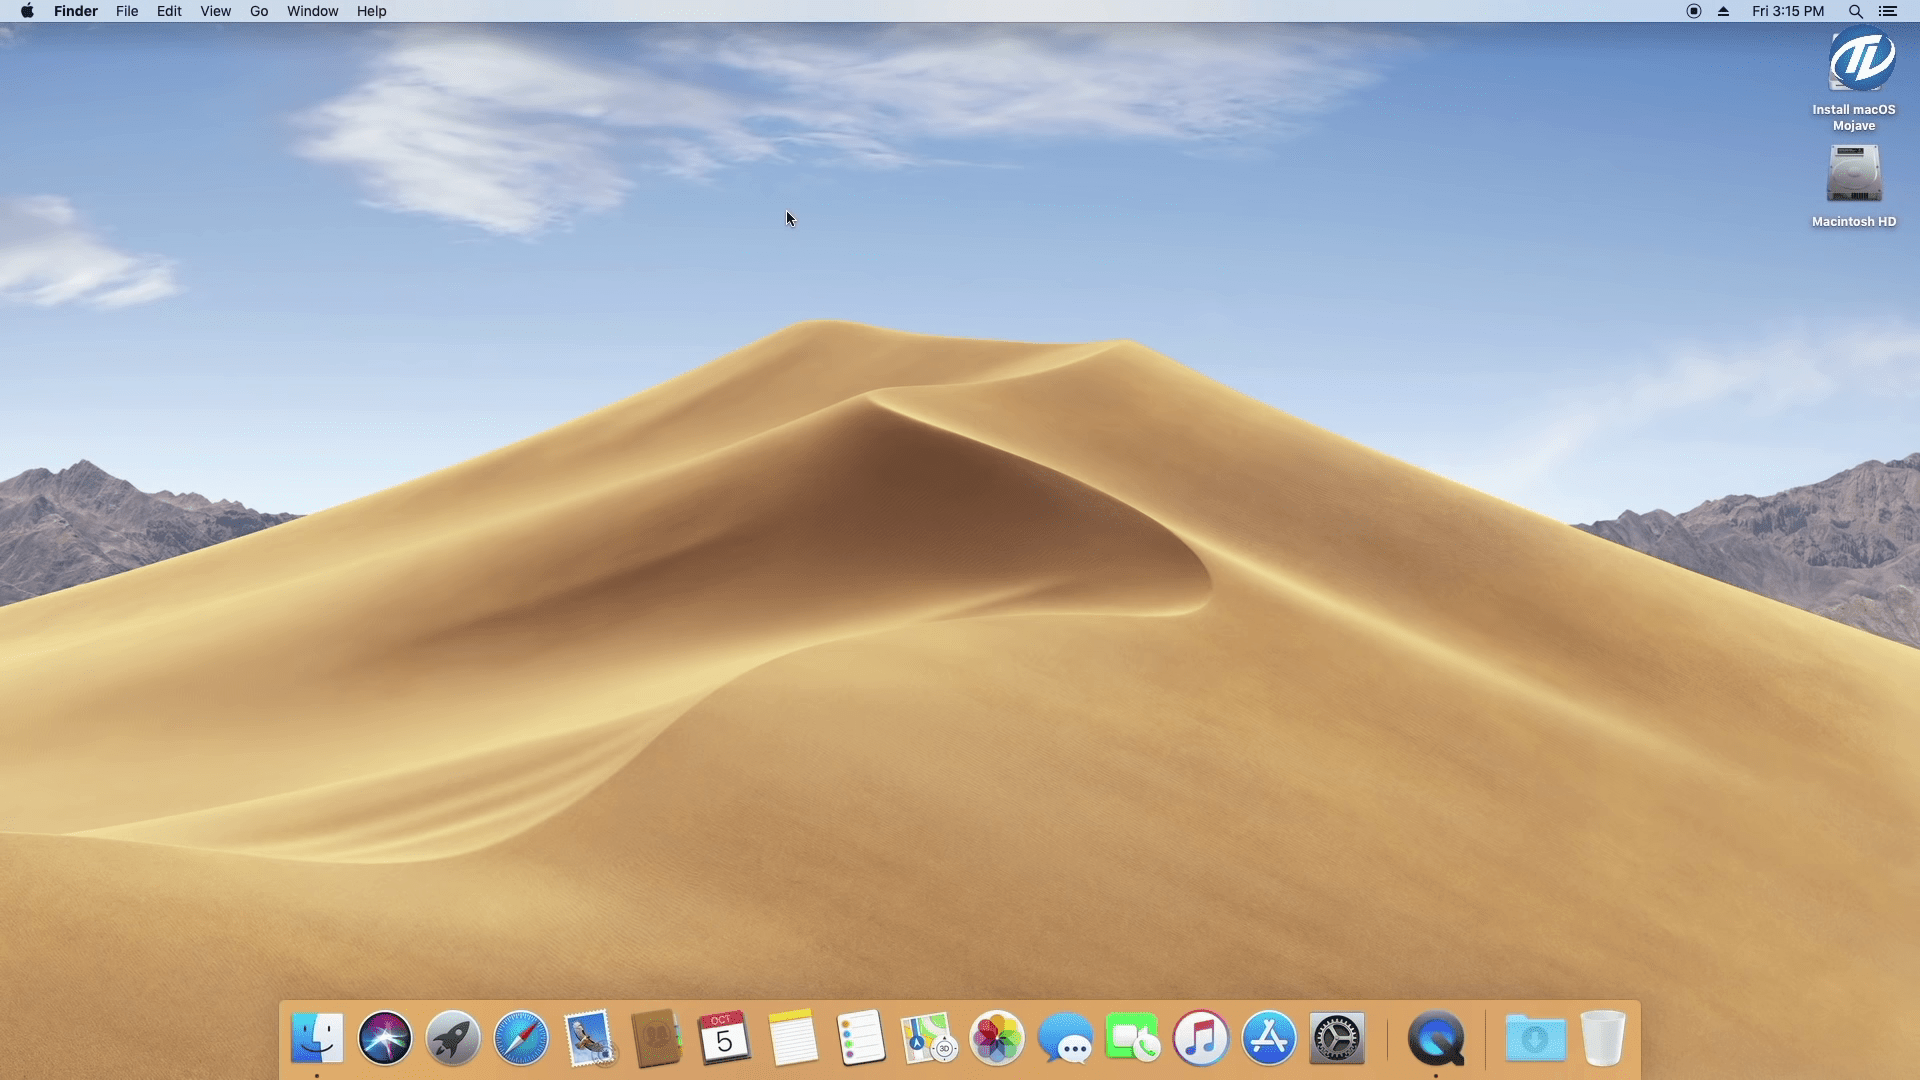
We’ve ended up with Mojave perfectly running without any problem. Your boy is waiting and you can use ask it to do everything you want. For the post-installation, you can install the Multibeast. Once installed, you can use Wi-Fi, update it, and do much more. You can also install macOS Catalina this way or any other Mac operating system.
We’re pleased to say that that’s all. After a huge series of steps, we’re now completely free and ready to use. That was how to Install macOS Mojave On PC – Hackintosh. Hope it worked for you and you have no problem but in terms of using it, you might be a little confused but with the time, it will be fine.

