• About us
  • Contact us
  • Privacy Policy
GEEKrar
  • Home
  • Virtual Machines
    • VMware
    • VirtualBox
  • Mobile
    • Android
    • iOS
  • News
    • Windows (Microsoft)
    • iOS (Apple)
  • Discord
  • Windows
  • Mac
  • THE FORUM
No Result
View All Result
  • Home
  • Virtual Machines
    • VMware
    • VirtualBox
  • Mobile
    • Android
    • iOS
  • News
    • Windows (Microsoft)
    • iOS (Apple)
  • Discord
  • Windows
  • Mac
  • THE FORUM
No Result
View All Result
GEEKrar
No Result
View All Result
Home VMware

Fix macOS Mojave Screen Resolution(HiDPI) on VMware

Ali by Ali
April 29, 2025
in VMware
6
Fix macOS Mojave Screen Resolution(HiDPI) on VMware

Fix macOS Mojave Screen Resolution(HiDPI) on VMware

25
SHARES
363
VIEWS
Share on TwitterShare on Facebook

Eventually, you’ve installed macOS Mojave with VMware Tools on your macOS virtual machine and you’re probably thrilled for getting your hands dirty with it. Surprisingly, when you power on the virtual machine and sign in, wait for the screen to actually load up with apps, unfortunately, the screen will load up with pretty maximize and do a sort of zoom or magnify or whatever you call which you definitely want to fix macOS Mojave screen resolution on VMware.

And when you would like to change to your typical resolution, you won’t be able to do that or if you do change, it will revert back to the zoomed resolution. The problem is not really known and identified, as well as the cause is not actually detected. If that’s the case and you’ve been tolerating that, you’re straight into the solution, here’s how to do a quick fix macOS Mojave screen resolution step by step.

https://www.youtube.com/watch?v=lXo4Z5F1xKE

What you’ll need

Before you begin, make sure you download the following files.

macOS Mojave Screen Resolution VMware Commands: In order to fix macOS Mojave screen resolution, you’ll need to run this command. This is a text file that contains a command that you’ll need to run.

Fix macOS Mojave Screen Resolution(HiDPI) on VMware

The first thing you’ve to do is fire up the macOS Mojave (Virtual Machine) and sign in. Once you’ve signed in and the homepage problem appears, click on the search icon or spotlight icon if you’ve worked with before.

Search Spotlight
Search Spotlight

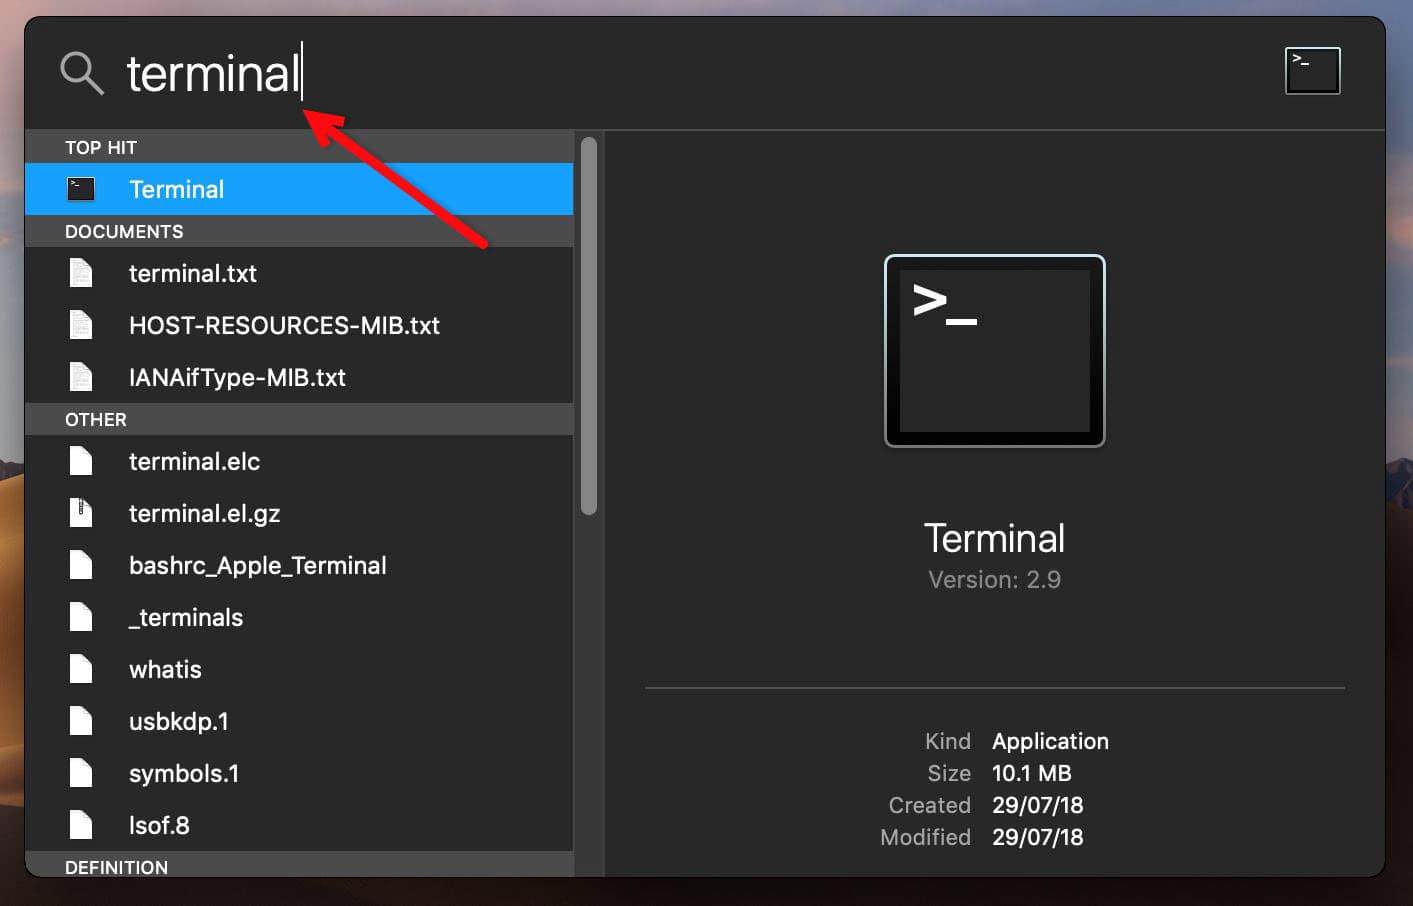
In the Spotlight window that opens, type terminal and you’ll see the most similar results that terminal will be the first, just hit Enter or click the Terminal to start.

Launch Terminal
Launch Terminal

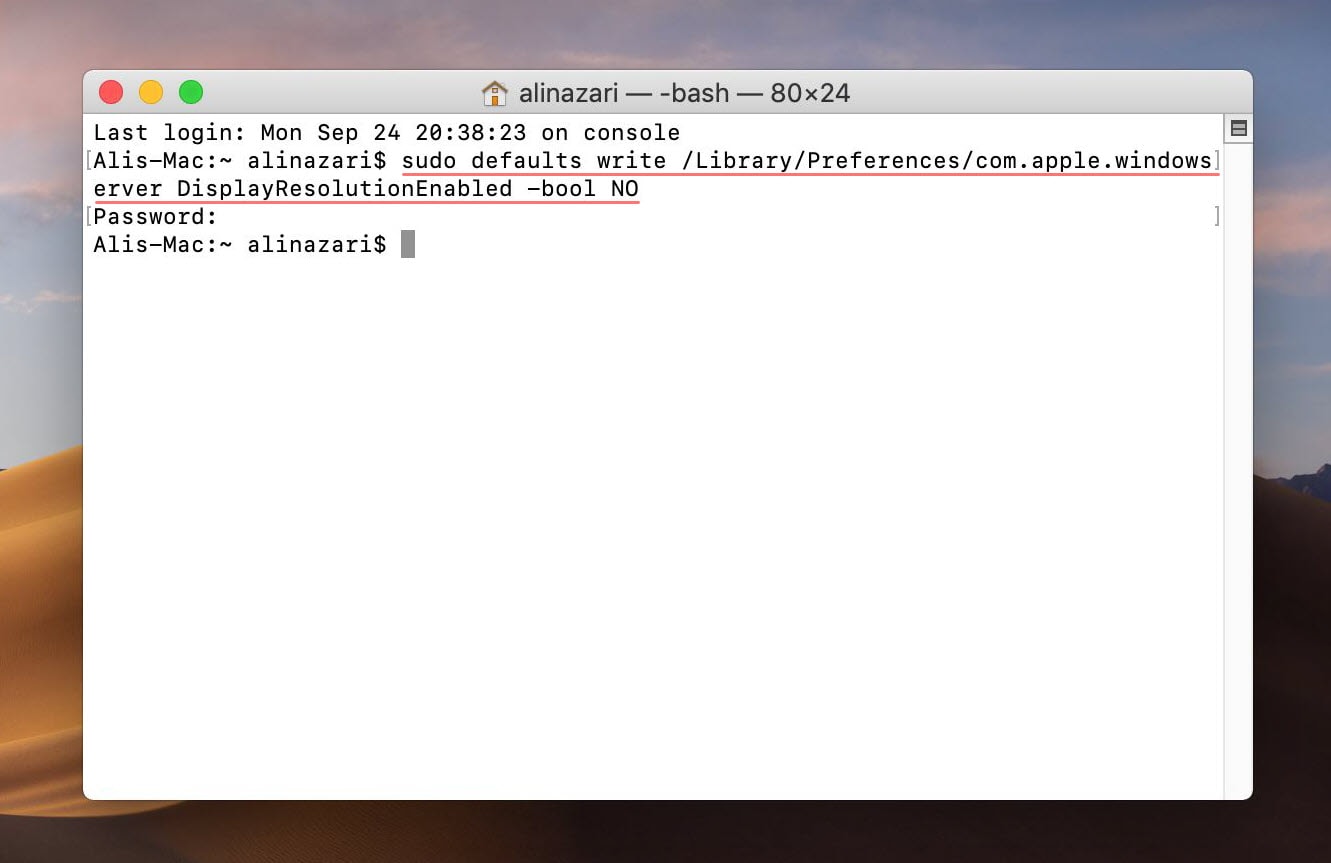
The important part that needs to pay attention is that where you need to place the code. For making things a little easier, just copy the code from the notepad file in Windows, and you can paste it in the terminal as easy as doing it in Windows though.

Alternatively, you can drag and drop the commands file into macOS Mojave and right after that you’re able to copy and paste commands from there. In every way, what you need to do is, copy the commands from the file and head to terminal and right click and paste it then hit Enter. For security reasons, enter your password correctly when required and hit Enter on your keyboard.

Terminal - Enter Commands
Terminal – Enter Commands

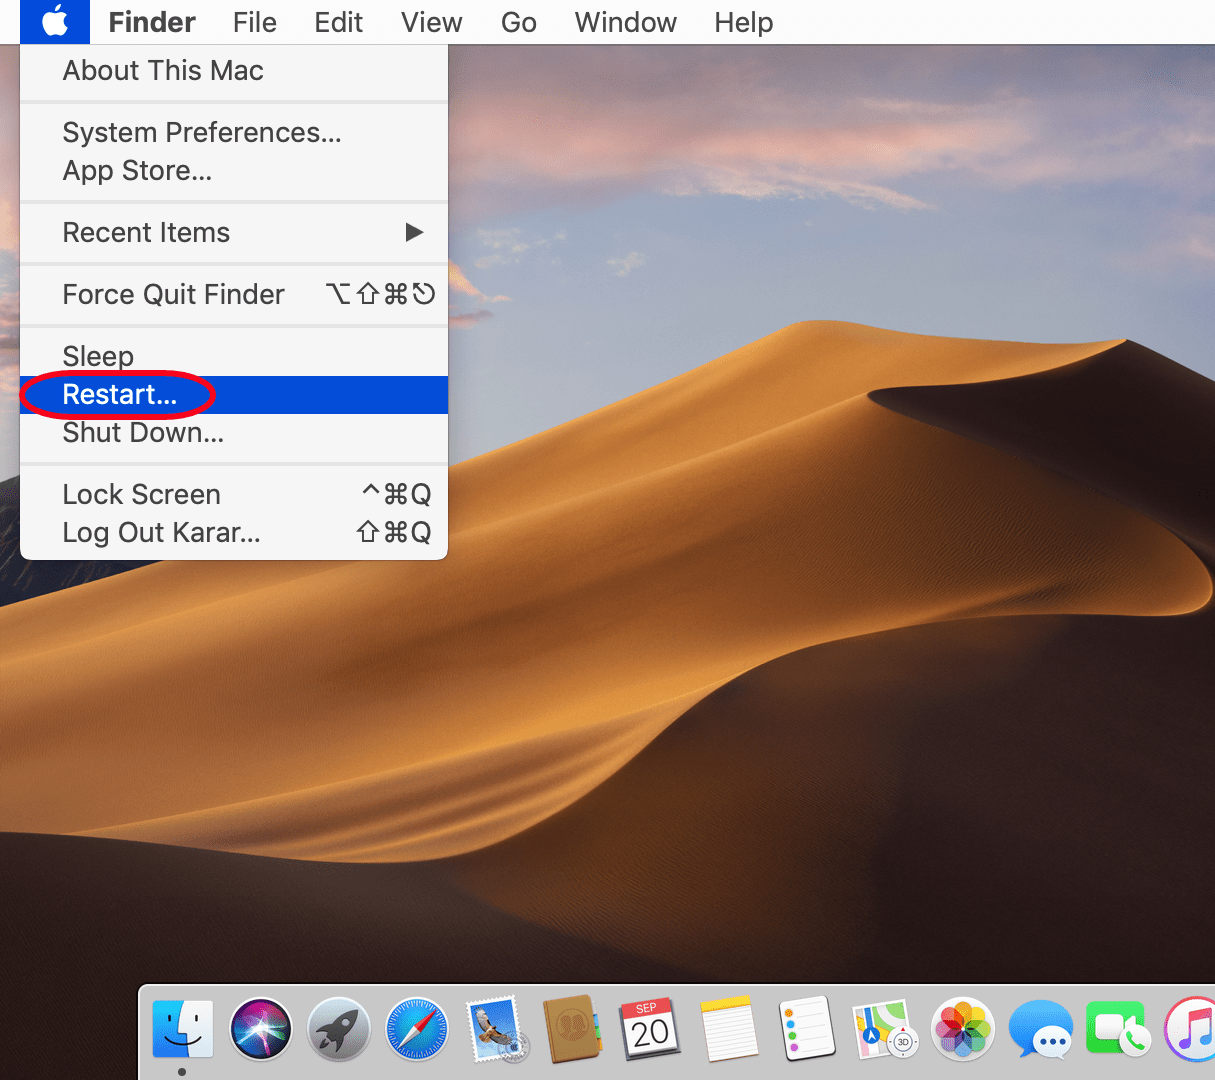
To perform and accomplish what you’ve done, restart or at least sign-out of your account. In this case, it’s better idea to restart rather than signing out, to do that just click the Apple logo icon at the top left corner and click Restart. When you’re asked, simply hit Restart.

Restart Your Mac
Restart Your Mac

Finally, when you’re back with a fresh start, you are done with that and will appear your real screen resolution. Here’s a glance of what it looks like.

macOS Mojave Full Screen Resolution
macOS Mojave Full-Screen Resolution

And if you would like to do a quick check, you can do so, go to Apple logo > About this Mac >Display > System Preferences and you’ll see the screen resolution that is applied. Without this, what you might have noticed is that the second resolution (HiDPI) has vanished and that is a great news!

macOS Mojave - Display
macOS Mojave – Display

With that done, you’re definitely on the go. Now you can dig around, surf a little bit or try or test some interesting apps you’ve considered in line. Perhaps, there are pretty much things with whole operating system waiting for you and all of it’s features and functions, that you can do little bit tweaks you may not have know about.

If you’ve something to say about my instructions or about anything you have idea, that is for betterment, I’d love to hear them, let me know in the comments down below.

Tags: fixFix HiDPIHiDPImacOS Mojavescreen resolutionVMware
Previous Post

How to Install VMware Tools on macOS Mojave

Next Post

Install macOS Unlocker for VMware Workstation/Player 2023

Ali

Ali

Next Post
macOS Unlocker for VMware

Install macOS Unlocker for VMware Workstation/Player 2023

Comments 6

  1. Linkwell fook says:
    6 years ago

    It worked for me.

    Reply
  2. nizar4all says:
    6 years ago

    your procedeures work with me…Thanks

    Reply
  3. karthgieyan says:
    6 years ago

    Please tell me I follow your all instruction to fix resolution in mac OS 14 but I have different issues in resolution .How to fix it ????Please see this screenshot https://drive.google.com/file/d/10i5VFqUbrC74-7UxE7wdKJ7gvUx3NsCP/view?usp=sharing

    Reply
  4. birjesh sharma says:
    6 years ago

    Steps:
    Start or boot the macOS guest OS.

    1. In VMWare menu, click the “VM” and select “Settings…”
    2. Under “Hardware” tab select “Display” and under the “Display scaling” uncheck the “Automatically adjust user interface size in the virtual machine”:

    Note: it is important that your guest OS is booted or else the “Automatically adjust user interface size in the virtual machine” option will not be available:

    Reply
  5. Zia Ur Rehman says:
    6 years ago

    Did not work for me… instead of it following worked…

    1. Open the System Preferences -> Security & Privacy to confirm -> General tab in the guest, make sure there is nothing to allow.

    2. Virtual Machine -> Reinstall VMware Tools. Open volume “VMware Tools”, double click “Uninstall VMware Tools”, then reinstall it.

    Reply
  6. Vikram Bhandari says:
    7 years ago

    Thanks very much for this; the article helped me a ton! All the best…much love! <3 <3

    Reply

Leave a Reply Cancel reply

Your email address will not be published. Required fields are marked *

  • Trending
  • Comments
  • Latest
Download macOS Ventura ISO file

Download macOS Ventura ISO file

October 28, 2024
How To Bypass Mega Download Limits (2025 Update)

How To Bypass Mega Download Limits (2025 Update)

March 22, 2025
Download macOS X Lion 10.7 ISO and DMG Files

Download macOS X Lion 10.7 ISO and DMG Files

October 28, 2024
macOS High Sierra

Install MacOS High Sierra On VirtualBox 2024 (Easy Method)

April 10, 2025
How to Fix The CPU has been disabled by the guest OS

How to Fix The CPU has been disabled by the guest OS

253
Install macOS Catalina on VirtualBox

Install macOS Catalina on VirtualBox on Windows PC: 2025 Guide

124
Install macOS Catalina on VirtualBox on AMD Systems

How to Install macOS Catalina on VirtualBox on AMD Systems | 2025

86
Install macOS Catalina on VMware on Windows PC

Install macOS Catalina on VMware on Windows PC: 2025

82
Create macOS Sequoia bootable USB on Windows

Create macOS Sequoia bootable USB on Windows

April 29, 2025
Install macOS Big Sur on VMWare Windows 10

Install macOS Big Sur on VMWare Windows 10: 2025

April 29, 2025
macOS Unlocker for VMware

Install macOS Unlocker for VMware Workstation/Player 2023

April 29, 2025
Fix macOS Mojave Screen Resolution(HiDPI) on VMware

Fix macOS Mojave Screen Resolution(HiDPI) on VMware

April 29, 2025

Recent News

Create macOS Sequoia bootable USB on Windows

Create macOS Sequoia bootable USB on Windows

April 29, 2025
Install macOS Big Sur on VMWare Windows 10

Install macOS Big Sur on VMWare Windows 10: 2025

April 29, 2025
macOS Unlocker for VMware

Install macOS Unlocker for VMware Workstation/Player 2023

April 29, 2025
Fix macOS Mojave Screen Resolution(HiDPI) on VMware

Fix macOS Mojave Screen Resolution(HiDPI) on VMware

April 29, 2025
Facebook Twitter Youtube
GEEKrar

We are a team of skilled writers, editors and tech enthusiasts that help you how to get tech into work, pros and cons, explain hows and whys, hacks, and fixes of new modern tech.

Browse by Category

  • Android (24)
  • Discord (5)
  • Downloads (15)
  • Featured (17)
  • Internet (507)
  • iOS (26)
  • Linux (4)
  • Mac (150)
  • News (398)
    • iOS (Apple) (266)
    • Windows (Microsoft) (101)
  • Reviews (5)
  • Tech (21)
  • Virtual Machine (31)
  • VirtualBox (80)
  • VMware (66)
  • Windows (88)

Recent News

Create macOS Sequoia bootable USB on Windows

Create macOS Sequoia bootable USB on Windows

April 29, 2025
Install macOS Big Sur on VMWare Windows 10

Install macOS Big Sur on VMWare Windows 10: 2025

April 29, 2025

© 2022 geekRAR.com

We use cookies on our website to give you the most relevant experience by remembering your preferences and repeat visits. By clicking “Accept”, you consent to the use of ALL the cookies.
Do not sell my personal information.
Cookie settingsACCEPT
Manage consent

Privacy Overview

This website uses cookies to improve your experience while you navigate through the website. Out of these, the cookies that are categorized as necessary are stored on your browser as they are essential for the working of basic functionalities of the website. We also use third-party cookies that help us analyze and understand how you use this website. These cookies will be stored in your browser only with your consent. You also have the option to opt-out of these cookies. But opting out of some of these cookies may affect your browsing experience.
Necessary
Always Enabled
Necessary cookies are absolutely essential for the website to function properly. This category only includes cookies that ensures basic functionalities and security features of the website. These cookies do not store any personal information.
Non-necessary
Any cookies that may not be particularly necessary for the website to function and is used specifically to collect user personal data via analytics, ads, other embedded contents are termed as non-necessary cookies. It is mandatory to procure user consent prior to running these cookies on your website.
SAVE & ACCEPT
No Result
View All Result

© 2022 geekRAR.com

Go to mobile version