
Think your Mac is protected? Maybe you should think again. If you’ve set up a complex password for your Mac and think it’s enough to protect your entire Mac including your files and sensitive data, think again. A password is basically the simple layer of security which ensures people can’t access your device without trying any tricks. Here is How to Encrypt macOS System Drive on Virtual Machine
But if someone has physical access to your device and try to gain access to your personal files, there’s nothing you could do to protect from them. Unlike Windows, resetting the password won’t take much time to bypass even if you’ve signed in with your Apple ID. Unless you’ve configured FileVault to protect your Mac’s system drive that will only let him the last option, which is wiping the whole drive with its data.
If you’re using a Mac, whether, on an actual Mac or macOS installed on VMware or macOS installed on VirtualBox on a virtual machine, you should enable FileVault to protect your personal files and folders. The FileVault feature allows you to encrypt your Mac’s entire hard disk. With FileVault set up, your files are stored on an encrypted, unbreakable drive. Even if someone gains access to your Mac, reset your password – it’s not possible with FileVault enabled but let’s suppose, and attempt to access or make changes your personal files, he won’t be able to do anything, doesn’t matter if he removes your hard drive physically or tries to make changes within your Mac.
On Windows, you can encrypt your system drive with BitLocker which is available only on Professional or Enterprise editions of Windows. But, on macOS, you don’t need such a thing. This trick works with every Mac regardless of their versions or running whether on a virtual machine on Windows or anywhere else. Here is How to Encrypt macOS System Drive on Virtual Machine
Recovery Mode
By encrypting your system drive, you also encrypt your Mac’s reset password trick on recovery mode. This special environment is used when you’ve eventually no option left. With recovery mode, you could do many things and one of them is resetting your user account password. This is pretty easy to do with recovery mode.
If you’re on an actual Mac, all you need to do is a reboot and hold down Command+R when booting. Accessing the recovery mode won’t necessarily ask you password like you normally sign in. This is what everyone can access and reset your password, and also do some more things even with removable devices. This means anyone would be allowed to reset your user password and access your entire Mac despite your password. In this case, your user account password can’t do anything about it.
So, if you’ve set up just a password on your Mac, anyone could access it by resetting it from the recovery mode. With this simple trick, anyone could access your personal files and do everything they want with it. But if FileVault enabled, they won’t be able to access your loved files even if they have physical access. This doesn’t let making changes to your hard drive without the encrypted key. They may access recovery tools but they won’t be able to do anything bad with your files even with resetting your typical Mac’s password.
All they could do is reset the entire drive or reinstall macOS which would wipe your entire hard drive that they won’t gain access to any of your files. At least, this makes your files out of approach, no matter if you couldn’t get them back but you might have likely the backup of your entire drive or at least your personal files.
Encrypt Your Mac’s System Drive on Virtual machines
While setting up a password protects your Mac but doesn’t really protect your files, you may need to enable FileVault to encrypt your system drive. However, you can also encrypt other drives and installation media or removable devices. When you’ve enabled FileVault encryption, no one can actually reset your user account’s password to break into.
This also protects your files if someone tries to boot another operating system or remove the hard drive to read it on another computer. With FileVault enabled, there’s no risk in anyone could access your personal files. The nice thing is, it’s all built in. With that said, let’s get started.
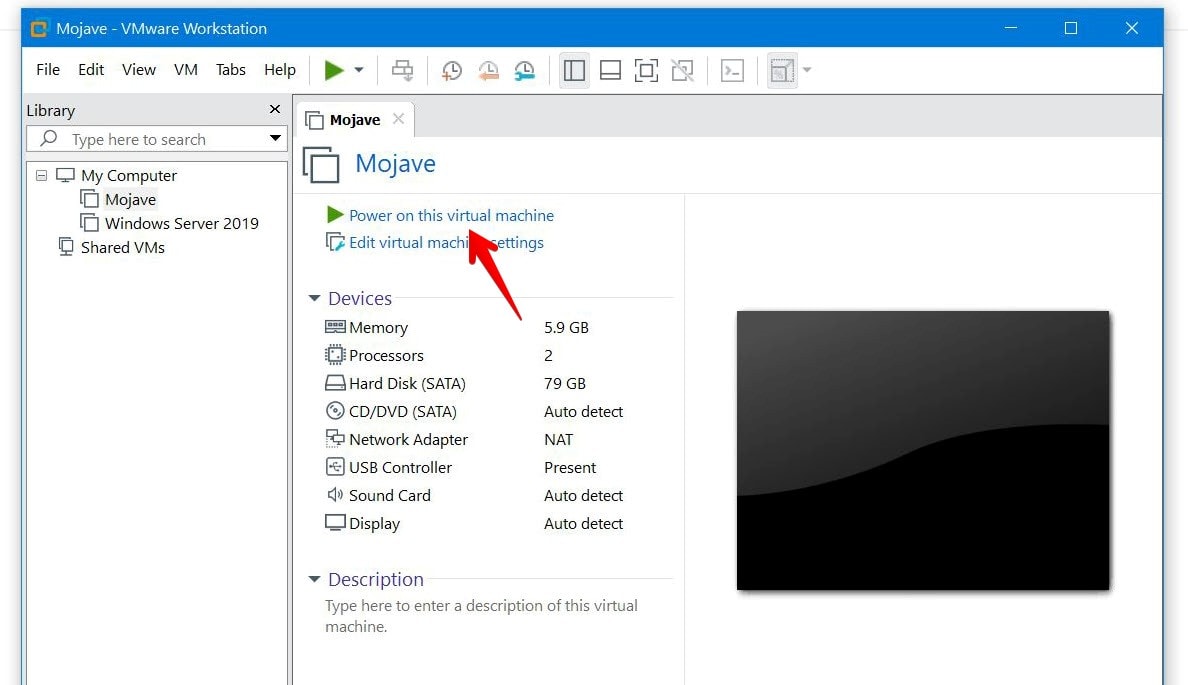
The first thing you need to do is switch macOS on whether on VMware or VirtualBox – This works for both
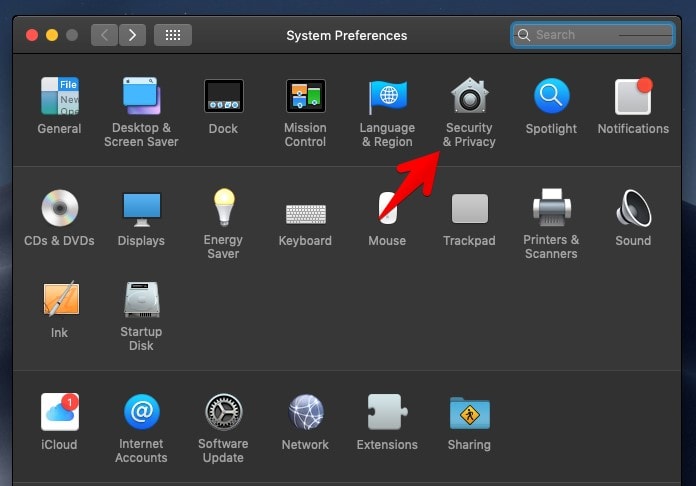
Once you’ve signed in, open System Preferences or Settings known by Windows users, and click on Security & Privacy.
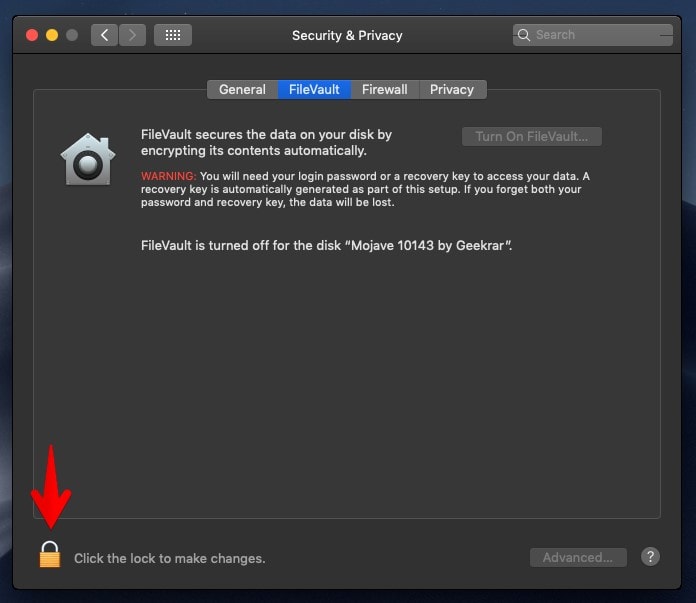
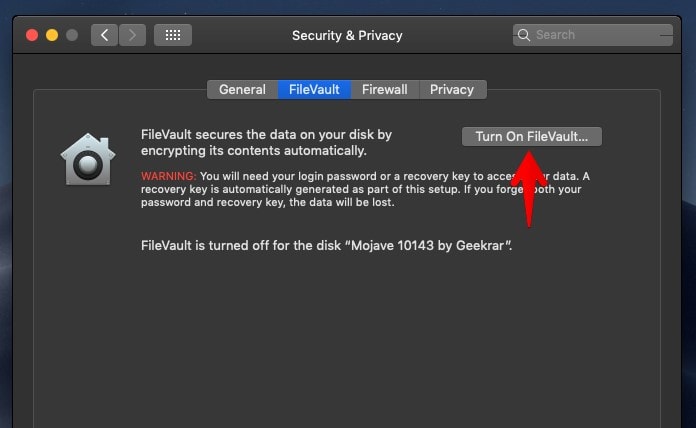
Now click the FileVault tab and click on the lock icon to sign in to make changes.
When you do that, click on Turn on FileVault. Enabling FileVault will ask you your login password or the recovery key provided by them when you try to access your files. Even if you forget your login password, you may be asked for resetting your Apple ID or your recovery key. If you didn’t remember it, you can only reinstall your Mac to unlock it which means you’ll lose all of your files.
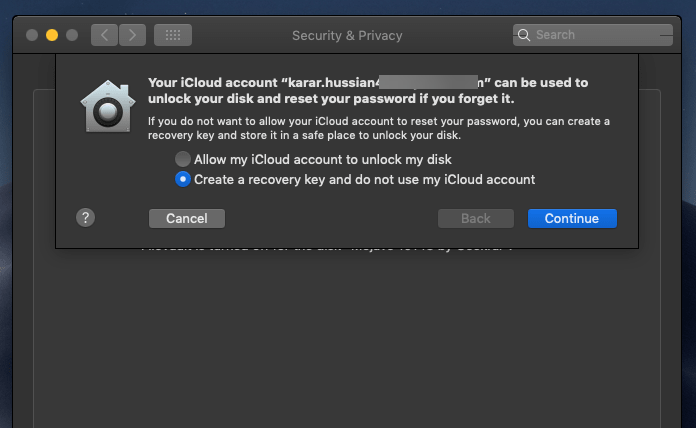
Clicking it will prompt you to whether you want to use your iCloud or Apple ID to reset the password or create a recovery key. Whatever you choose, then click Continue.
We recommend using your iCloud account which is safer and you’re not likely to lose it. In my case, I used my iCloud account to unlock the disk.
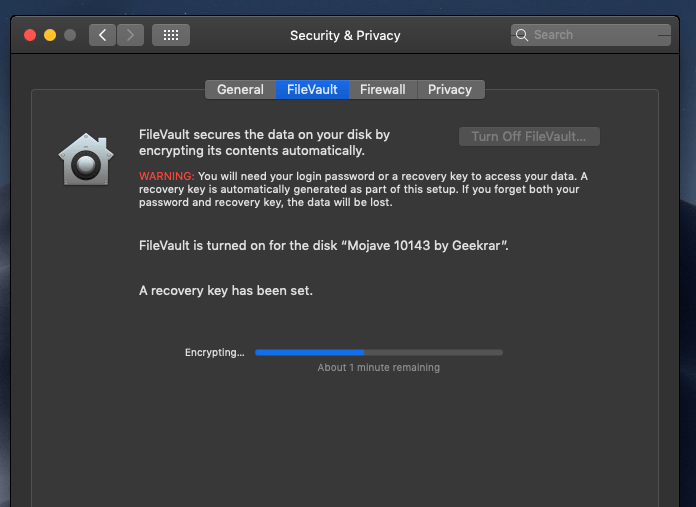
As soon as you click, it will begin encrypting which will take time depending on how much files do you have. If you’ve a lot of files, encrypting will take more time that you may need to keep your Mac awake until the encrypting process finishes.
When it’s finished, your Mac is completely encrypted and you’re ready to do whatever you’ve in mind. If you forgot the password, you can, however, reset it with your Apple ID or recovery key whichever you chose when setting up FileVault.
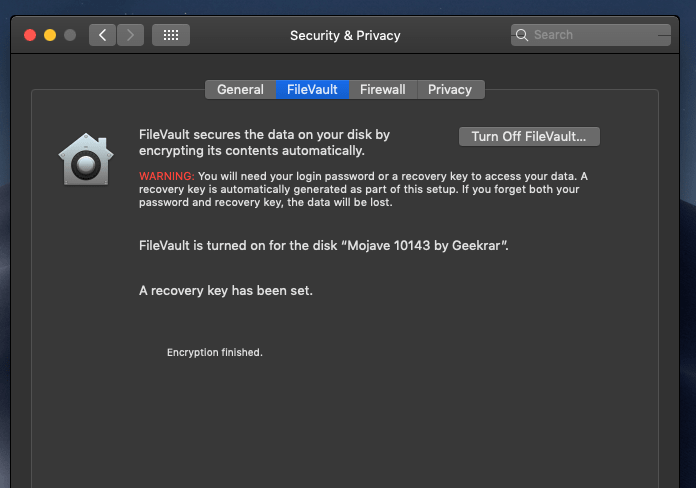
That’s the end to setting up FileVault. There’s nothing you need to do, all good.
If there’s something you would like to tell us, we are happy to know by comments.


I run Catalina as a test system on a windows 10 host with VirtualBox. When I try turning on filevault, the next screen for recovery key is all grayed out and only option is Cancel. What am I missing?