


With the virtualization apps like VMware, VirtualBox that makes the installation process fairly simple, it may be still a little tricker for some. However, if you’ve attempted to install macOS Mojave on VMware or install macOS Mojave on VirtualBox and experienced problems, here’s how to deal with also How to Fix macOS Mojave Problems on Virtual Machine.
These errors can appear for different reasons. In fact, the primary and majority of reasons are with, disabled hardware acceleration and another virtualization program like Hyper-v, you may have enabled or installed. Basically, these aren’t the only reasons and except them, there are other problems too, some of which are with booting or mouse & keyboard or other. Like this, there are dozens of users who reach us for their problems. This way, I’ve picked up frequent questions most users had and answered them here let’s take a look.
Table of Contents
Turn on Virtualization options (VT-x) on BIOS or UEFI Firmware
The VT- x or virtualization options integrated into BIOS or UEFI settings is a superb feature which accelerates and enhances virtualization. By default, it is not enabled on Intel systems which may be the reason for the problem.
To enable it, if you have an Intel-based CPU, you’ll probably have an Intel VT-x, Intel Virtualization Technology, Virtualization extensions or something similar option to it in your BIOS or UEFI Firmware. In simple, go to your computer’s boot menu or BIOS or UEFI, look out for one of the virtualization options named above and enable it with the arrow and enter keys.
Other than this, if you have an AMD based CPU, you’ll always find it enabled by default.
Unluckily, like the previous versions of macOS, this time again, you won’t be able to install macOS Mojave on your AMD system at least not with this guide ( Maybe with other steps if you Google ). But you have the alternative version to install, macOS X Yosemite. Here are the steps to fix those problems.
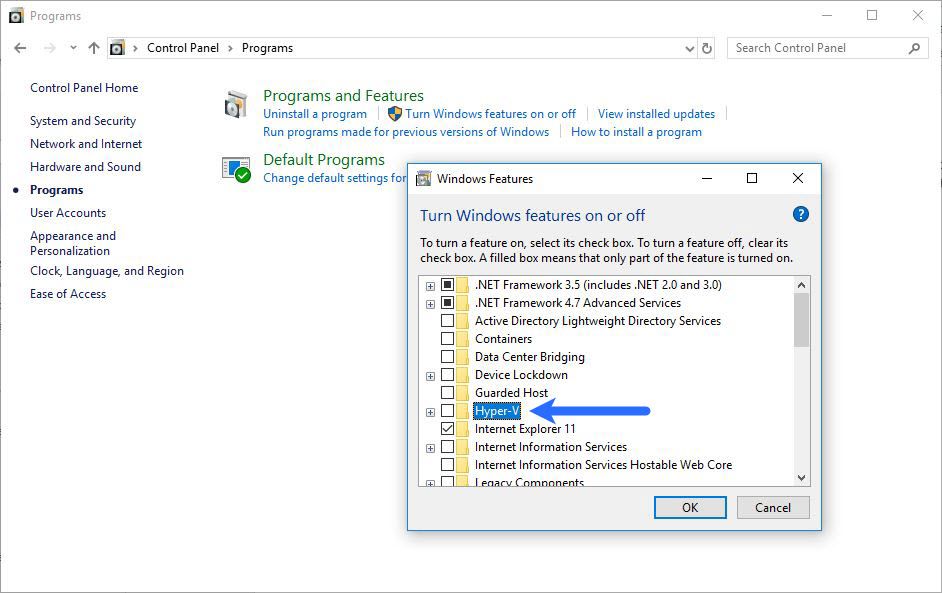
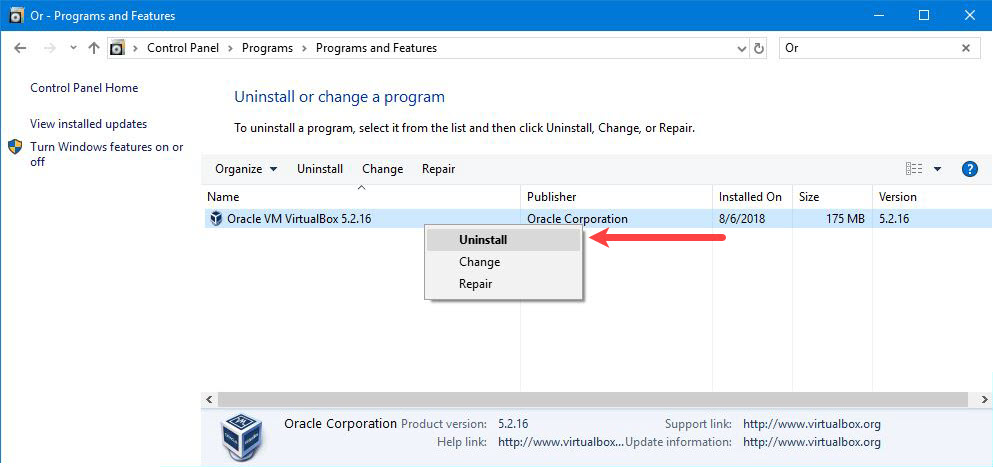
Uninstall Hyper-V & VirtualBox
If you have installed Hyper-v or VirtualBox, you have to uninstall those to work with this one. Because those apps won’t let other virtualization apps access to hardware acceleration features. That’s why you may have viewed error saying (VT-x not enabled) or somewhat similar to it.
All you need to do is: Go to Control Panel > Programs > Turn Windows features on or off > uncheck Hyper-V and you’re all set.

To uninstall VirtualBox or other virtualization apps: Go to Control Panel > Uninstall programs > Select and click Uninstall/Change button and proceed to the uninstallation wizard.

Fix macOS Mojave Issues from Q/A Solutions
If the steps above didn’t work for you, it’s time to head towards Q/A solutions, where the frequent questions are answered.
Fix macOS Mojave Boot & Technical Problems on VMware


Here are questions and answers which are asked the most. To simplify and figure out yours, I’ve divided these into two sections that you can figure out yours easily within the sections. For example, if you have a problem with boot you can find it in the first section or if there’s a problem with sound or other you can scroll down for the next section to see fixes for other problems.
- The virtual machine is stuck at Apple logo while booting and reboots again and again how to fix?
> Please check your guest OS you’ve selected the appropriate one or try once from beginning step by step.
- Hi, I set up all according to tutorial (I hope), but when I power up the virtual machine I can see the bar is filling up, but almost at the middle it’s stop screen goes black and VM is restarted. It’s going again and again. I am using VM Workstation 14. Should I use VM 12 version? Thanks.
> Check your Guest OS and Version and change your Guest Version to older.
- The guest operating system has disabled the CPU. How to solve it?
> Enable VT-x in your BIOS settings. If you don’t know how to do it, see the instructions above.
- Hi, when I play it, it says “Mac OS X is not supported with binary translation. To run Mac OS X, you need a host on which VMware Player supports Intel VT-x or AMD-V.
> Please enable Intel VT-x in BIOS, find out the instructions above how to do it.
- Hi, can I update to Mojave from Beta 1 to Beta 2 (or future releases)…?
> Yes, you can.
- I repeated the steps several times, at the “Add New Virtual Disk to VMware” the wizard does not offer the option “Hard Disk” … what am I doing wrong?
> Check your VMware version. If it’s older, upgrade to a newer version.
> Thanks for your reply, I’ve managed to get past this point. Only had to finish the wizard before the hard disk appeared.
- Hi, after installed VM Tool, I restart the machine and it stuck at apple logo after loading bar reaches 100%.
> Keep your image file then reinstall VMware and create a new virtual machine.
- I’m stuck as VMware doesn’t show me the disk to remove, nor I can add one. It shows every kind of device except for the hard disk. I followed every step and couldn’t find any solution on Google. Been trying my luck for a couple of years now.
> Yes, you can add new virtual machine disk (VMDK) and set up a first boot disk.
- Unfortunately, the vmdk disk is not compatible with VMware below version 14. When I tried to add it says its incompatible and when I looked up inside I saw the compatibility is set to. ddb.virtualHWVersion = “14”
- Download and install to use new VMware Player (14) version!
- I was stuck for awhile! Now I’m stuck on getting this error message: “The selected virtual disk is incompatible with this Workstation 12.x virtual machine. Adding this disk would make this virtual machine incompatible with older VMware products.”
> Hi check your VM version.
- Everything went smooth, but when I power on the VM, there is only a black screen with Apple logo. No further screens. Tried a number of times already on Workstation 12 and 14 Pro, Tried Sierra and Mojave, same Problem every time.
> Check your setting (50% of RAM, CPU). Change guest version to older version.
- I’m not seeing version 10.14. It only goes up to 10.12
> Check your VMware Version.
- When I play the virtual machine after all the steps. The only thing that happens is the VMware logo comes up and it just goes in a loop, kindly help.
> When editing the virtual machine on Notepad, try removing the quotations marks when typing like this:
version = 0
- Can I use the hardware for the VM like this:
RAM: 2602.6 MB
CPU: 4 Cores
RAM: 4000 MB
CPU: Intel Core i5
is it ok?
> Yes, set 50-60% of your Ram and CPU.
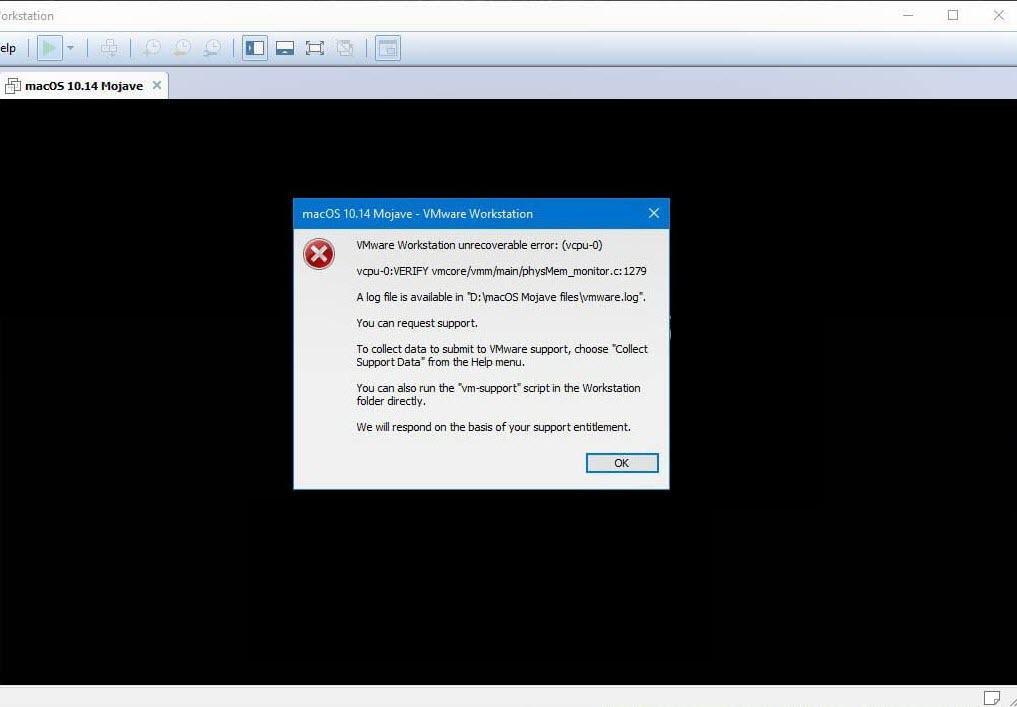
- I have an error with displaying as follows.
VMware Workstation unrecoverable error: (vcpu-0)
vcpu-0:VERIFY vmcore/vmm/main/physMem_monitor.c:1178
A log file is available in “C:\Users\User\Documents\Virtual Machines\OS X 10.11\vmware.log”.
You can request support.
To collect data to submit to VMware support, choose “Collect Support Data” from the Help menu. You can also run the “VM-support” script in the Workstation folder directly.
We will respond on the basis of your support entitlement.
> Open VMX file with Notepad and paste this
smc.version="0"
- Hello, I used the macOS Mojave 10.14.
2) I downloaded an update from the Apple Store (MacOS Mojave Final)
3) I ran the update, but now it does not boot.
4) Get stuck in the setup screen.
5) I’ve been taking a look at some articles on the internet.
6) I was told that I should add a command line smc.version = 0
7) I did just that, but it did not solve my Boot problem.
8) I did this procedure but it does not run.
9) Could you help me solve this Reboot problem?
10) Thank you for all possible help.
> Check your new Partition is APFS or HFS? Because Virtual machine doesn’t work with APFS partition.
- I did all of these steps and got “No boot filename received” “Operating system not found” How can I fix this? I try to google this solution an hour ago but I still can’t fix it yet.
> Check your Guest OS and Version or create a new virtual machine step by step.
- I get “The CPU has been disabled by the guest operating system. Power off or reset the virtual machine.” While it displays a black screen with the Apple logo.
> Hi. Do you enable Intel VT-x in BIOS? Check!
- While following the instructions I noticed that I had to chose “Other” OS, because there was no macOS choice….. then i thought I’d have to change the guestOS setting in the VMware file, but didn’t really know what to type in “Other”‘s place… any hint?
> Hi. Keep your image file. Reinstall VMware and create a new virtual machine (step by step).
- Hello, when I start the virtual machine, I can see this message and the virtual machine does not run …“This host is not compatible with the virtualization of the real mode. The Intel “Invited VMX without restrictions” feature is required to run this virtual machine on an Intel processor”The ‘CPUIDEarly’ module failed. Error starting the virtual machine. Any ideal about this …? I have an i7 860 @ 2.80 GHZ.
> I could solve this problem by adding this line to the configuration file of the virtual machine: monitor.allowLegacyCPU = “true”
- I attempted to startup from:
->EFI VMware Virtual SCSI Hard Drive (0.0) unsuccessful
->EFI VMware Virtual IDE CDROM DRive (IDE1:0) unsuccessful
->EFI Network…..
> Add the code without quotation try!
smc.version = 0
- Does this work on AMD CPU?
> By the way, you won’t be able to install macOS Mojave not by the way in the guide, however you may install it in some other ways if you search for. Here’s the one you can install is Yosemite version.
Fix Display, Screen Resolution, USB Connecting & Other Problems on VMware
- Hello, I have installed Mojave and everything’s fine except my screen resolution in small (1024×768). My actual resolution is 1366×768. How can I change the resolution?
> Hi, install VMware tools. When installed, go to the system preferences > display and change it to scale. It will work this way.
- It only gives me 1024×768 RES after VMware tools are installed.
> Go to the system preferences > display and change it to scale.
- Hi, I am having a resolution issue where every time I try to change the display in OSX to 1920×1080 it automatically reverts to 960×479 (HiDPI). I have tried going in and adding code in the VMX file to try and take care of this but isn’t working. I also tried to go into the virtual machine settings and setting the display manually and that did not work either. Lastly, I tried adding a line of code in the VMware preferences file and that did not work either, need help.
> Hi, install VMware Tools. When installed, go to the system preferences > display and change it to scale.
- I can’t move to full screen after installing VMware tools. But there is command that shows that daemons are working?
ps -ax | grep .vm.
86 ?? 0:00.62 /Library/Application Support/VMware Tools…
> Hi, check your VMware version if it’s older version, upgrade it to the latest.
> Installation of VMware 14 solved my problem. Hope this can help anyone!
- FaceTime has not received any video from the connected camera.
> Restarting and open VMware and change USB Port to 2.0. Try!
- How can I speed it up? It worked but it runs pretty slow..
> Go to Virtual Machine Settings and increase to 50-60% of CPU & RAM.
- Like many other users, macOS is stuck in a boot loop after I installed VMWare Tools.
> Go to “System Preferences” and “Security & Privacy” then click “Allow” VM Tool.
- Hello, the virtual machine is working great, thanks! However, I can’t connect an iPhone 5 to it. It’s just not recognized by the macOS when I connect it to the virtual machine. Any ideas on how to fix that?
> Open VMware then change USB port to 2.0 and enable VMware USB Service.
- Hi, VMware USB Arbitration Service is enabled, after setting USB port to 2.0 the phone started disconnecting from the host, trying to connect to virtual machine, then reconnecting to host and is stuck in that infinite loop.
Tried what Jan-E suggested, same infinite loop.
> Enable ‘Automatically connect new USB devices’, start the virtual machine, open iTunes. And then connect your iPhone.
> Thanks, this worked for connecting my iPad.
- The USB devices don’t work, as I already changed the compatibility from 3.0 to 2.0 do you have a fix for this?
> Please check if you have enabled VMware USB Service, click Start button and search Services.
- Hi, everything works except I don’t have the internet and I don’t know how to configure it, I have already installed VMware tools have you any idea?
> Try reinstalling VMware Tools and it will work.
- Is there any way to activate video acceleration? Or change the amount of video memory? In the settings, it says the guest OS doesn’t support it.
> Install VM Tool and the Virtual machine is working with 128 MB of VRAM.
- Hi, VMWare tools aren’t supporting. After I restart VMware tool on the right hand of the desktop, its pointer isn’t smooth and also can’t use full screen.
> Because this is a new version, open System Preferences – Security & Privacy then enable VM Tool to fix this problem.
- Hi, will it work in a Dell XPS 15 9560 4k, with the 4k screen, the text is too small.
> Install VM Tool to fix problem with resolution. When installed, go to the system preferences > display and change it to scale. It works this way.
- The newer version of VM-Tools installed but resolution sticks to 1024×768.
> Go to the system preferences > display and change it to scale. It will likely work.
Fix macOS Mojave Boot & Technical Problems on VirtualBox

- Hey, I have followed the steps, but when I try to start it, I am prompted to a black screen with the below error
“Error allocating 0x14b6 pages at 0x0000000001879000 alloc type 2.
> Create a new virtual machine and step up 1 Core of CPU and switch to (macOS 64-bit) and follow step 3 properly.
- Hi. I have a skylake i5 6500 CPU, and the virtual machine won’t go into macOS, but rather just restart over and over again. I assume this is because macOS doesn’t recognize the CPU. How do I fix this problem and boot completely?
> Keep the quotations around the name of virtual machine when applying.
- Hi, the VM doesn’t boot, UEFI is found but soon after I have:
“This version of mac os x is not supported on this platform!”
Type: Mac OS X
Version: Mac OS X (64-bit)
Processor : Intel Xeon E3-1230 v6 @ 3.5Ghz
RAM: 16GB
> Check your Guest OS and Guest Version and change to (macOS 64-bit).
- I have a problem installing on virtual machine, it is showing a blank screen after I ran all the commands as directed. Is there any way to fix it?
> Hi. Close your VirtualBox and try step 3 again or switch to (macOS 64-bit).
- VBoxManage.exe: error: Failed to create the VirtualBox object!
VBoxManage.exe: error: Code CO_E_SERVER_EXEC_FAILURE (0x80080005) – Server execution failed (extended info not available)
VBoxManage.exe: error: Most likely, the VirtualBox COM server is not running or failed to start.
> Check your VirtualBox version!
- When I turn on the machine I just get a black screen and nothing else.
> Enable Intel VT-x in BIOS and switch to (macOS 64-bit) and do apply step 3 properly!
- * VBoxManage setextradata “MacOS” “VBoxInternal/Devices/efi/0/Config/DmiSystemProduct” “iMac11,3” when I entered this command it shows me an error too many parameters.
> Enable Intel VT-x in BIOS. If you don’t know how to do it see the instructions above.
- Hi, I have error in cmd.
when i put this command ( VBoxManage.exe modifyvm “macos” –-cpuidset 00000001 000106e5 00100800 0098e3fd bfebfbff)
result:
exe: error: could not find a registered machine named “macos”
vboxmanage.exe: error: details: code VBOX_E_OBJECT_NOT_FOUND
> Check your “ virtual machine name”. Open VirtualBox and copy your virtual machine name.
- Hi, I can’t bypass the black screen.
> Switching from version “High Sierra to generic “Mac OS X (64bit)” solved the problem.
- Still cannot get it to work, getting the black screen on boot. I know that the settings have been applied correctly, as this is what I see in my “macos_dev.vbox:”. And yet, nothing. VT-x is enabled.
> Hi. Set up 1 core of CPU and change your Chipset to PPIX3 or IHC9 and apply step 3 properly check!
- The CPU is the latest i7-7500U KobyLake. 16GB of RAM, NVidia GTX 970 4G video card, just black screen, nothing else.
> Hi. Change your Chipset to PPIX3 or IHC9 and switch to macOS (64-bit) try.
- I followed this as explained and I am getting the gray screen with the logo and progress bar, followed by a darker gray screen that is blank, and nothing more. I tried the suggestion for ‘Stuck on first screen’ and this fails immediately stating it is incompatible (I also tried using the ‘Mac OS (64-bit)’ selection and that was the same as the ‘High Sierra’ selection). Any thoughts on how I can get past this and on to the setup screens? Thank you.
> Hi. Set up 1 core of CPU, enable Intel VT-x in BIOS and switch to macOS (64-bit) try Check!
- I got something further, like “Error allocating 0x17e7 pages at 0x00000000000108b000 alloc type 2; Error loading kernel cache (0x9); Boot Failed. Mac Boot; Book Failed. EFI DVD/CDROM”.
> Instead of setting the “Version” to “El Capitan,” set it to MacOS 64-bit.
- I have a black screen using VirtualBox 5.2.0. I solved by selecting Version: Mac OS X (64-bit) instead of macOS X 10.11 / 10.12 / 10.13
i5 6500
16 GB of ddr4
XFX RX 480 8gb
Windows 10 Pro 64 bit
> Yay, I found the solution. It is easy: instead of setting the “Version” to “El Capitan”, set it to MacOs 64-bit. Everything then works. ( Fixed black screen and other booting problem.
- Hi there! I’m experiencing a continual boot screen, but nothing else. What should I do? I followed your instructions to the letter.
> Hi, check your Guest OS, Intel VT-x and switch to (macOS 64-bit)!
> I solved my black screen display error by selecting MacOS 64bit in VirtualBox, it booted with errors but eventually completed loading.
- When I try to add the code VBoxManage.exe modifyvm “macOS 10.14 Mojave” –chipuidset I’m getting an error Could not find a registeres machine named ‘macOS 10.14 Mojave’
> Hi. Open your VirtualBox and check virtual machine name.
- Stuck on the boot screen. Message for past 15 mins…
Waiting for DSMOS…
EXC_RESOURCE -> ifcstart[52] exceeded mem limit: InactiveSoft 15 MB (non-fatal)
> Check your Guest OS and version. You should create new virtual machine (step by step).
- Hi, I want to create a bootable USB For mac in Windows with VirtualBox. But I m stuck, I can’t copy the macOS Mojave. dmg to Virtual Box, drag and Drop is not working too. I also tried the sharing files, but again it didn’t answer. So, please do you know how to enable copy and paste or drag and drop????
> Copy your data to USB flash and mount this USB to VirtualBox.
Fix Display, Screen Resolution, USB Connecting & Other Problems on VirtualBox
- Hi, the sound isn’t working, can you help, please?
> Install and use Voodoohda kext (driver).
- Do you have commands for Linux?
> The commands are same to just remove (.exe): VBoxManage modifyvm…
- Hello! I already run my macOS Mojave but I can’t control my mouse integration. How can I turn it on?
> Install the VirtualBox Expansion pack first. Then I switched the USB setting to USB2. Make sure your pointing device is set to USB Tablet.
- Use this to change the resolution:
– Close VirtualBox
– Open cmd (Console) as administrator
– run the following commands:
cd “C:\Program Files\Oracle\VirtualBox\”
VBoxManage setextradata “macOS 10.13 MacOS Mojave” VBoxInternal2/EfiGraphicsResolution 1920×1080.
- Does this work with VirtualBox on a Linux host?
> Yes, just remove “.exe” text in commands line.
- How do you enable sound on there?
> The sound is working with this machine. If you have a problem sound, you should reinstall Voodoohda kext.
- Hi! Here is what I get after booting for the second time. It worked fine yesterday. I installed iterm, sublime text, Xcode and brew. What should I do?
> Keep your image file and create a new virtual machine.
- Thanks for the instruction. Initially, I could not get past display screen, it would go 2/3 way then go to grey screen. I changed config to use PIX and took my CPU count down to 2 from 4 and it booted. I am on Lenovo Y520 if others have same issue. My question is once booted my keyboard is not recognized. How do I configure the VM to see my standard 101 keyboard and mouse is hesitant. I tried attaching a Logitech USB keyboard and mouse same issue. Does this require me to get a mac mouse and keyboard?
> Hi. Enable USB 3.0 in your VirtualBox to fix problem with Keyboard and mouse.
- Hi, the mouse & keyboard is not working.
> Install “VirtualBox Oracle VM VirtualBox Extension Pack” then enable USB 3.0 and connect your mouse. Check!
- Hello, I have a problem with updates.
After downloading and installing update 10.13.2 the os reboots, print “error loading kernel cache”, reboots again – and boots in not-updated os (i see the same update available). How can i fix this problem?
> Check your Virtual Disk before restart (Virtual Machine Disk is HFS Partition
- I have no sound in system preferences it normally shows internal speakers but there is no input-output device.
I am using host driver as Windows DirectSound and controller as IntelHDAudio.
> Hi. Install Voodoohda kext to help you fix this problem.
My suggestions
I have the following suggestions for improving your instructions.
Place the Virtual Machine file folder into the Oracle or VirtualBox folder before creating your new VM in VirtualBox. When I installed mine, I realized I still had it in my downloads folder, which I regularly cleanout.
Make sure name of the Virtual Machine is one word. You can’t leave the quotes in the CMD prompt step, so you have to use something like macOSHighSierra and cannot leave spaces.
Current issue: I tried to install the latest update for MacOS Mojave and got that black screen folks are talking about. I think it’s just that the VM occasionally glitches.. You have to power down the VM and restart manually to get it back up and running. So far it took me two tries to get the update to install properly.
That’s it. If you have any other issue which doesn’t appear, let us know by putting a message in comments.