
The next version of macOS which is macOS Catalina is out for a while now. What makes this update so important is it’s improved and better features and all the new things. This method is different from the other ones and it’s completely done with macOS Catalina ISO. In this post, we’ll install macOS Catalina on VirtualBox with macOS Catalina ISO. This update certainly comes with plenty of new incredible features and some powerful updates such as improved security, update old apps and features, and more. So there’s probably new stuff to explore and try out. That’s particularly possible when Catalina is installed. Here’s how to Install macOS Catalina on VirtualBox on Windows PC.
While Macs are straightly supported by Apple, they can install macOS Catalina and previous versions in whatever stage. Similar to macOS Catalina which is still evaluation, Mac users are able to try out quickly now and later. Though macOS has been installed on Mac and is done now. The best news is, Windows users can still install macOS Catalina and Mojave and previous versions on their Windows PC. In this post, we’ll show how to Install macOS Catalina on VirtualBox on Windows PC with macOS Catalina ISO. Doing that, trying all those features will be under your hand which is done as easy as switching a button on. Here’s how to Install macOS Catalina on VirtualBox on Windows PC.
Table of Contents
VirtualBox
For those who are unfamiliar, VirtualBox is the perfect virtual machine app which has all the required things packed up. How this app and most virtual machine app works is it creates a sandboxed-separated environment that can be installed another operating system there which will work and functions completely separate from the actual operating system. This virtual machine app makes the process quite easy.
With VirtualBox, it’s pretty easy to create, customize, manage, and do all the other things needed for a virtual machine. After those are done, there isn’t much more left to do, all there is needed is to proceed with a few prompts of the installation. So when it’s installed, the operating system will run and operate completely fine with all the components that include the internet, hard disk, and all to there it is. Now how to Install macOS Catalina on VirtualBox on Windows PC.
Install macOS Catalina on VirtualBox on Windows PC [New Method]
One of the benefits of the VirtualBox is, it supports installing macOS officially without installing patches like VMware Workstation. With that, it also accepts installing VirtualBox extension and installing VirtualBox Guest Tool which makes running virtual machine perfectly nice. So there’s no need to install patch like Unlocker for VMware.
[button-yellow url=”https://www.geekrar.com/download-oracle-vm-virtualbox-install-on-windows/” target=”_Blank” position=”Center”]Download VirtualBox [/button-yellow]
Step One – Create or Download macOS Catalina ISO File
Whatever operating system you would like to install, you would probably need the OS installer file. That’s the case in this spot. Whether you’d like to install on Mac or on Windows, you’ll need the macOS Catalina VMDK or macOS Catalina ISO For VMware & VirtualBox file. There are two different ways to download macOS Catalina ISO For VMware & VirtualBox. This can be either created or downloaded from the links we’ve provided which is pretty easy. Whichever way you choose, we’ve covered you up with both. Let’s do how to Install macOS Catalina on VirtualBox on Windows PC.
To create a macOS Catalina ISO file, simply click the link below and follow out on the steps.
For download macOS Catalina ISO For VMware & VirtualBox file without creating one, you’re good to get one from the following link. This is simple. With macOS Catalina ISO, how to Install macOS Catalina on VirtualBox on Windows PC.
macOS Catalina Final Version (19A602) 15 Oct 2019 (Recently Updated)
- Installing Catalina is pretty easy, but that’s not the case with downloading. This process seems very easy which should require a few clicks, that’s correct but matters where you’d catch up the file. That’s what makes it difficult. So we’ve cut you to the chase and straight to the point, download macOS Catalina ISO For VMware & VirtualBox.
[button-yellow url=”https://www.geekrar.com/download-macos-catalina-iso-for-vmware-virtualbox/” target=”_Blank” position=”center”]Download Now[/button-yellow]
From the BIOS, watch out if the Intel VT-x hardware acceleration options are enabled.
Step Two – Install Oracle VirtualBox on Windows
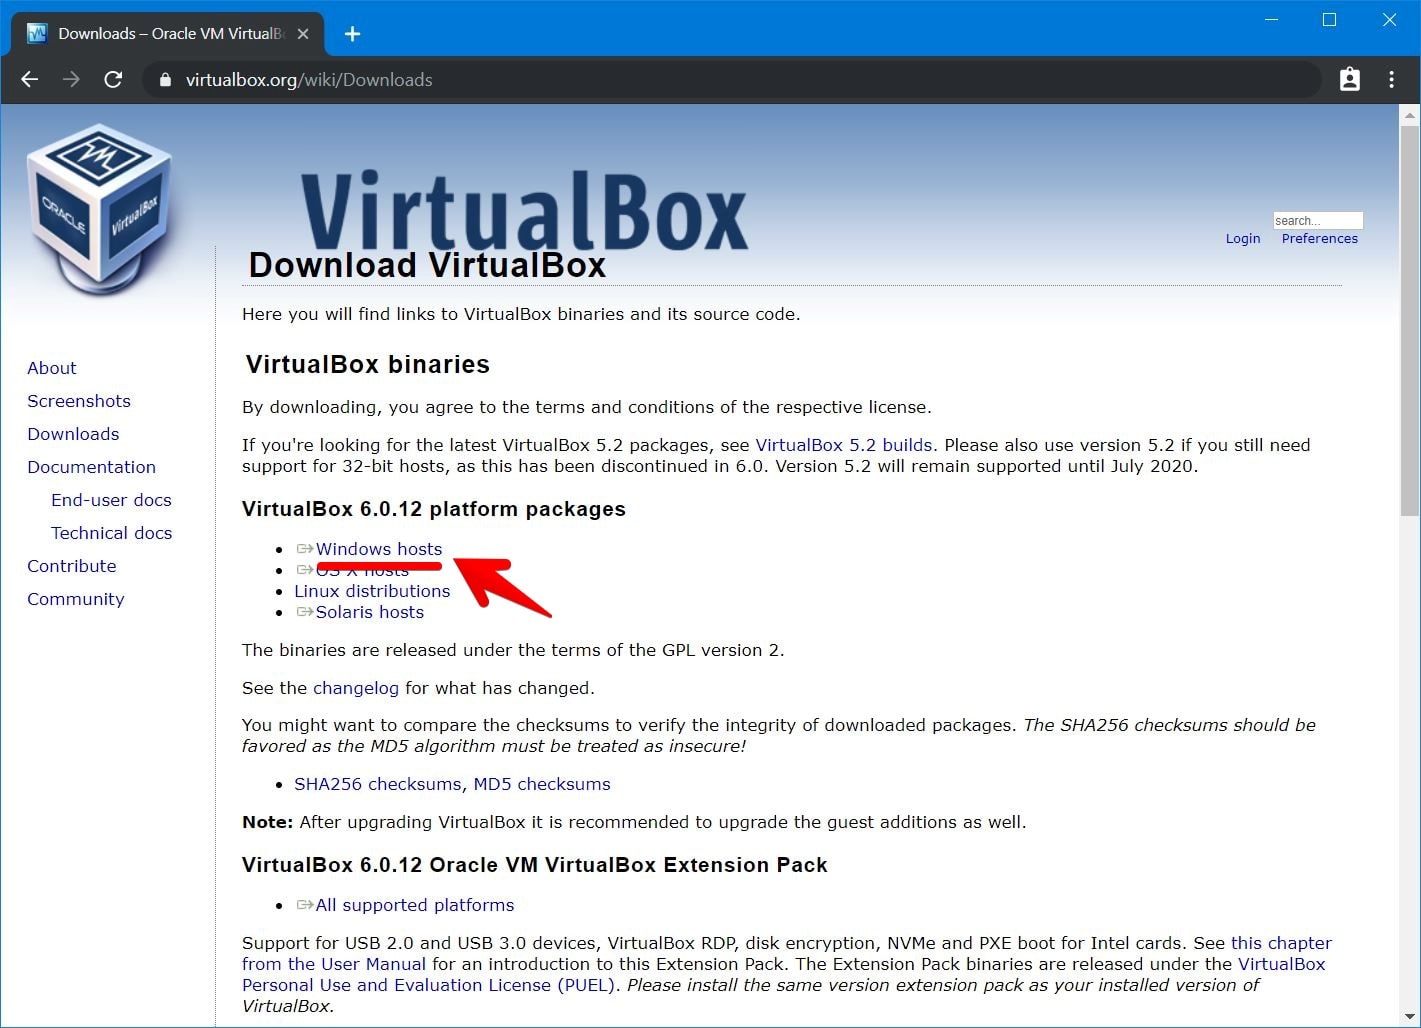
The next step to accomplish is installing VirtualBox which requires the setup file that can be obtained. From the VirtualBox official website, click on Windows hosts and let it download.
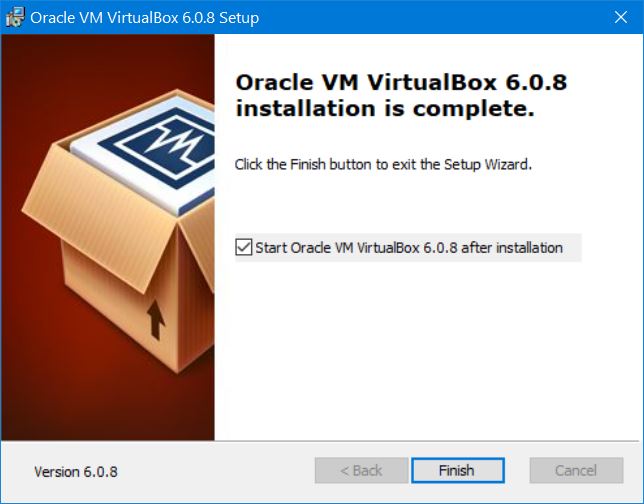
Once that’s done, open up VirtualBox setup and process it and let it install.
Step Three – Install VirtualBox Extension Pack
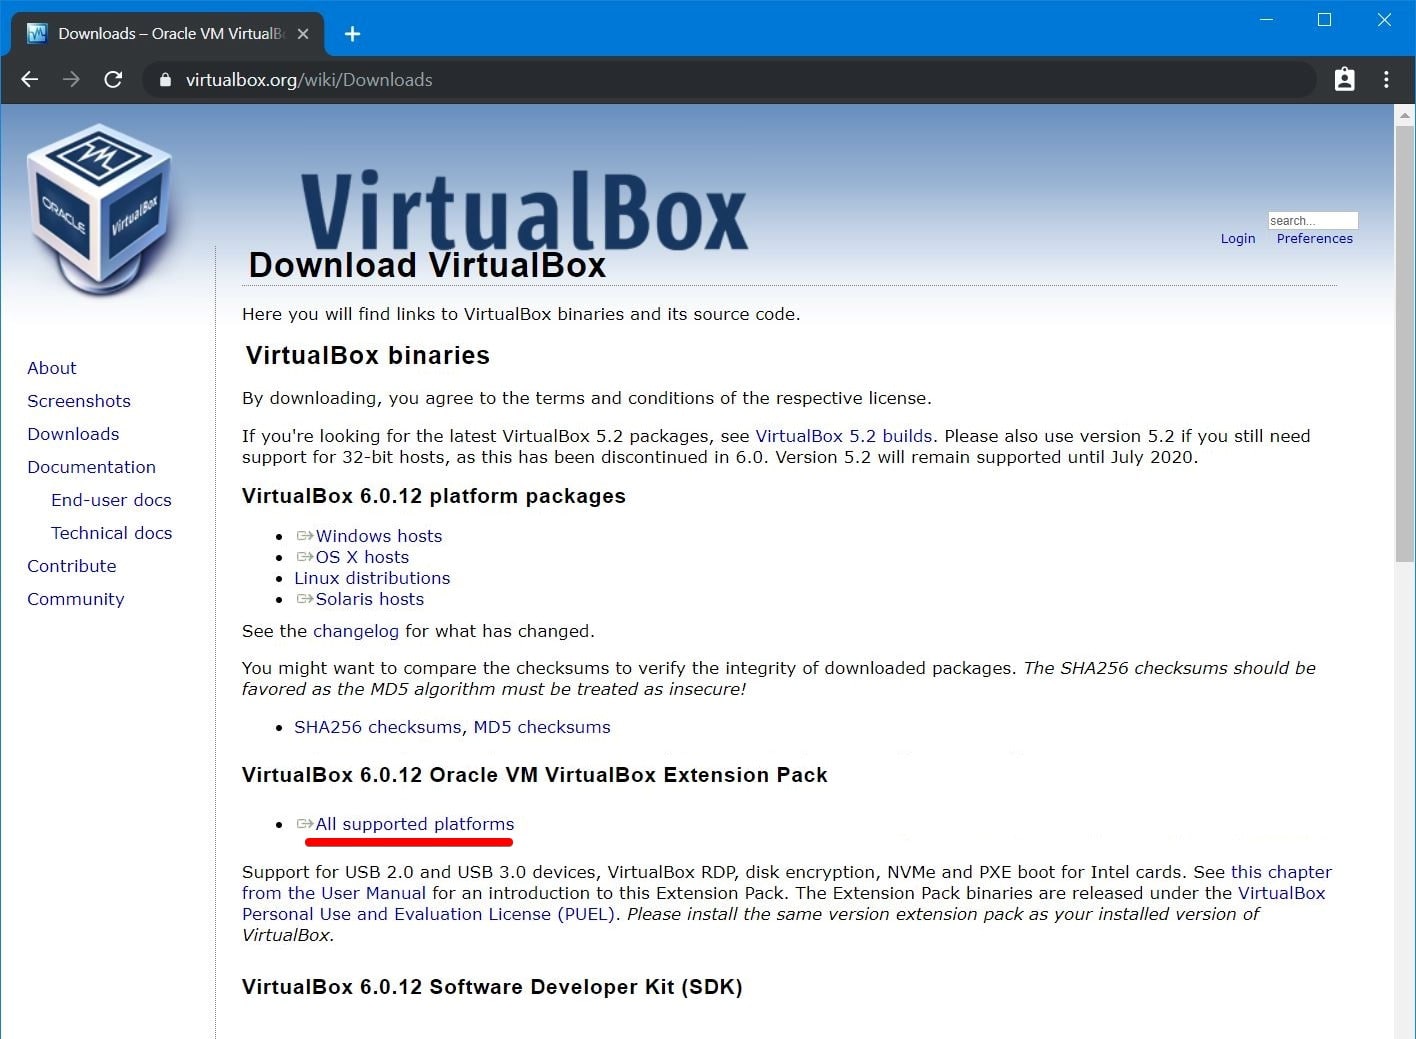
In terms of installing macOS Catalina, we need to install VirtualBox Extension Pack which will enable mouse and keyboard working fine. Head over to the VirtualBox download window and click on All supported platforms.
When it’s there, open it with VirtualBox and when it prompts on the VirtualBox, click Install.
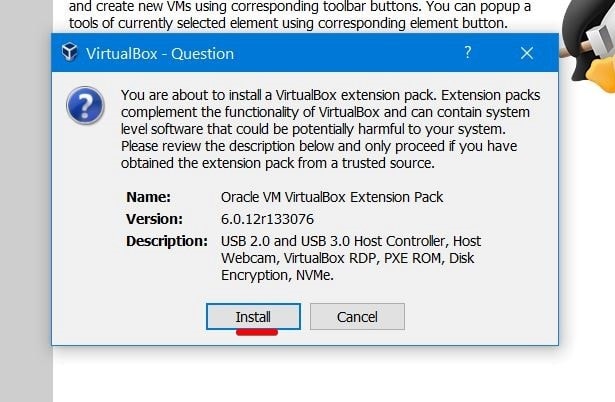
Agree with terms and conditions and let it install. When it’s done, click OK.
After it’s done, you’re good to go!
Step Four – Create A New Virtual Machine
Installing macOS Catalina on a virtual machine requires setting up a new virtual machine once you’ve installed VirtualBox.
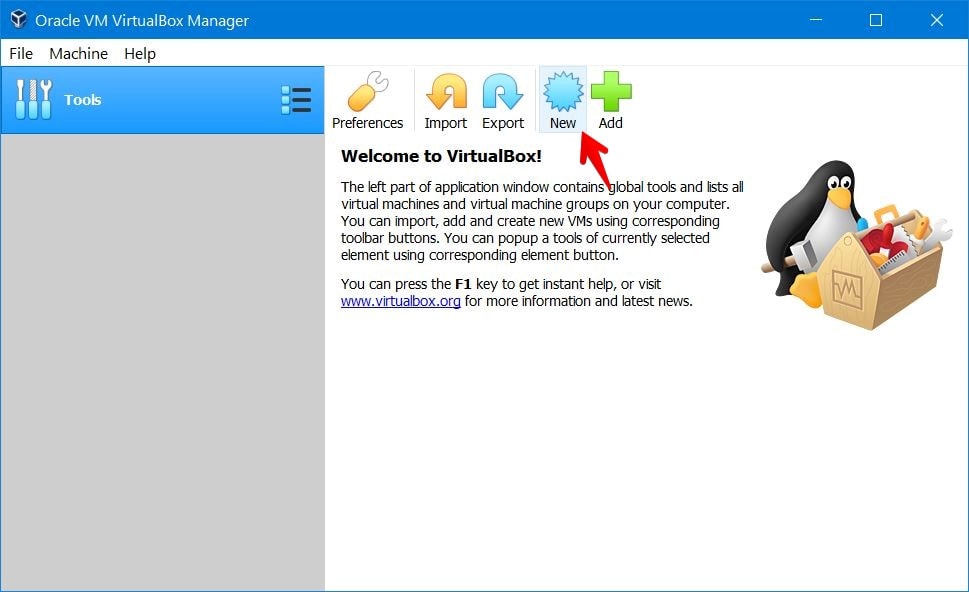
Then click on Expert Mode from the end of the window.
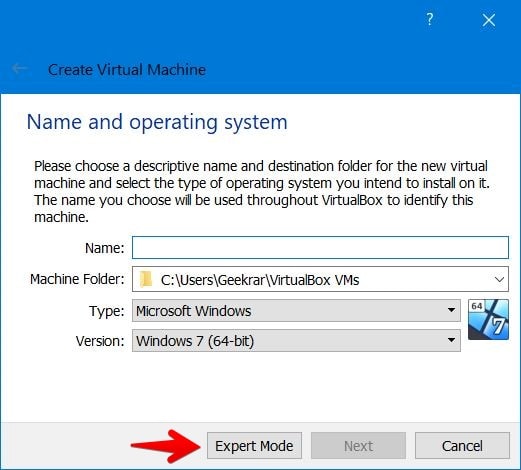
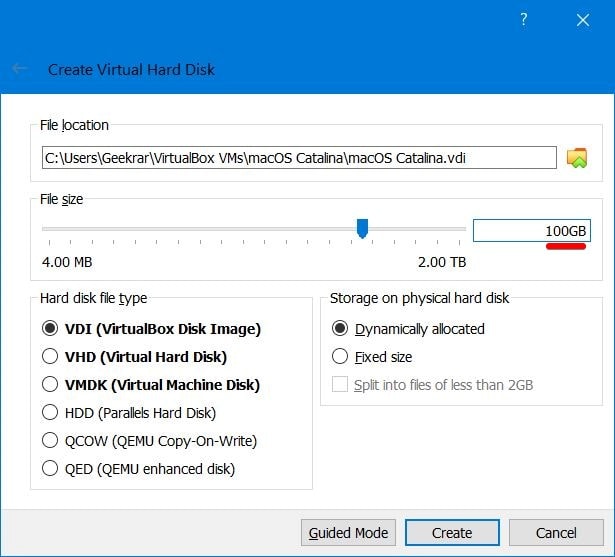
Now enter “macOS Catalina” for the name and specify a place to store the machine files. Then set up 50 – 60% of your system’s memory and select Create a virtual hard disk now for the hard disk and click Create.
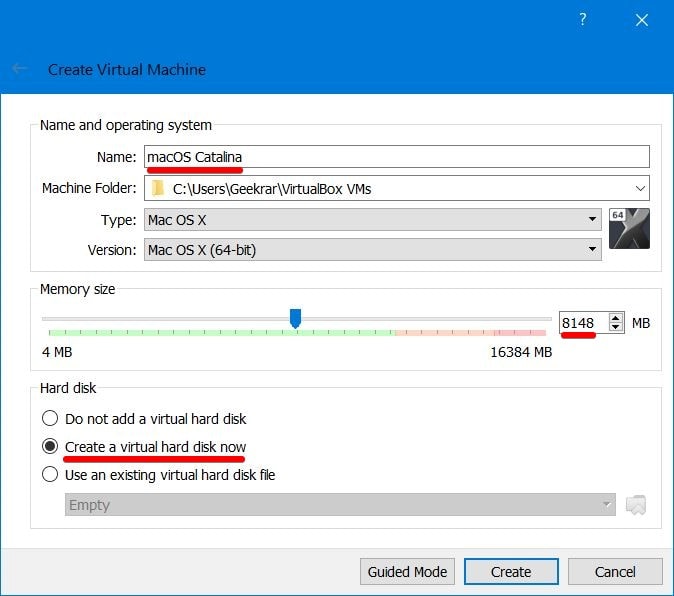
In this screen, type “100GB” and hit Create.
Step Five – Set up Virtual Machine Settings
Setting up macOS Catalina settings is what makes the installation work. These settings are the most important settings that empower and eventually install macOS Catalina. If one or more of these settings are not similar to what we’ve shown, the macOS Catalina will probably fail to boot. If this happens or happened to you, make sure you set these settings correctly.
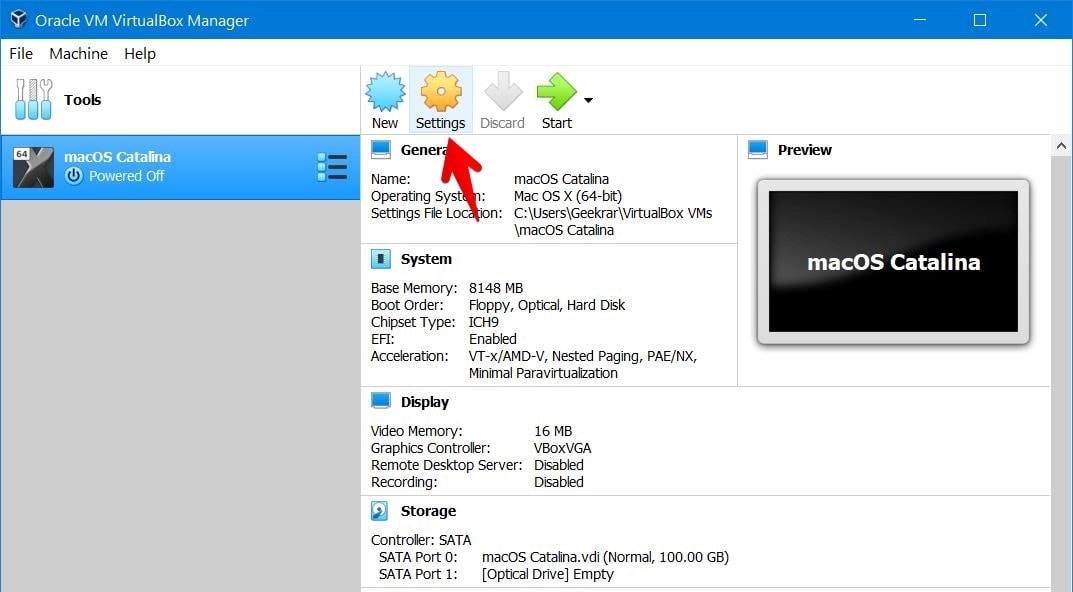
Navigate to the VM settings from the top.
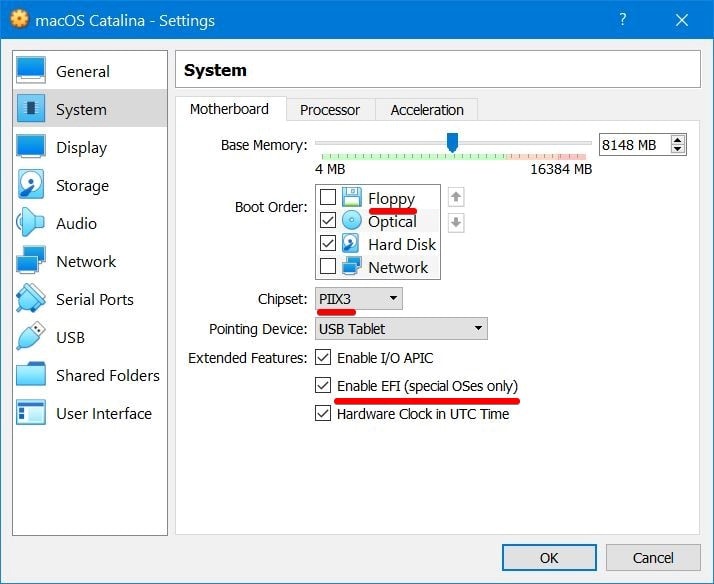
On the virtual machine settings, click on System and uncheck floppy then change the chipset to PIIX3.
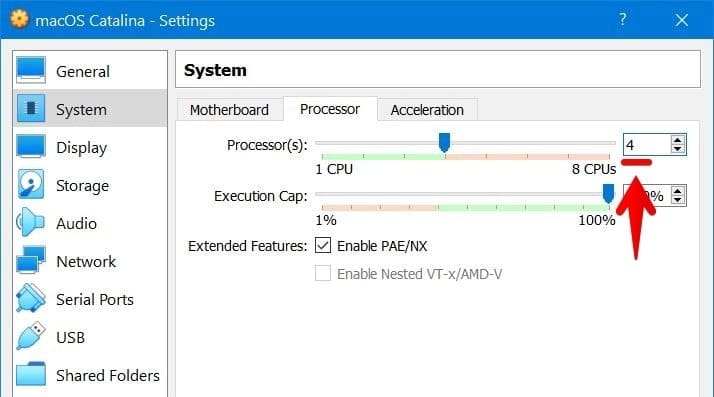
When that’s done, head over to the next tab which is processor and increase the number of processors to assign 50 – 60% processor of your system.
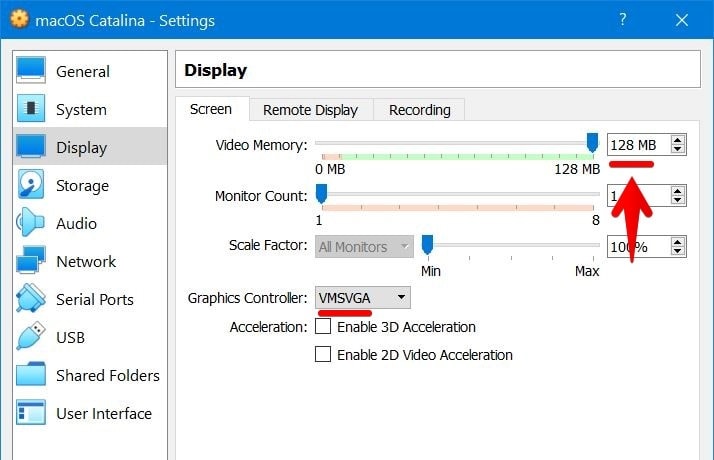
Now from the Display tab, increase the video memory to the end and change the graphics controller to VMSVGA.
Next to the Storage tab, click on the Empty disk there then click the disk with a down arrow icon and select Choose Virtual Optical Disk File.
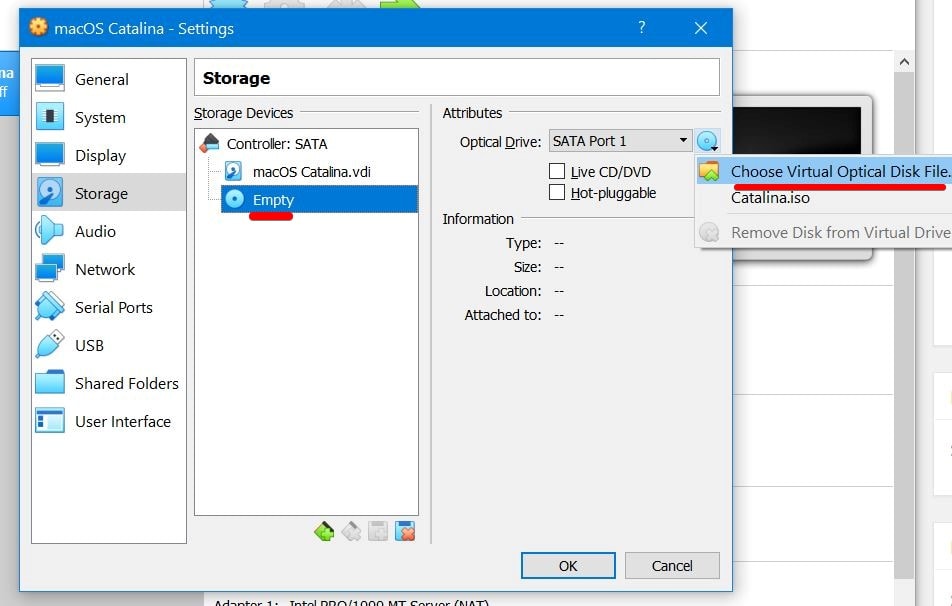
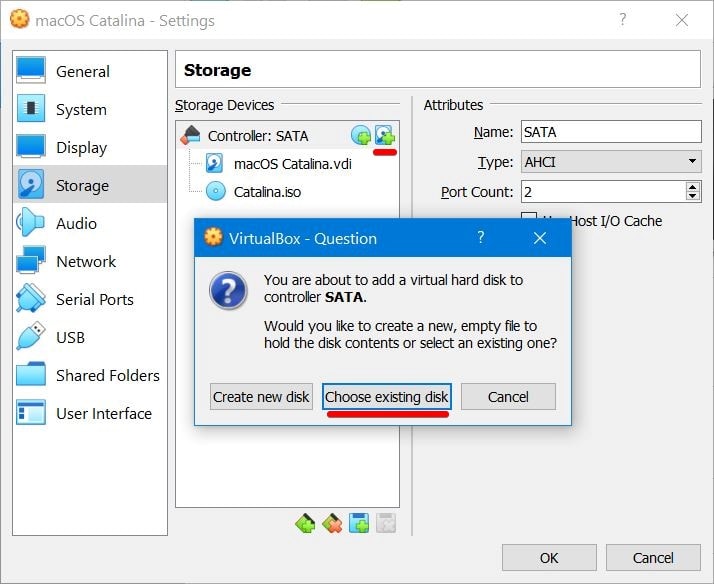
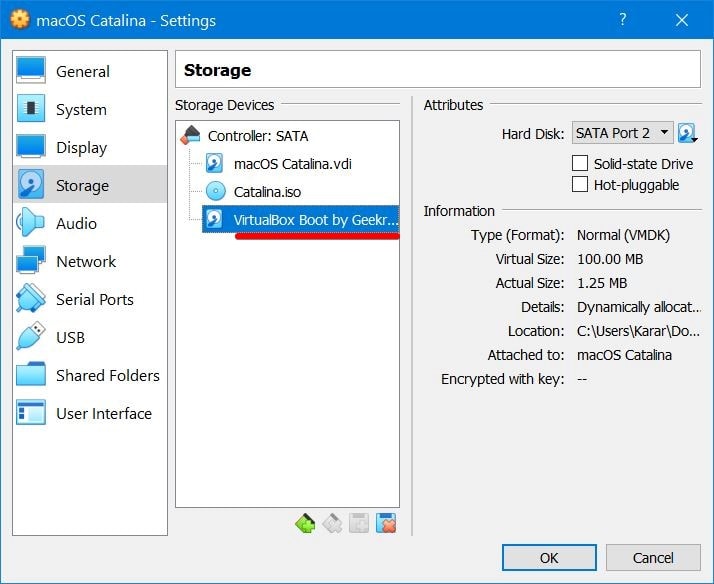
Browse the macOS Catalina ISO For VMware & VirtualBox file and select it. That done, click on the Controller: SATA and click on the small disk plus icon and select Choose Existing Disk.
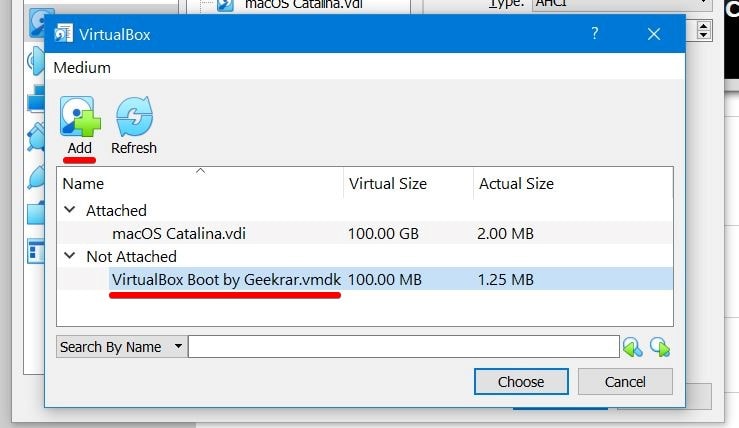
Click on Add then choose the VirtualBox Boot Image.
If the top one didn’t work or there is some problem, here’s another one.
After it’s done, it will look something like this.
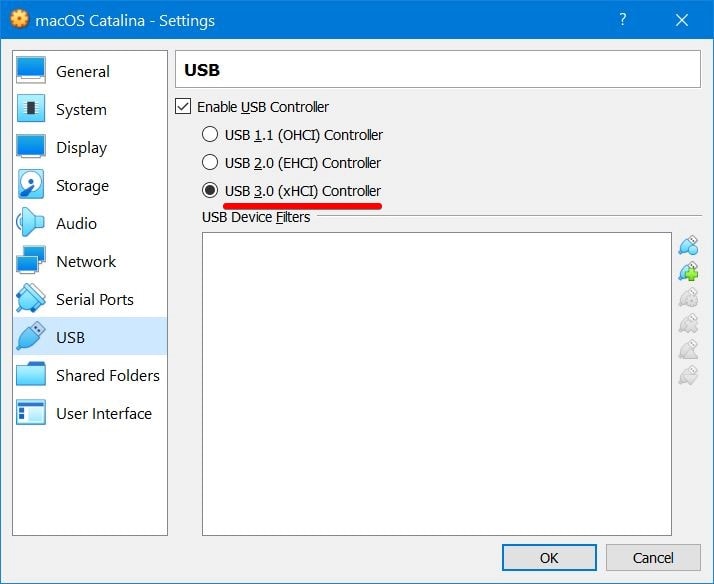
Now select the USB tab and select USB 3.0 (xHCI) Controller then click OK on the settings window.
Step Six – Apply Commands on Command Prompt
The settings of the virtual machine are near to end. With this step done, the installation part will probably begin.
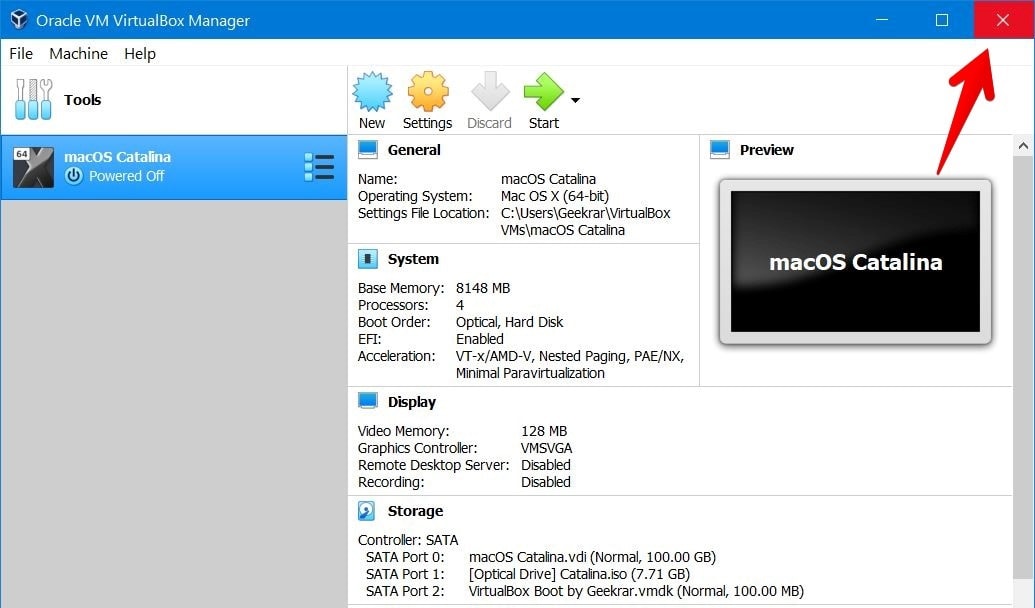
At this point, close the VirtualBox from the exit button.
Note: If the VirtualBox isn’t closed, the commands mightn’t work which will end up failed to install.
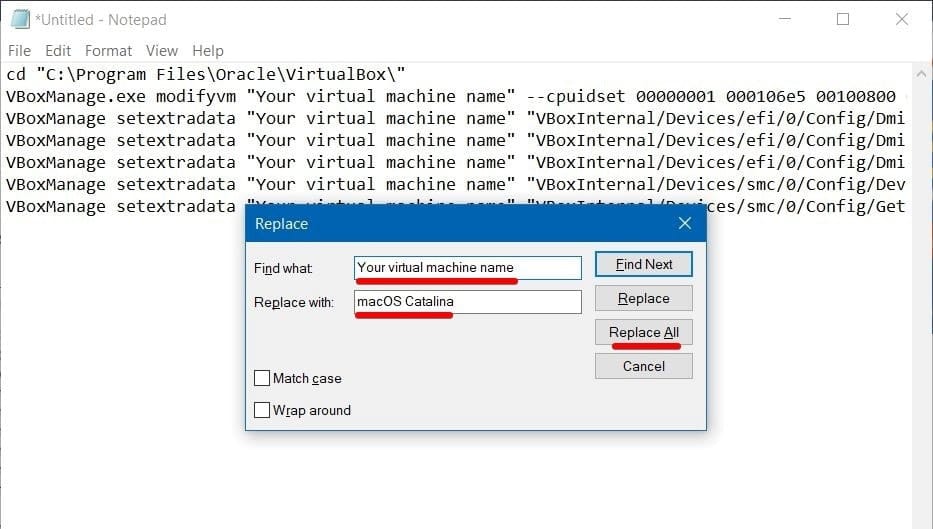
Next, copy and paste this command on the Notepad and press Ctrl+H. Now type in “Your virtual machine name” in the Find What then type “macOS Catalina” in replace with tab and click Replace All.
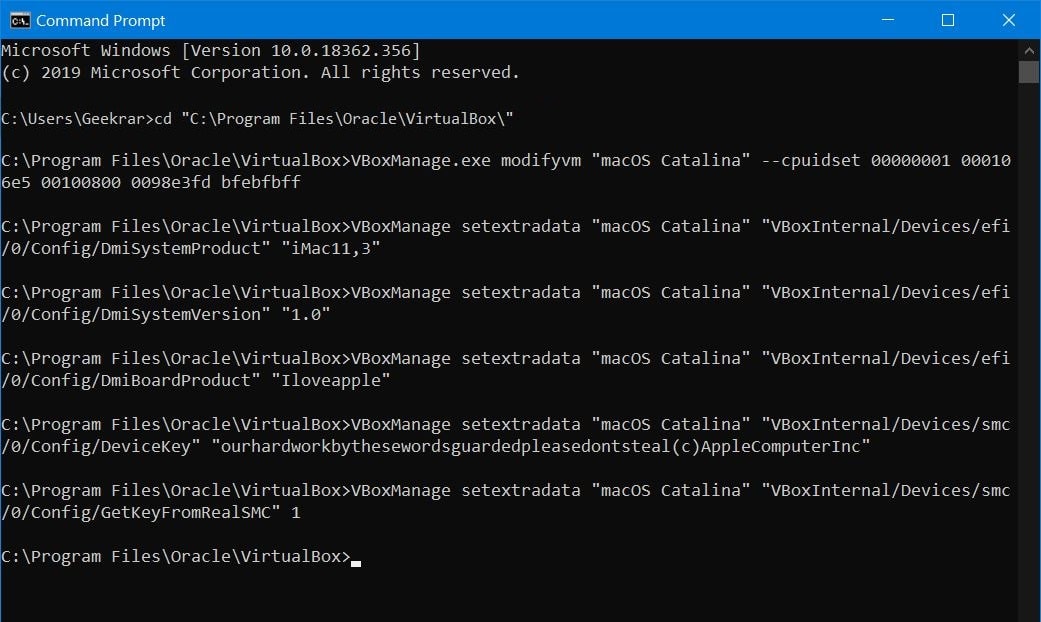
cd "C:\Program Files\Oracle\VirtualBox\"
VBoxManage.exe modifyvm "Your Virtual Machine Name" --cpuidset 00000001 000106e5 00100800 0098e3fd bfebfbff
VBoxManage setextradata "Your Virtual Machine Name" "VBoxInternal/Devices/efi/0/Config/DmiSystemProduct" "iMac11,3"
VBoxManage setextradata "Your Virtual Machine Name" "VBoxInternal/Devices/efi/0/Config/DmiSystemVersion" "1.0"
VBoxManage setextradata "Your Virtual Machine Name" "VBoxInternal/Devices/efi/0/Config/DmiBoardProduct" "Iloveapple"
VBoxManage setextradata "Your Virtual Machine Name" "VBoxInternal/Devices/smc/0/Config/DeviceKey" "ourhardworkbythesewordsguardedpleasedontsteal(c)AppleComputerInc"
VBoxManage setextradata "Your Virtual Machine Name" "VBoxInternal/Devices/smc/0/Config/GetKeyFromRealSMC" 1
After that, open Command Prompt simply without an administrator.
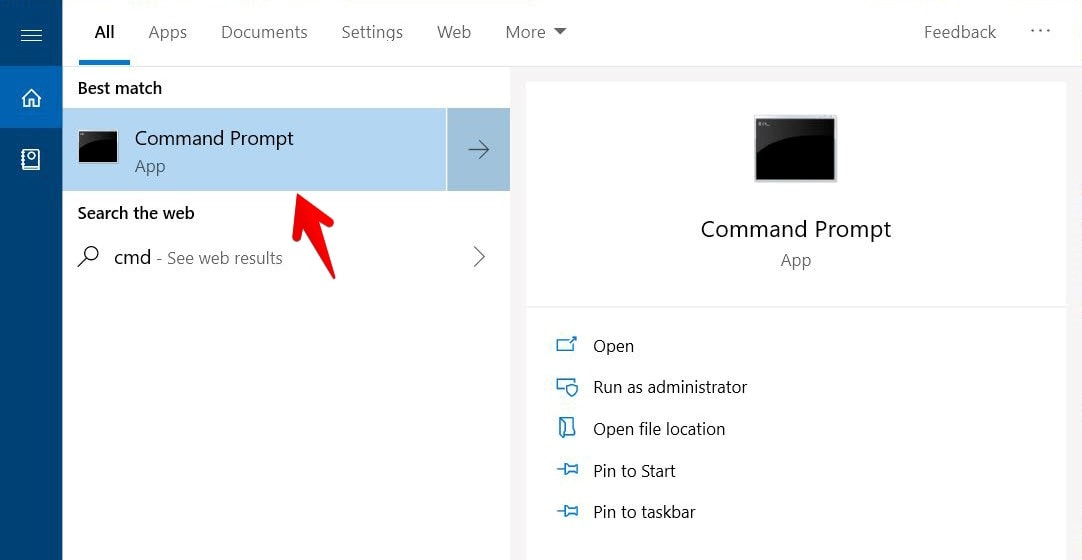
On the Command Prompt appeared, copy and paste the first line of the command first, then paste all of them.
With that out of the way, you’re completely ready to install macOS Catalina on VirtualBox on Windows PC.
Step Seven – Install macOS Catalina on VirtualBox
Now there’s nothing that would stop you from installing macOS Catalina. The installation is easy.
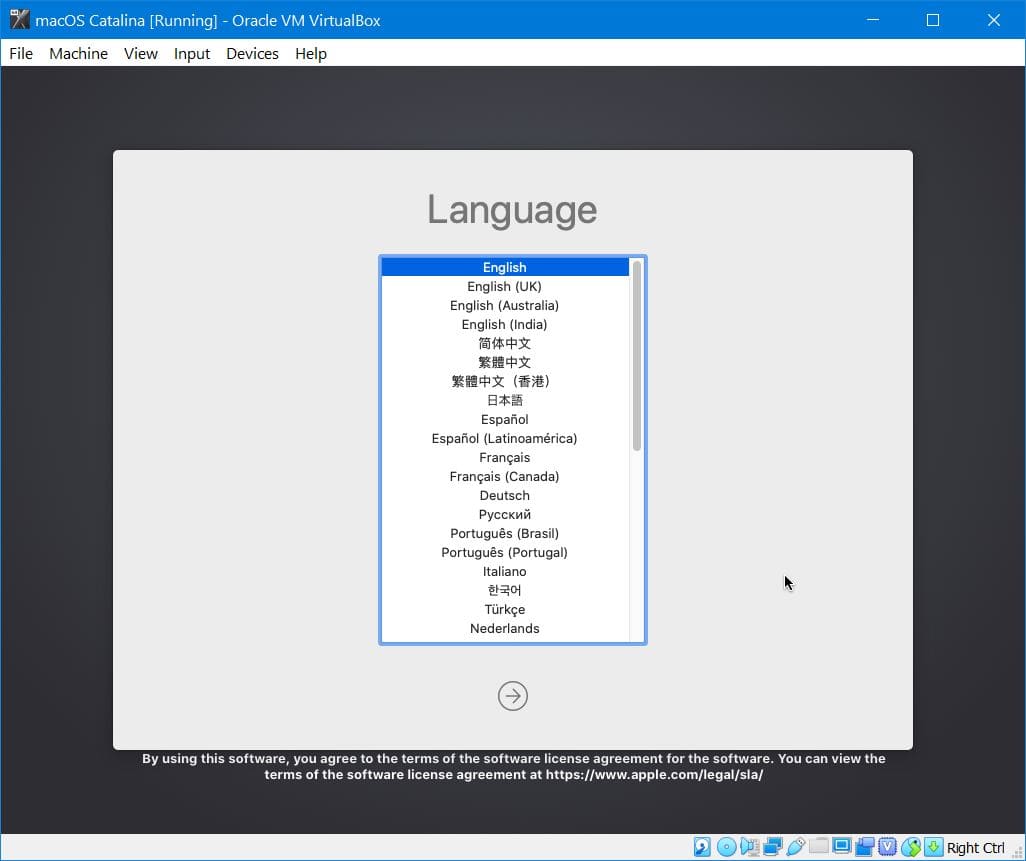
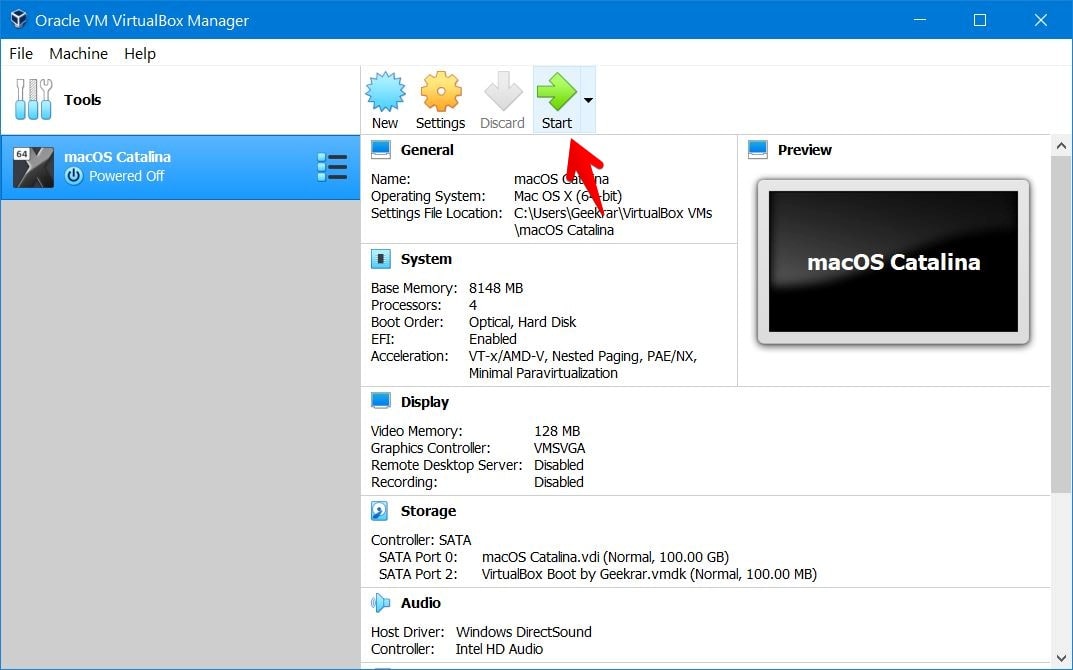
Fire up VirtualBox and click Start on the macOS Catalina. It will take some time to load up.

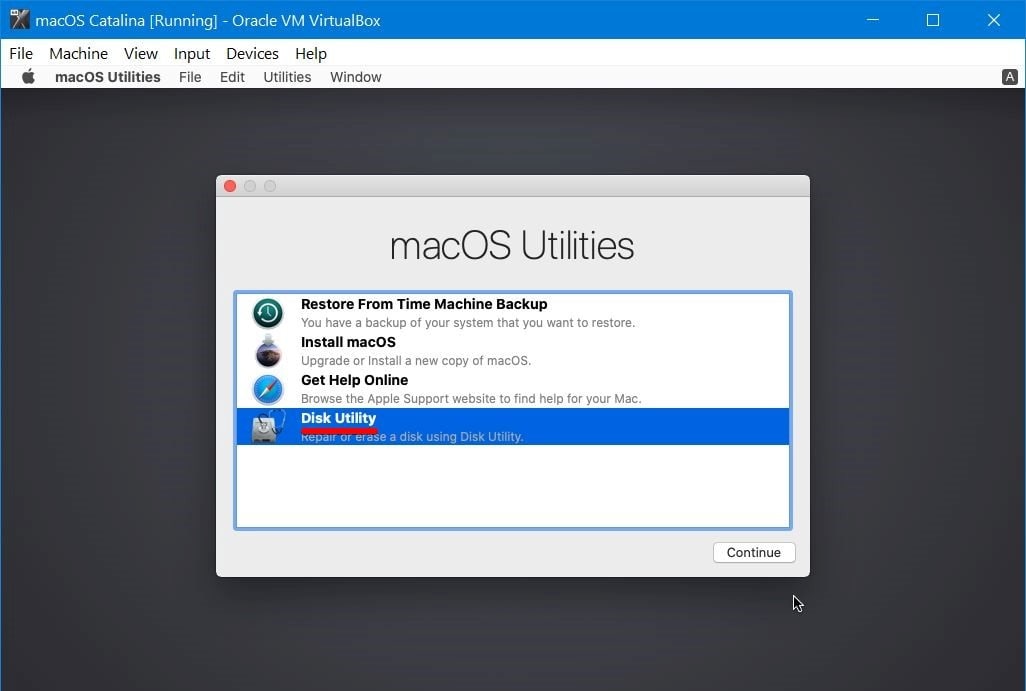
When it’s up, Continue with this window.
There, select Disk Utility and Continue with it.
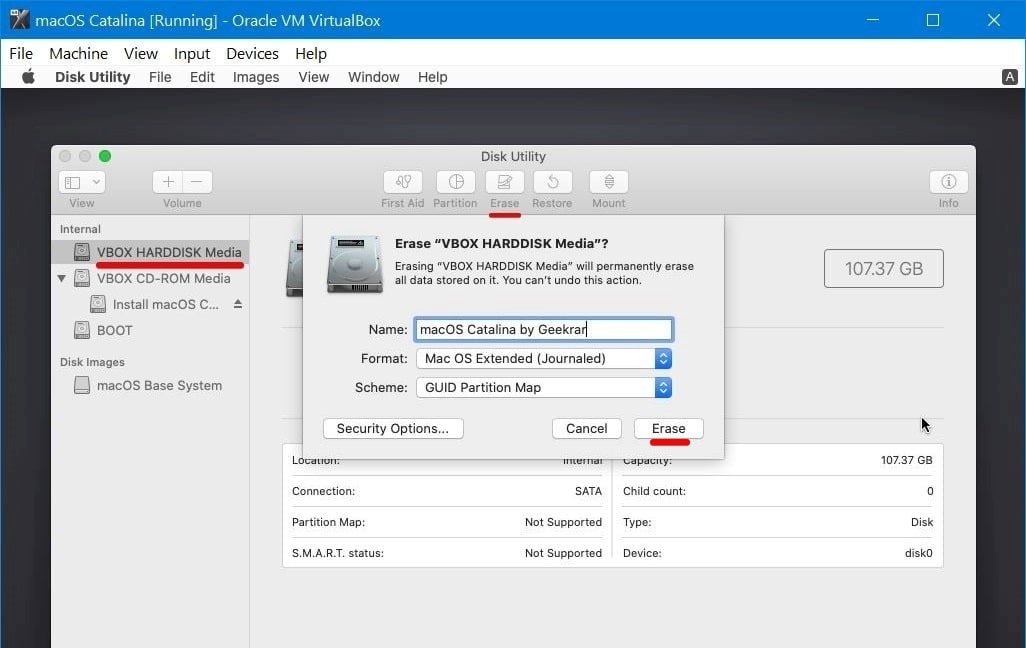
Then select the VirtualBox Virtual Disk that is “Vbox HardDisk Media” and click Erase then name the virtual disk and click Erase.
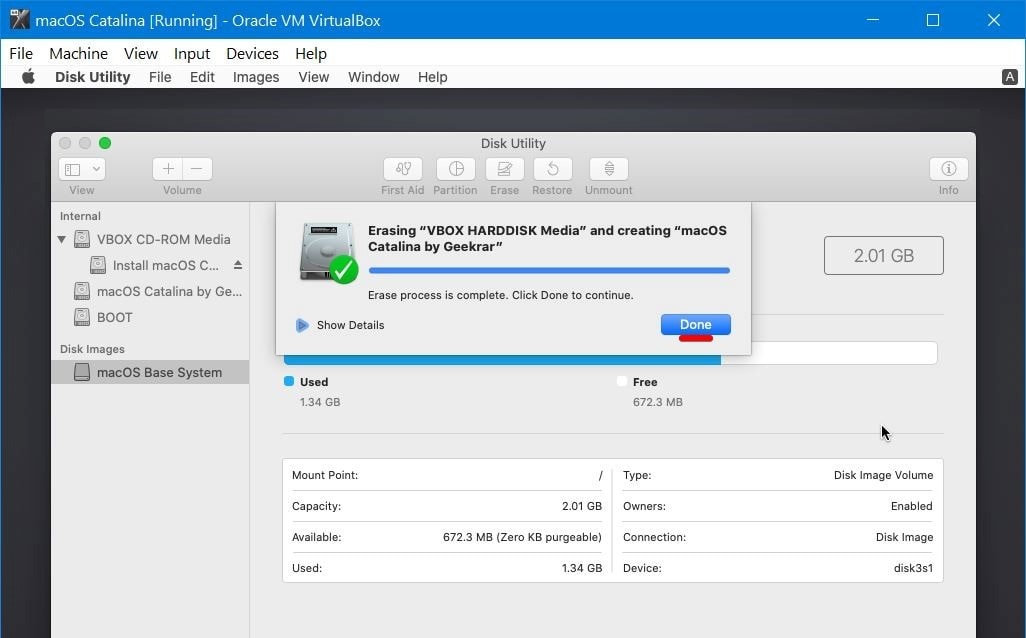
Once that’s finished, click Done.
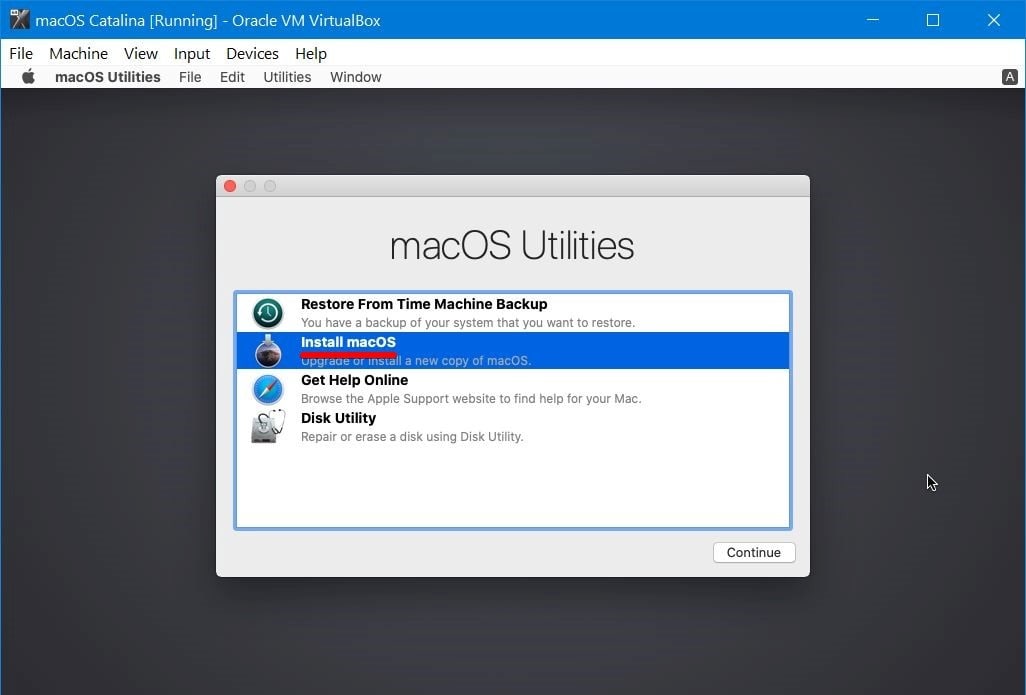
After then, close the window of the Disk Utility and select Install macOS then click Continue.
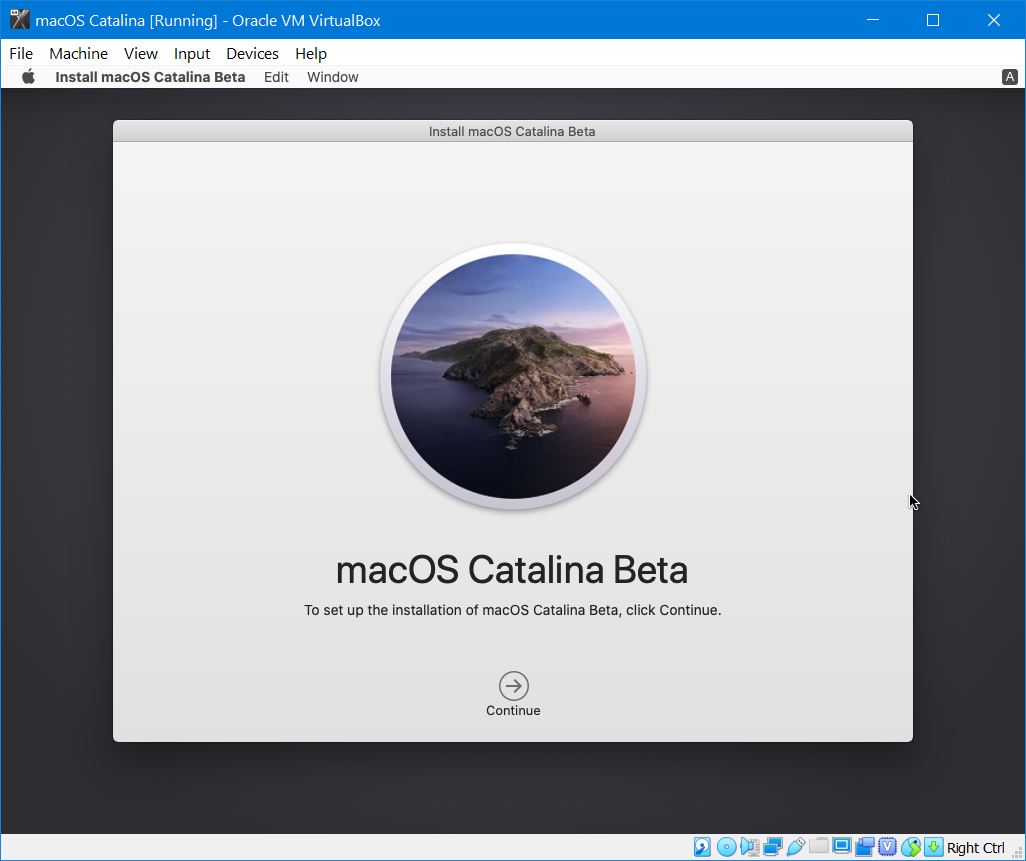
Continue with it simply.
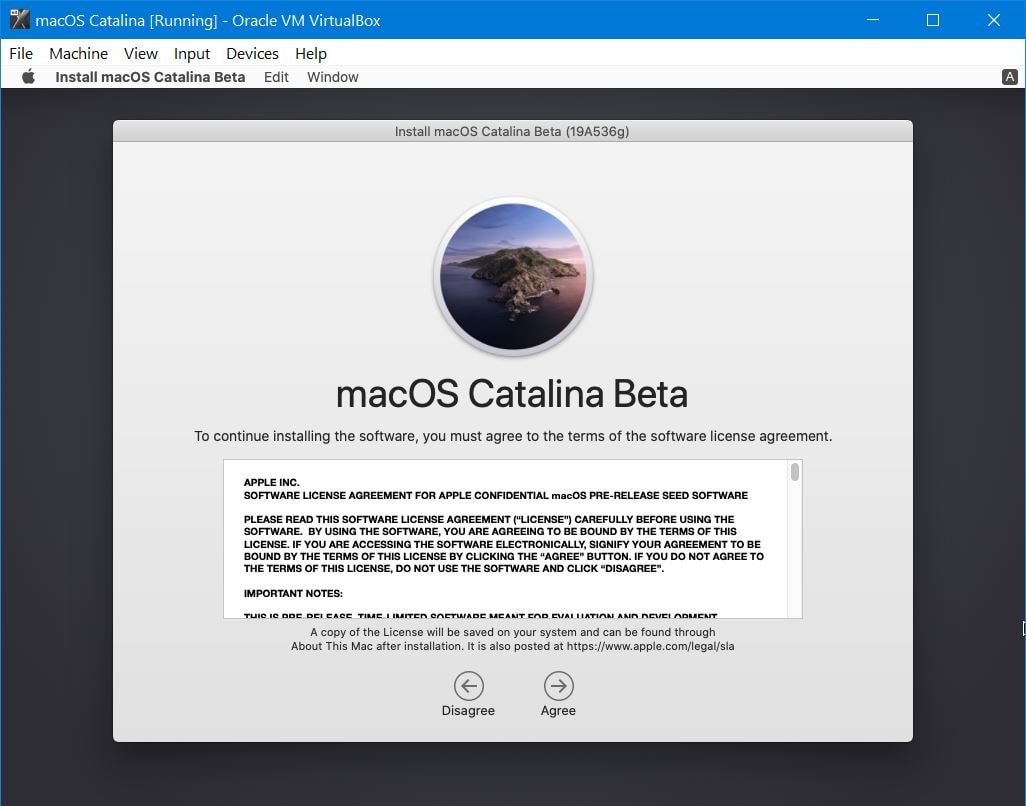
Next up, agree with terms and conditions.
Select the disk and click Install. The installation will begin now which will take a few minutes.

After the installation is completed, it will reboot so when it’s up again, shut down the virtual machine.
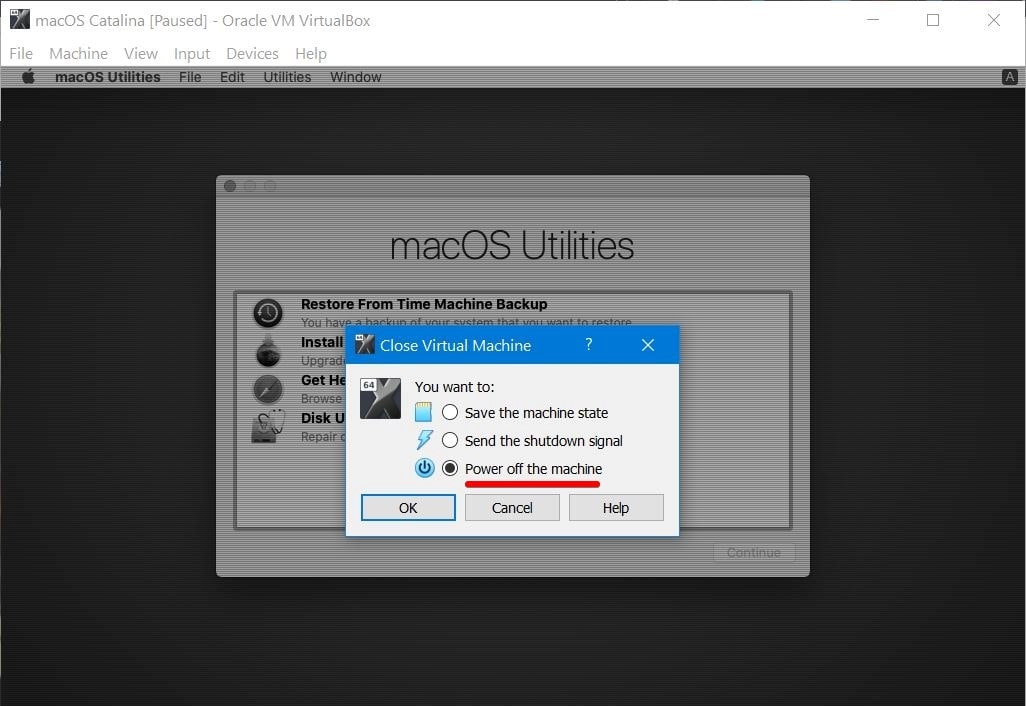
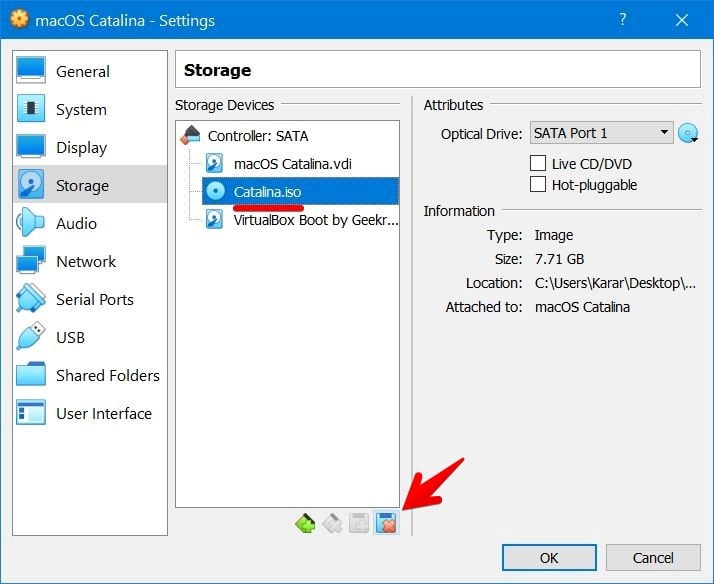
Goto virtual machine settings then Storage and remove the Catalina.iso file then click OK.
Once that’s done, start the virtual machine.
Now before 5 second press the Esc button immediately, then type “install.nsh” and hit Enter.
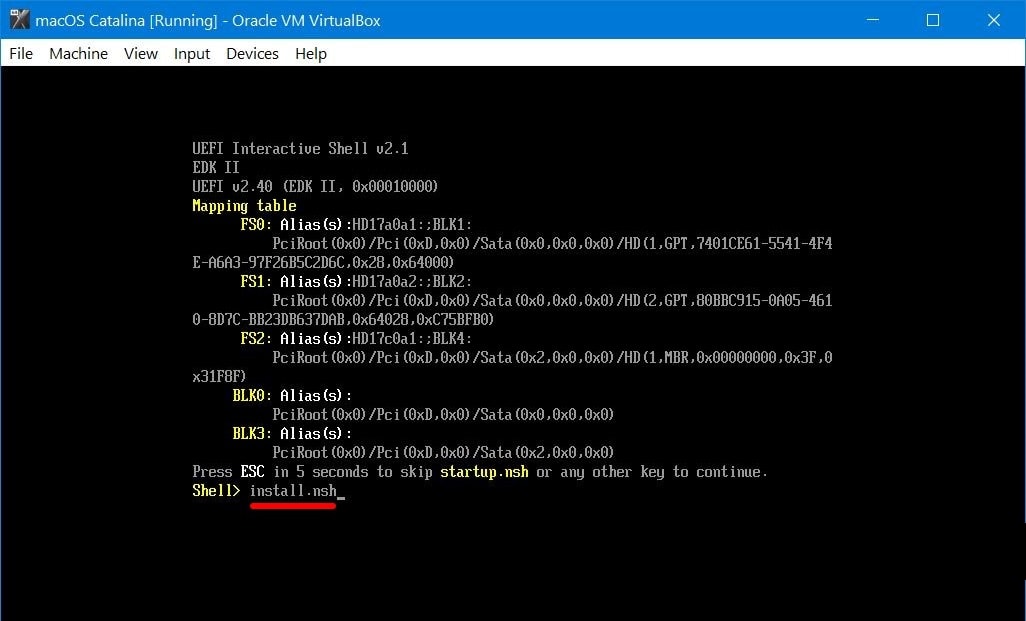
The macOS will be installing then.
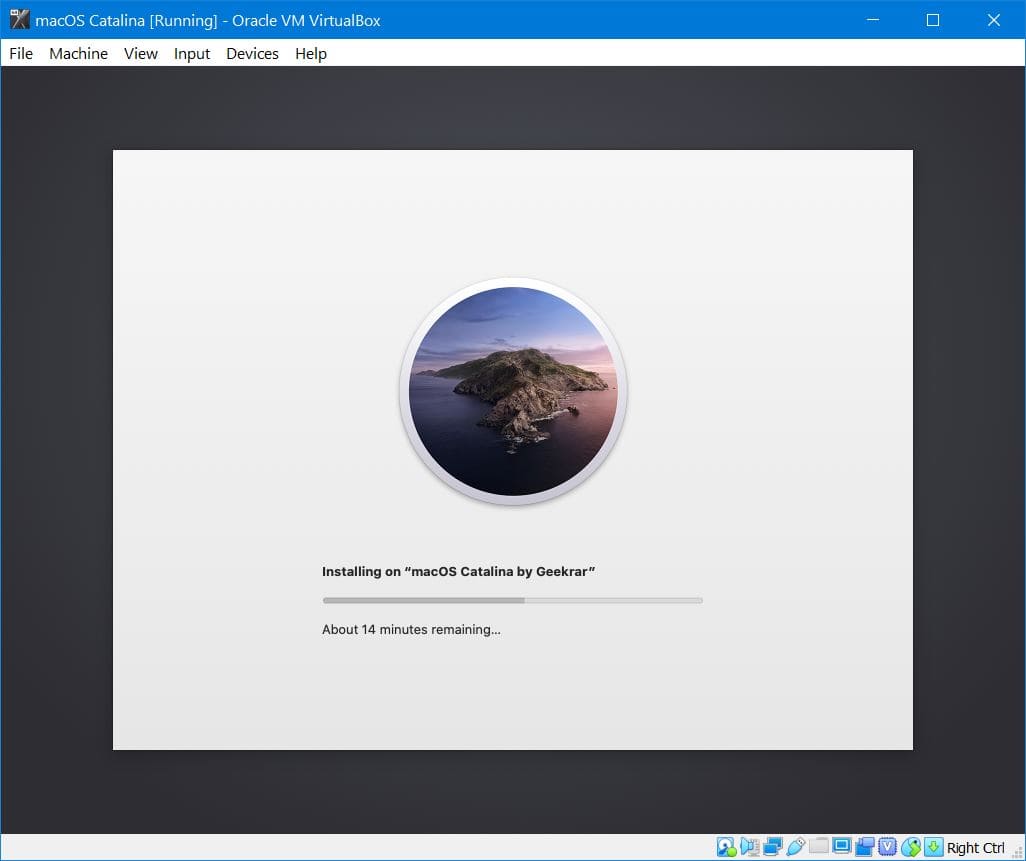
When it’s finished, it will reboot so there’s nothing to do more. Wait for it to start and it will be on Welcome window.
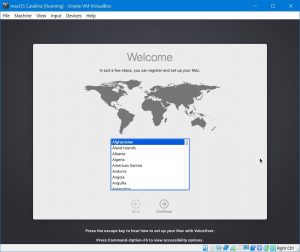
When that’s there, set up Mac like normal and at the end, you’ll eventually see the macOS Catalina desktop window. This will be the actual Mac running macOS that will be able to do the entire work, that includes whether creating a bootable USB or whatever. There’s no huge difference between a real Mac and virtual machine running on your Windows system.
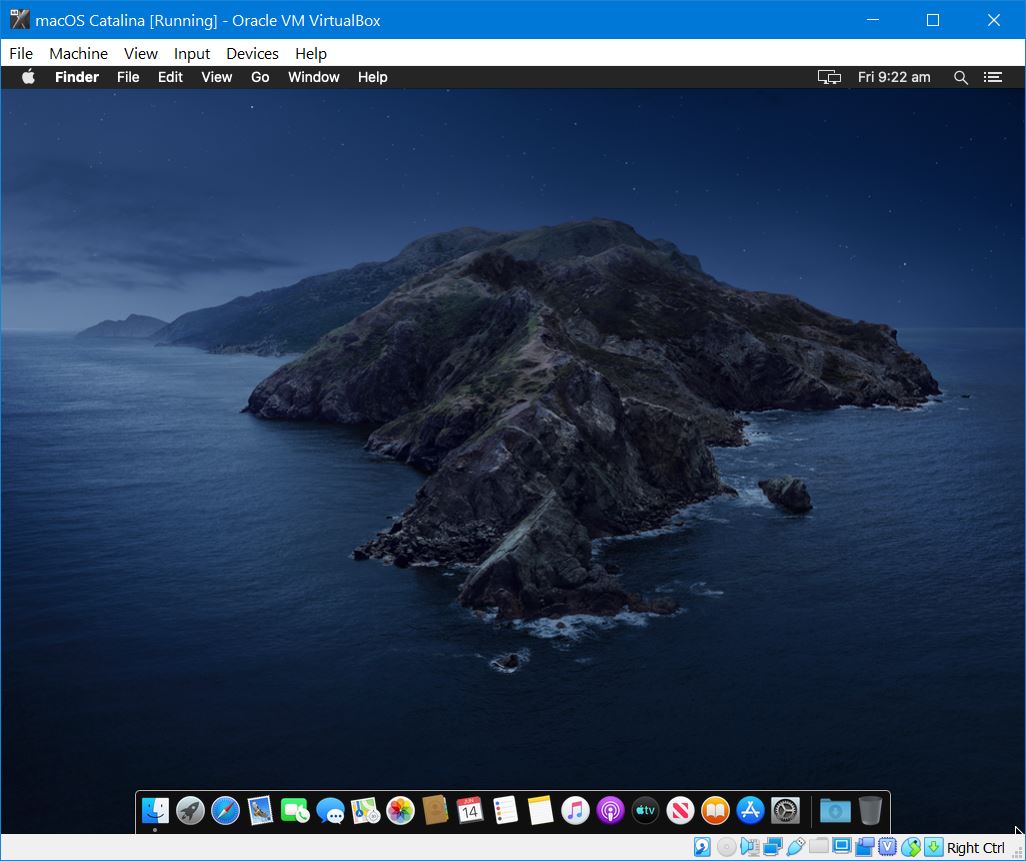
The only thing is, it now requires to fix the resolution which is pretty easy.
The nice thing is when that’s installed, you can update macOS to the latest version and take a snapshot which is able to restore back to the point. If there’s some speed issue, you can always speed up macOS Catalina.
That’s it. If there’s some problem or issue, put it down in the comments form.
Install macOS Catalina on VirtualBox on Windows – Video
https://youtu.be/-dylDY04W3A
Searches Related to it.
- macos catalina vmware image
- macos catalina vmware image download
- macos catalina iso vmware
- mac os catalina iso download
- vmware catalina black screen
- catalina vmdk
- macos catalina virtualbox
- catalina vmware file


It’s stuck on step 7 between the 2 pictures.
Shows the following message but is stuck here.
BdsDxe: loading Boot001 “UEFI VBOX CD-ROM VB1-1a2b3c4d” from PciRoot (0x0)/Pci (0x1F,0x2)/Sata(0x1,0xffff,0x0)
BdsDxe: starting Boot001 “UEFI VBOX CD-ROM VB1-1a2b3c4d” from PciRoot (0x0)/Pci (0x1F,0x2)/Sata(0x1,0xffff,0x0)
It asks me for a password when trityng to unzip it with rar. Whats the password?
The older files have a password of “Geekrar.com”
All new files in the forum dont have passwords.
can anyone help to find VirtualBox Boot Image File
its right here on the forum: https://forum.geekrar.com/forums/topic/download-virtualbox-boot-image-file/
stuck at code
not going forwad
region screen not coming
did you try a complete shutdown and reboot of the VM?
validate_root_image: validating rot dmg/Install macOS.app/Contents/SharedSupport/BaseSystem.dmg
Stuck at this for 2 seconds then again the process starts from the beginning.
Please help.
WHats your system configration? Did you run the CPU profile commands?
where I can download the vbox code file?
do you mean the boot image? it can be found -> here
When I press esc it opens the boot menu and not a command line to type Install.nsh. If I do nothing, the operating system starts up regularly
What do I have to do?
Check these steps-
https://techrechard.com/complete-guide-to-fix-virtualbox-errors-while-installing-mac-os-x/#install_nsh_is_not_recognized_as_an_internal_command
Why does it take forever to load? its been 4 hours still hasnt got the macos running
when I wanted to run macOS it said” Failed to open a session for the vietual machine macOS Catalina”
black screen after step 7 solved updating Virtual Box to latest version
i have two prblms, 1st the icloud could not be accessed from system preferences. And 2nd the sound is not working.
thank you……
The first part of the installation works but when the machine restart and after “install nsh” There’s the Apple boot screen which charging and it takes a very long time. It seems to be stuck at the end of the charging process but the “hardrive” seems to write. What can I do please ?
Thank’s for your tutorial.
Hi Ali, I noticed that your vitualbox boot image is 1.25MB while the downloads were all 384KB. Is this a new file that we should use? Thanks.
At step 7, I start the VM and I just get a screen that says Virtual Box and stays there forever. I don’t think it is doing anything. Task Manager shows activity in 4 cores but no I/O on the hard drive where the VM is supposed to run. What can I do? If I shut down the VM, are there any changes I should make? I read about the corrections on the script but it seems you already updated the script. Please help.
And how do you get the macOS Public Beta Access Utility on your “Hackintosh” with this new method?
Same issue there, mouse is laggy as hell, and my machine is impossible to use.
Any idea how to fix this ?
Thanks in advance.
the sound and appleid for imessage not working
Hi Ali, How do you fix the following error:
BdsDxe: loading Boot0001 “UEFI VBOX CD-ROM VB1-1a2b3c4d ” from Pci Root (0x0) /Pci (0xD,0x0)/Sata (0x1,0xFFFF,0x0). And this: BdsDxe: starting Boot0001 “UEFI
same error
getting “this Mac has been used to create too many new Apple IDs” when trying to create a new account.
when trying to use my actual Apple account, it says “This Mac is no longer eligble to create Apple ID accounts. Creat an Apple ID using a different device”
there is probably an underlying platform ID that is being sent to apple and if lots of people are using this virtual box process and instructions, they would all appear identical Mac’s
if possible have a single .rar file that contains both the iso and the virtualbox boot file. thank you very much
I’m getting the following error:
Shell> fs1:\system\library\coreservices\boot.efi
Script Error Status: Unsupported (line number 7)
The device is no longer eligible for creating an Apple ID
Also stuck at Step 7. I’ve followed all steps precisely. Used Geekrar’s images (noting that the Boot file is 384k instead of 1.25m as in example). When I boot the VM, I get a black screen in VirtualBox and it doesn’t move past it. I’m on a Dell Latitude 7400.
Hi,
Sorry for the inconvenience, I’m checking this.
I’ll notify when there’s an update. Hope you wait.
Yes I use VirtualBox Boot Image !! Sorry for the repeated comments
What are your system specs?
When I start the machine(Step 7) nothing happen, Help Please !!
Did you use VirtualBox Boot Image?
Black Screen un step seven, Help Please
“startup.nsh” is not recognised as an internal or external command, operable program, or script file. Faceing this issue pls help me on this
Sorry “Install.nsh”
Black screen right after Start with the New Method
After step 7, stuck on black screen, please help
After step 7, after clicking Start. Stuck on black screen
Unable to install Guest Extensions and you can’t sign into iMessage
hello, did you manage to solve this problem?
Hi,
May I know which problem are you talking about?
Hi,
Could you please support, Got stuck @Welcome Screen
Hi,
Resolve this issue by changing USB changing to USB 2.0
Thanks
mkhalid
Okay – installs fine using the instructions and errata people pointed out about the double dashes in the commandline script. Also, you need to enable 3D Acceleration for Display.
Issues so far … Mouse gets laggy either with USB set to 2 or 3. USB 3 lets you use your webcams, setting it to 2 does not.
And neither method gets you sound. I believe you need TonyMacX86.com’s UNIBEAST to do that. If anyone has good instructions on how to post-install Unibeast on Catalina … that would be great.
Hi. I dont install Catarina. I make step by step. And after i start the machine, write this : BdsDxe: loading Boot0001 “UEFI VBOX CD-ROM VB1-1a2b3c4d ” from Pci Root (0x0) /Pci (0xD,0x0)/Sata (0x1,0xFFFF,0x0). And this: BdsDxe: starting Boot0001 “UEFI …….I dont know where is problem. Thanks for your feedback.
Hello Ali, i followed the NEW method, and there are some inconsistencies in your process causing some issues. Everything up to step 7 is okay, but after the remove of Catalina ISO steps and restart, you say to run “install.nsh”. Did that but errors.It says fs1:\macOS Install data\locked files\boot files\boot.efi is not recognized as an internal or external command, operable program or script file, and does that for each fs (fs0->fs4).
I don’t see how the boot image is loaded when the first hard disk is the Catalina ISO. In other people procedures, we see that the imageboot is an optical drive setup, and booted before the catalina image(ISO/VMDK).
Below is the file sets in each FS, can you advise how to correctly start the “install.nsh”, maybe the VBOX setup is not correct? or something is out of order when copying files from boot image?
FS0:
Has folder \EFI\APPLE\EXTENTIONS\Firmware.scap
FS1:
long string\ boot.efi with a lot of .im4m files
FS2:
has file kernelcore
FS3:
has the usr,bin,sbin,Library,System,dev,tmp, etc..
FS4:
Has long string folder, with usr, var, Library & System folders only
FS5:
Looks to be the actual macOS install:
Has sw, .HFS+ Private Dirctory Data, home, usr, Library, System, mnt,private,Users,Applications, opt,Volumes,etc..
FS6:
has 3 files, VboxApfs.efi, startup.nsh, install.nsh
VirtualBox Boot Image not working in google drive
Here’s another one.
https://www.geekrar.com/download-macos-catalina-virtualbox-boot-image/
A small erratum:
In “VBoxManage.exe modifyvm “MacOS Catalina” -cpuidset 00000001 000106e5 00100800 0098e3fd bfebfbff”, make sure there are two “-” before ‘cpuidset’, namely, the line should be:
VBoxManage.exe modifyvm “MacOS Catalina” –cpuidset 00000001 000106e5 00100800 0098e3fd bfebfbff
when i do the initial start of the mac os, the command line keeps going on a loop and never makes it to the language menu
Indeed!
After update to 10.15.1 halting on boot at “cryptoAlloc:671 using 64 buffers”…. line.
Any guidance on how to correct the inability to log into iMessage from a VirtualBox Catalina image?
Thanks!
What’s the password for the VirtualBox Boot Image .rar file?
The password is:
Password: Geekrar.com
Hi Ali, thanks for the tutorial! Followed all the steps and managed to fire it up to the beginning of step 7, but I have issues with input:
– Mouse pointer is super laggy, making it almost unusable
– Everytime I press a key, the system seems to believe I pressed it for several seconds (or several times), which makes it impossible to navigate or input anything during this step.
I’m running it on a Surface Pro 7 – i5 – 16 GB – 256 GB
Any ideas what could be the problem, or how I could solve it? Thanks in advance!
1. “Add to my Drive”
2. In your drive: “Make a Copy”
3. Now You can download “Copy of …”
I can´t upgrade macOS Catalina in VirtualBox
10.15.1 to 10.15.2,
The device is no longer eligible for creating an Apple ID
had to set it on usb 2 for the keyboard and mouse to work. installed but no sound with old or new method . any idea why ?
thanks
Installation went smoothly. However, I keep getting prompted to update to macOS 10.15.1 even after I have installed the update and restarted my VirtualBox. What am I doing wrong?
why there are a password in winrar
install.nsh command is not work. How can resovle it? Thxs
Check this.
https://www.geekrar.com/fix-macos-catalina-install-nsh-isnt-recognized-as-an-internal-error/
On step 6 is the first line wrong.
the correct one is:
VBoxManage.exe modifyvm “Your Virtual Machine Name” –cpuid-set 00000001 000106e5 00100800 0098e3fd bfebfbff
before cpuid you will need two — and is has to be cpuid-set and not cpuidset.
Failed to open a session for the virtual machine MacOS Catalina.
The virtual machine ‘MacOS Catalina’ has terminated unexpectedly during startup with exit code 1 (0x1). More details may be available in ‘C:\Users\perry\VirtualBox VMs\MacOS Catalina\Logs\VBoxHardening.log’.
Result Code: E_FAIL (0x80004005)
Component: MachineWrap
Interface: IMachine {5047460a-265d-4538-b23e-ddba5fb84976}
What to do?
install.nsh is not recognized as an internal or external command operable program when i press ESC
where is VirtualBox Boot Image
Hi,
The VirtualBox boot image is added, check.
I have the same problem; where do I find the VirtualBox Boot Image?
I also want to know where to get the Virtialbox Boot by Geekrar.vmdk
I got the message on step install that the copy of the istall macos Catalina is damaged (
hello where can i find the file from step 5, photo 7? (VirtualBox Boot Image)