

In today’s digital age, DVDs are becoming less popular as streaming services and digital downloads take over. However, many of us still have a collection of DVDs that we cherish and want to preserve. One way to ensure that your DVDs are accessible on modern devices is by ripping them to MP4 format. In this guide, we will walk you through the process of ripping DVDs to MP4 on a Mac, providing step-by-step instructions and valuable tips along the way.
Get the tools
1. To rip a DVD to MP4 on Mac, one thing you will need is an optical drive. Since built-in optical drives are no longer included with recent Macs, you can either purchase an external SuperDrive from Apple for £79/$79 or get another Mac compatible DVD drive.
2. With an optical drive on your Mac to read the disc, another thing you will need is a DVD ripper. Some DVDs don’t have digital copy protection, thus you may rip their contents to MP4 on your Mac with ease. For instance, a DVD may be freely converted into an MP4 file using the free open-source media player VLC. But the majority of DVDs you purchase from a retailer include copy protection. It’s challenging to rip a DVD due to copy safeguards. Options exist, but they require a bit of a workaround. That’s why MacX DVD Ripper Pro is recommended.
MacX DVD Ripper Pro is specifically designed to convert protected DVDs to MP4 and various formats on Mac. This software offers a wide range of features and benefits. One of the key advantages is its powerful decryption ability, which allows it to bypass various copy protections found on DVDs, including CSS, region codes, UOPs, bad sectors, 99 titles, and even the latest encryption schemes. This means that you can easily rip and convert DVDs that are normally protected and not easily accessible.
Additionally, MacX DVD Ripper Pro utilizes Intel/AMD/Nvidia GPU acceleration technology, which ensures DVD to MP4 ripping that is about 5x faster than similar tools without compromising the quality of the output video.
It also offers a range of customization options. You can choose the codec and quality of the output MP4 file, select specific audio and subtitle tracks, as well as adjust settings such as resolution, frame rate, and bitrate. This allows you to optimize the converted MP4 DVD movie for any device or platform.
Good news: before December 4, 2023, all our readers can participate in the company’s Black Friday lucky slot game and win up to a 40% off coupon on MacX DVD Ripper Pro. Furthermore, customers who make purchases during the Black Friday event will be eligible to enter a lucky draw contest, with prizes including an Echo Show 10 (3rd Gen), Beats Fit Pro, an Amazon gift card, or a free order.
Steps to Convert A DVD to MP4 on Mac
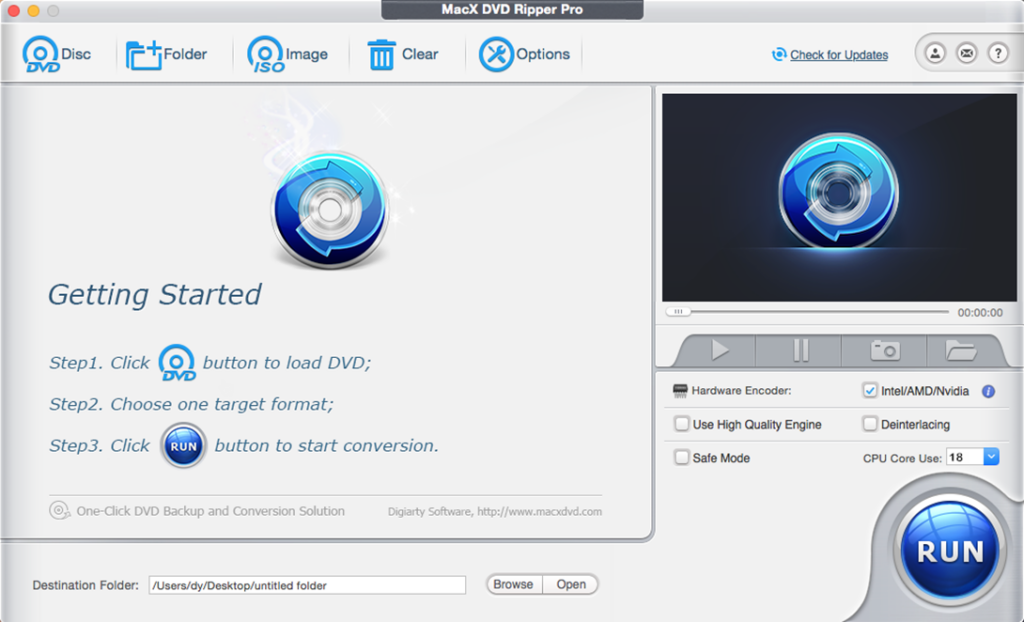
Step 1: Download the Ripper and Insert Your DVD
Download the DVD ripper on Mac and open it. Then insert your DVD into your DVD drive. Next, click the DVD button in the top-left corner, select your disc from the drop-down menu, and click OK.

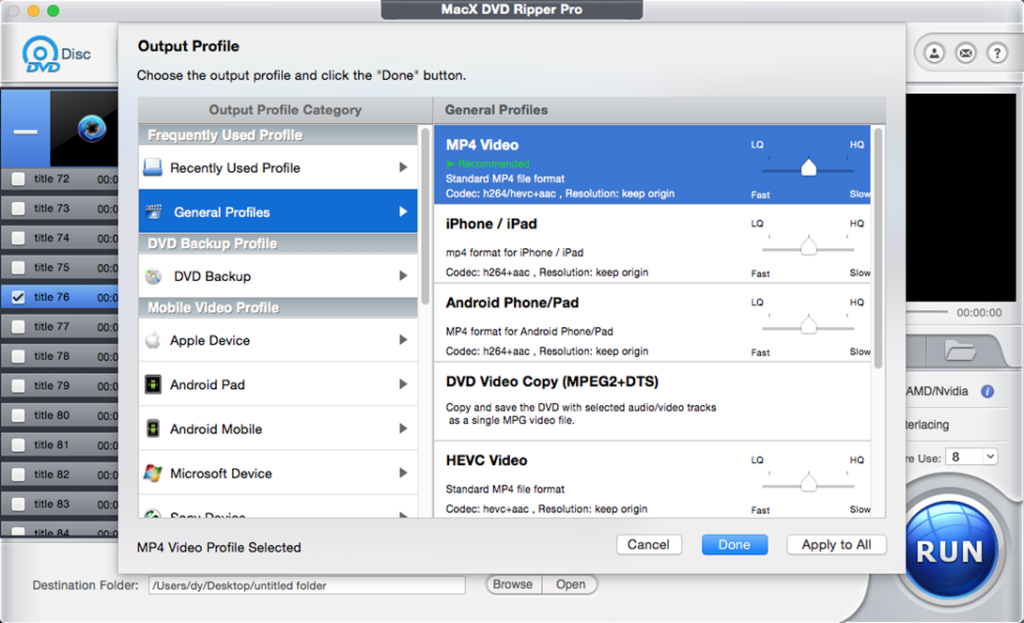
Step 2: Select MP4 as the Output Format
The program will spend a few seconds analyzing your disc, then give you a selection of preset output profiles to choose from. To rip DVD to MP4, click General Profiles from the left column and choose MP4 Video on the right list. You can also choose to rip the DVD to an iPhone from the range of Apple devices or other devices or formats as you need. Then click Done.

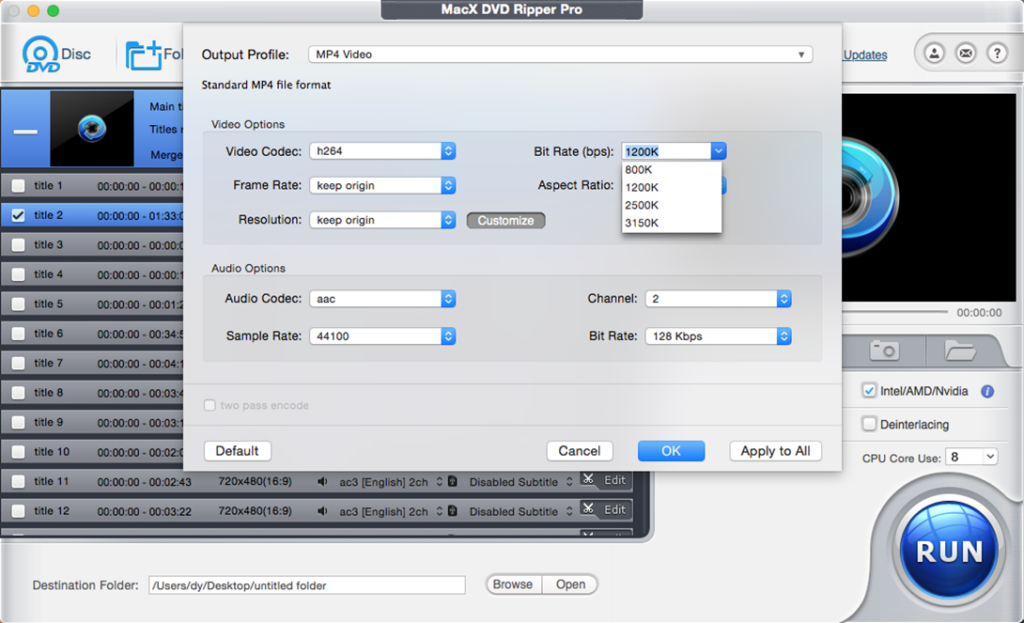
Step 3: Adjust Settings and Customize Output
You may want to take a moment to adjust the settings according to your preferences. Back on the main interface, click the selected profile, and then you can choose the desired video resolution, bitrate, and frame rate (keep in mind that higher settings will result in better video quality but also larger file sizes). You can also choose whether you want to rip the DVD to MP4 in H.264 or HEVC codec.
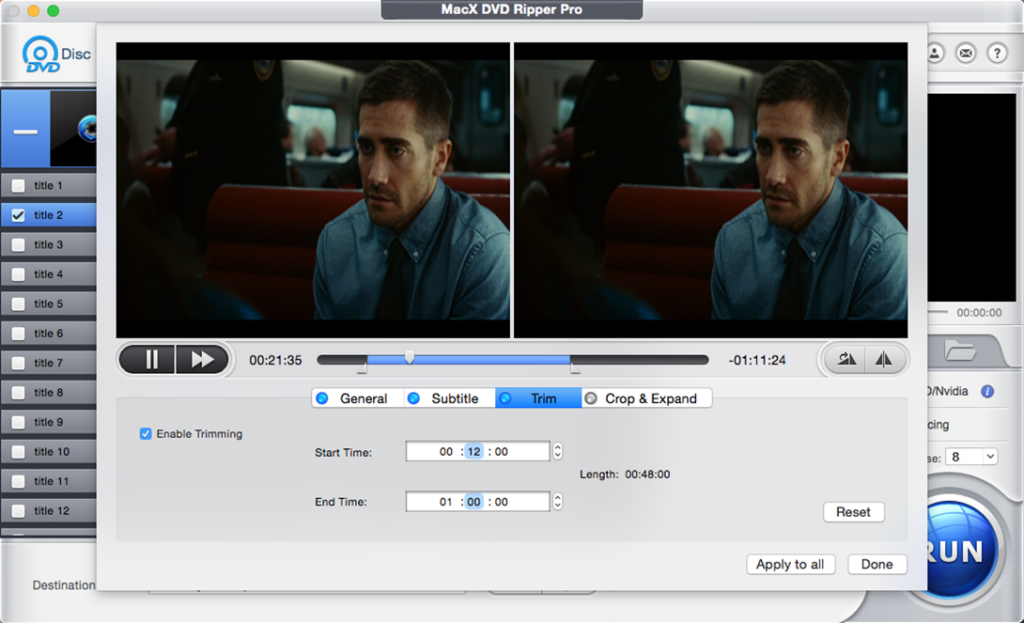
Step 4: Edit the Output MP4 Video
Next, click the Edit button on the selected movie title and enter the movie editing window. You may want to customize the MP4 output by adding subtitles or cropping the video to remove black bars. You can also cut the beginning or ending and only keep the main movie.
Step 5: Start the Ripping Process
Back on the bottom of the main interface, browse and choose a destination folder on your Mac to save the ripped MP4 video.
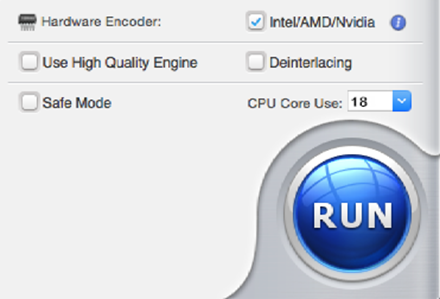
On the bottom-right, the Intel/AMD/Nvidia should be checked automatically to use any GPU hardware on your Mac to accelerate the DVD to MP4 ripping speed. You can select High Quality and Deinterlacing to get the best results. The most crucial thing to remember is to always try using Safe Mode if you have trouble ripping a difficult DVD. Additionally, you may choose how many CPU cores to dedicate to ripping.

Click the Run button to begin the ripping process. Sit back, relax, and let the software do its magic. Once the ripping process is complete, you will have a digital copy of your DVD in MP4 format on your Mac. You can now transfer the files to your preferred device or media player and enjoy your favorite movies and TV shows without the need for a DVD player.
Conclusion
Ripping DVDs to MP4 on a Mac can be a useful way to digitize your DVD collection and make it more accessible. There are several DVD to MP4 converters available for Mac users, including Handbrake, VLC, iSuper DVD Ripper, etc. However, MacX DVD Ripper Pro provides the most powerful yet easiest way. With a few simple steps, you can convert your DVDs into MP4 or other digital files that are compatible with a wide range of devices. Follow the steps outlined in this guide, and you’ll be on your way to turning your DVD collection into an MP4 movie library that is both convenient and accessible.
More Tips about Ripping DVDs to MP4 on Mac
1. Can I rip a DVD to MP4 using Mac’s built-in apps?
No, but it is possible with some workarounds. One option is to use the Disk Utility app, which allows you to create a disk image of the DVD and then convert it to MP4 using another app like Handbrake or VLC. However, you should know that the Disk Utility app won’t support DVDs with copy protections.
2. How long does it take to rip a DVD to MP4 on Mac?
The time it takes to rip a DVD to MP4 on Mac can vary depending on several factors, such as the speed of your DVD drive, the processing power of your Mac, and the specific software you are using. Generally, it can take anywhere from 30 minutes to a couple of hours to rip a DVD to MP4 on Mac. However, a DVD ripper that is able to use the GPU for the ripping can significantly reduce the time it takes for the ripping.
3. How to rip DVDs to MP4 on Mac with Handbrake?
Handbrake is a popular choice to convert a DVD to MP4/MKV on Mac, Windows, or Linux. It offers tons of customization options to adjust the output MP4 video. But to rip a protected DVD to MP4, you need to get libdvdcss on Mac.
Step 1. Download and install Handbrake on Mac. Then insert the DVD into your Mac’s DVD drive.
Step 2. Open Handbrake and click on the “Source” button to select the DVD. Handbrake will scan the DVD and display a list of available titles. Choose the title you want to rip.
Step 3. Under the “Destination” section, select the output folder where you want to save the ripped MP4 file.
Step 4. In the “Output Settings” section, choose the MP4 format as the container.
Step 5. Adjust the video and audio settings according to your preferences. You can change the video codec, frame rate, bitrate, etc.
Step 6. Click on the “Start” button to begin the ripping process.
4. How to convert DVDs to MP4 on Mac with VLC?
VLC can be used to convert homemade DVDs to MP4 or other formats on Mac. VLC users can get the job done without downloading extra software. But note that VLC is a basic option to rip DVDs to MP4. It’s neither efficient nor feature-rich.
Step 1. Download and install VLC on Mac. Insert the DVD into your Mac’s DVD drive.
Step 2. Open VLC and click on “File” in the menu bar. Select “Open Disc” from the dropdown menu.
Step 3. In the “Disc Selection” window, make sure the “DVD” option is selected and click on “Browse” to choose the DVD drive.
Step 4. Click on “OK” and VLC will start playing the DVD. Pause the playback if it starts automatically.
Step 5. Go to the menu bar and click on “File” again. Select “Convert/Stream” from the dropdown menu.
Step 6. In the “File” tab, click on the “Add…” button to select the video tracks you want to convert.
Step 7. Click on the “Convert/Save” button. In the “Convert” window, choose the output format as “Video – H.264 + MP3 (MP4)” or any other desired format.
Step 8. Specify the destination folder where you want to save the converted file.
Step 9. Click on the “Start” button to begin the DVD to MP4 conversion process.
5. Is it legal to rip a DVD to MP4 on Mac?
When ripping DVDs, it is important to consider the legal implications. While ripping protected DVDs are prohibited in many countries, it is generally legal to convert a DVD that you own to MP4 for easier playback or backup purposes. In practice, it’s safe to rip a DVD to MP4 on Mac, unless you distribute or share copyrighted content without permission.