


From Cheetah to High Sierra, Mojave is the most interesting operating system for Mac. But that doesn’t end up only for Mac. If you are well interested in it, you could hands on it right in your Windows computer. That’s might be a bit tricky but isn’t that difficult that you couldn’t since we’ve covered you with the step by step tutorial. Here’s how to Install macOS Mojave on VMware on Windows PC also here How to Fix This Virtual Machine Requires AVX2 But AVX is Not Present.
But not only it’s tricky, it’s also loaded with problems so this mightn’t go well for everyone. This makes it more tricky and difficult. From downloading the image to installating, there’s an entire army of problems to fight against. That means, from the earliest step to the bottom which is installing, there’s no lack of problems. Most of the problems can be likely due to Apple doesn’t support the process and VMware neither. After all, they are part of the installation which we need to fix.
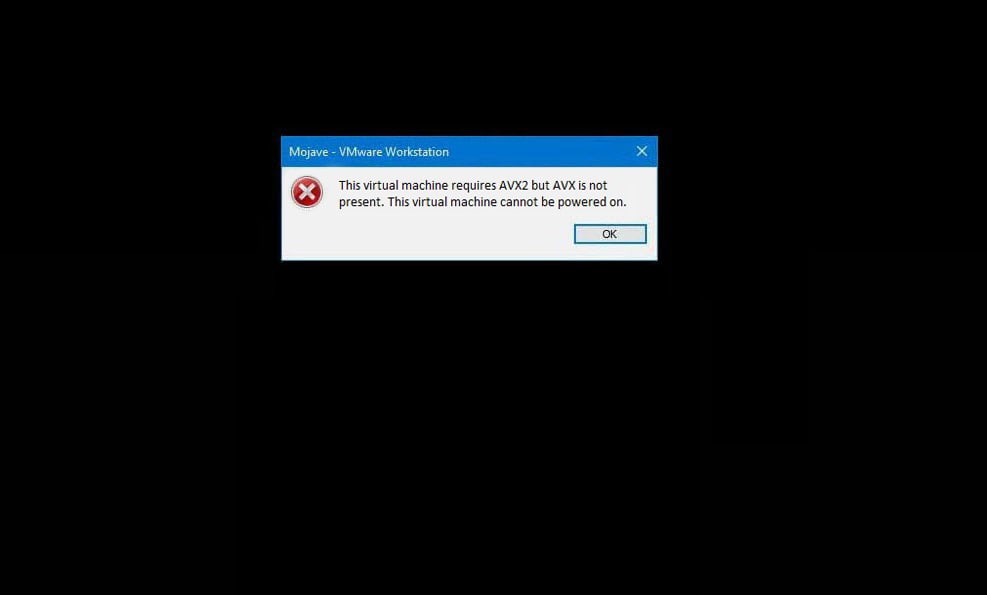
When it comes to installing macOS on your Windows computer, there’s a scenario. While every computer has processors, it’s whether Intel or AMD. Installing Mojave on VMware on computers with AMD processors are a little bit different from installing Mojave on VMware on computers with Intel processors. The difference is small but it matters. If you didn’t make the change, you would likely experience not only one but a couple of errors. But among those, one of the problems that occur for most of the users is “This virtual machine requires AVX2 but AVX is not present. This virtual machine cannot be powered on.” This method works to fix the error for installing any version of macOS on AMD systems.
While VMware points AVX2 and absence of AVX but that isn’t really the problem neither the solution if you enable it. If you’re concerned, AVX is the name of one of many x86 vector extensions from Intel and AVX2 is the new version of AVX. They can potentially improve application performance related to high-performance computing, databases, and video processing. There’s no need to know more. Let’s get started.
Table of Contents
Fix This Virtual Machine Requires AVX2 But AVX is Not Present
The difference between the processors differs for the installation. One of the differences between Intel and AMD CPUs is the hardware acceleration. On Intel CPUs, this feature is often disabled or even most of the time, it’s disabled by default. But you can enable the hardware acceleration from BIOS or UEFI Firmware.
On AMD CPUs, it’s always enabled by default so there’s no BIOS or UEFI. This tiny difference might cause the problem but that’s not only reason since there’s a whole CPU difference. There’s also a difference in error. This error particularly appears when attempting to install Mojave on a computer with AMD processor. While on Intel processors, if the hardware acceleration isn’t enabled, you’ll see like “This virtual machine supports VT-x but it isn’t on” or something similar to it which indicates of the hardware acceleration isn’t enabled.
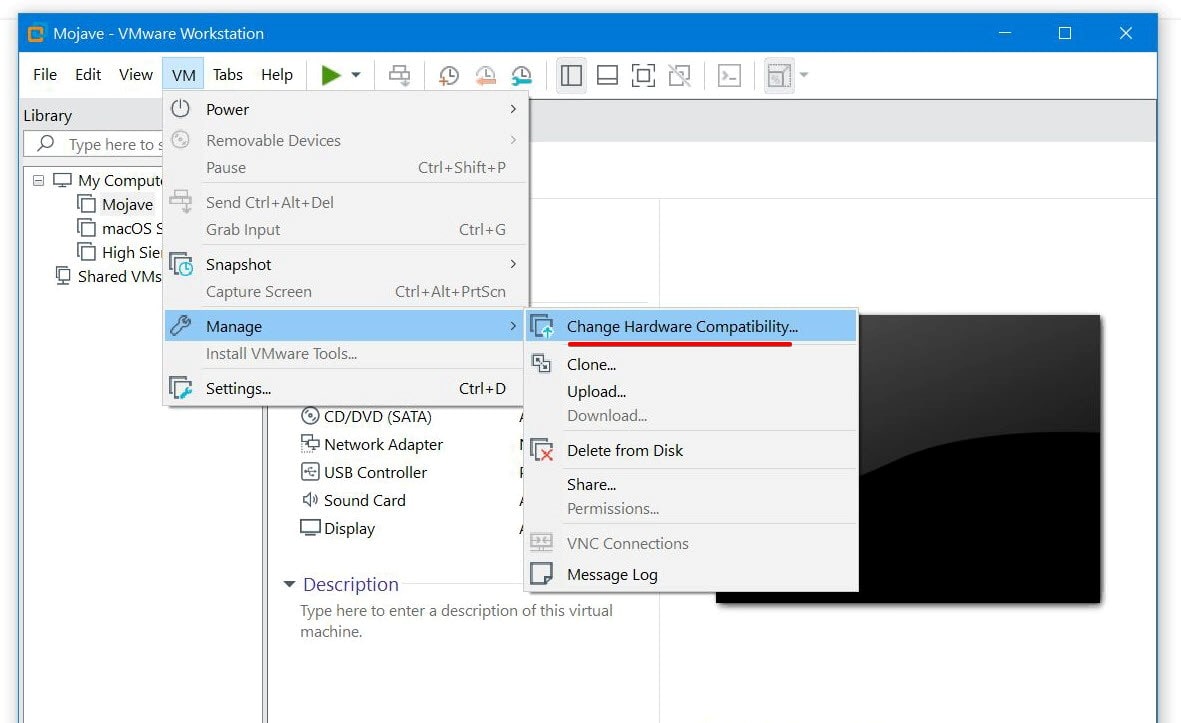
Step One: Change Workstation / Player compatibility version to 10.x
When you’ve set up the Mojave virtual machine, now for some reasons you may need to change the compatibility version of VMware to 10.x.
From the VMware window, select Mojave and click VM > Manage then click Change Hardware Compatibility.

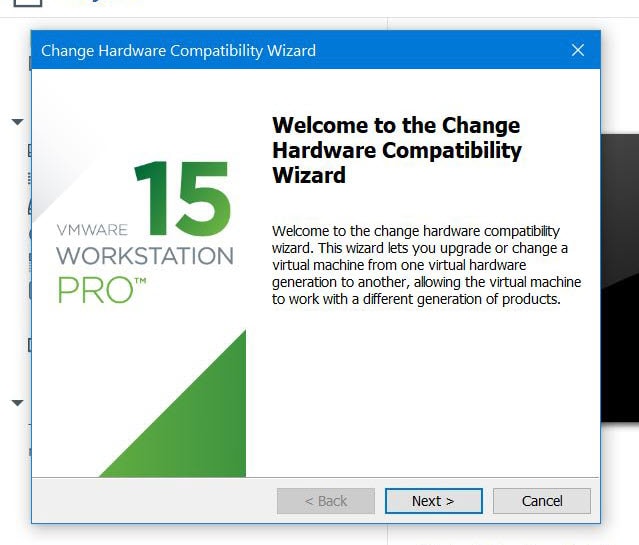
On the change hardware compatibility wizard, click on Next.

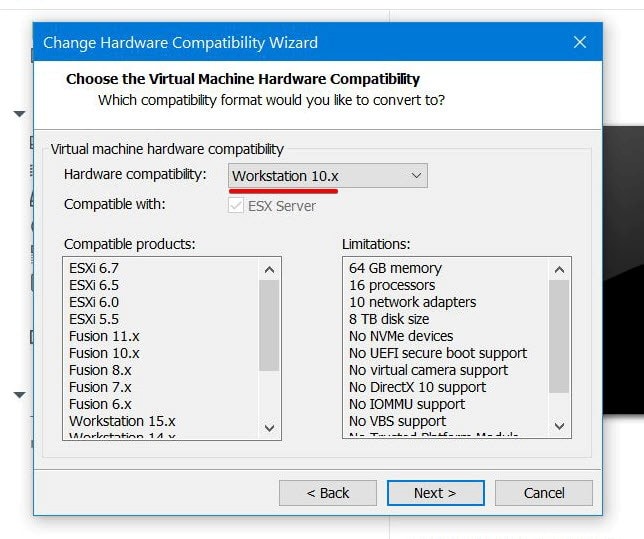
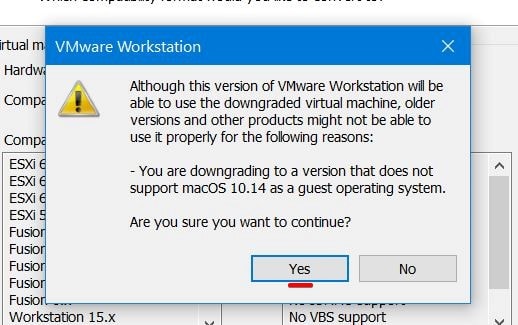
Next, click on the Workstation 15.x then choose the Workstation 10.x version from the drop-down menu, and click Next.

Confirm to use the version of the VMware Workstation for the virtual machine by clicking Yes.

In this screen, you can choose to create a copy of the virtual machine without the changes and if something goes wrong you’ll be able to revert back and use the clone of the virtual machine. The second option will apply the hardware configuration to the virtual machine without copy to let you revert back. Choose one of them and click Next.

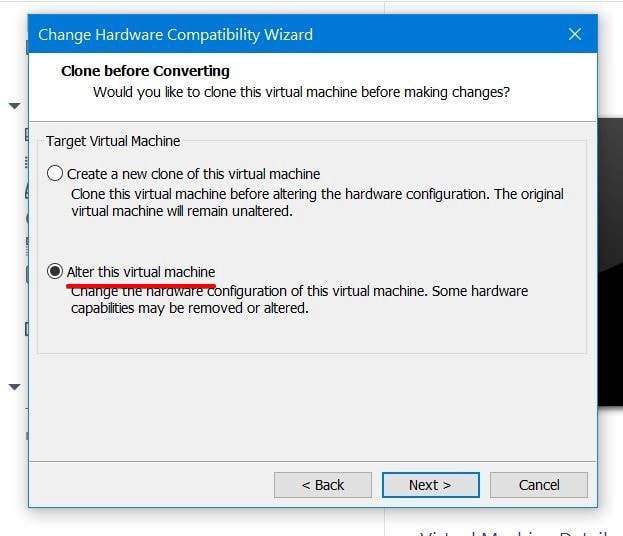
On the next screen, if you choose the clone option you’d see the specify the virtual machine window. But if you choose the alter this virtual machine then click Next.

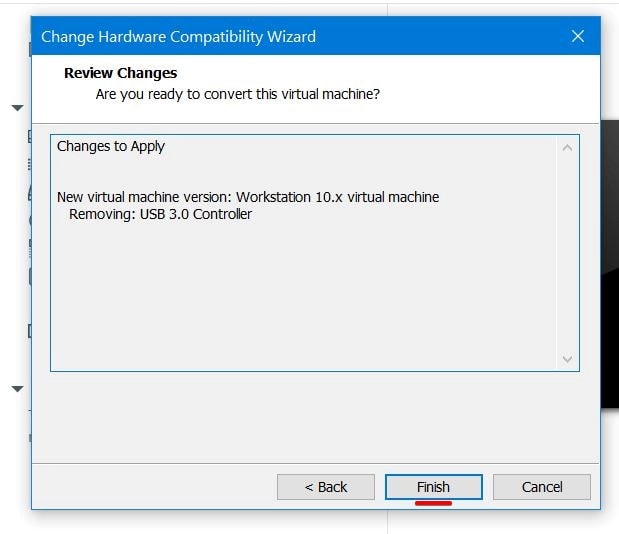
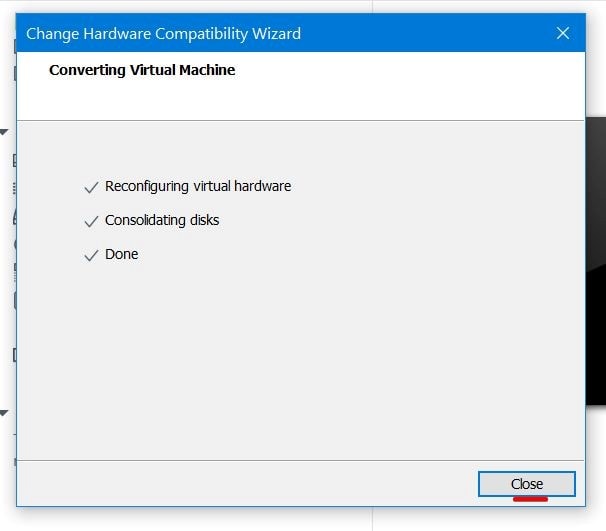
With the converting done, you’re good to go.

Step Two: Insert Config Key For The Virtual Machine (For AMD Only)
The next thing that you need to do for succeeding with the installation is inserting the config key for the virtual machine in the virtual machine configuration file. This is a little different from inserting config key for Intel systems but it’s not differently done. There are some more codes to add in addition to a single line code which is for Intel systems.
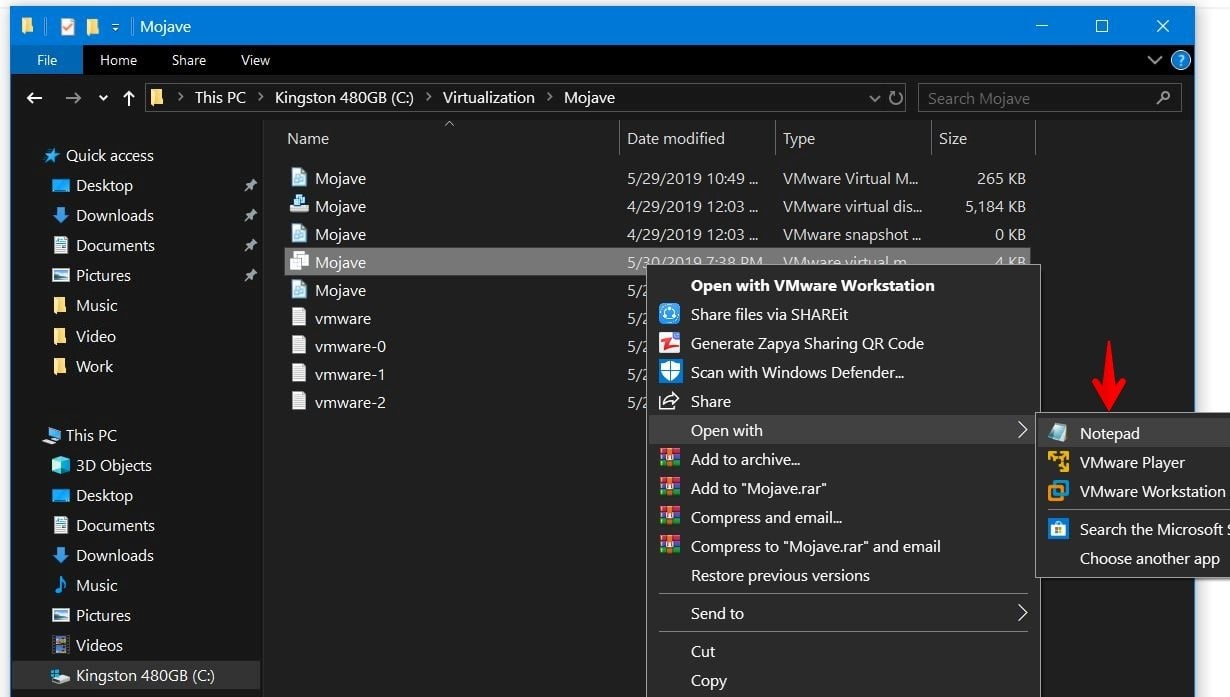
In order to fix, navigate to the virtual machine files and right click on the vmx file and click Notepad. If the Notepad isn’t there, go ahead and click on the Choose another app then select the Notepad.

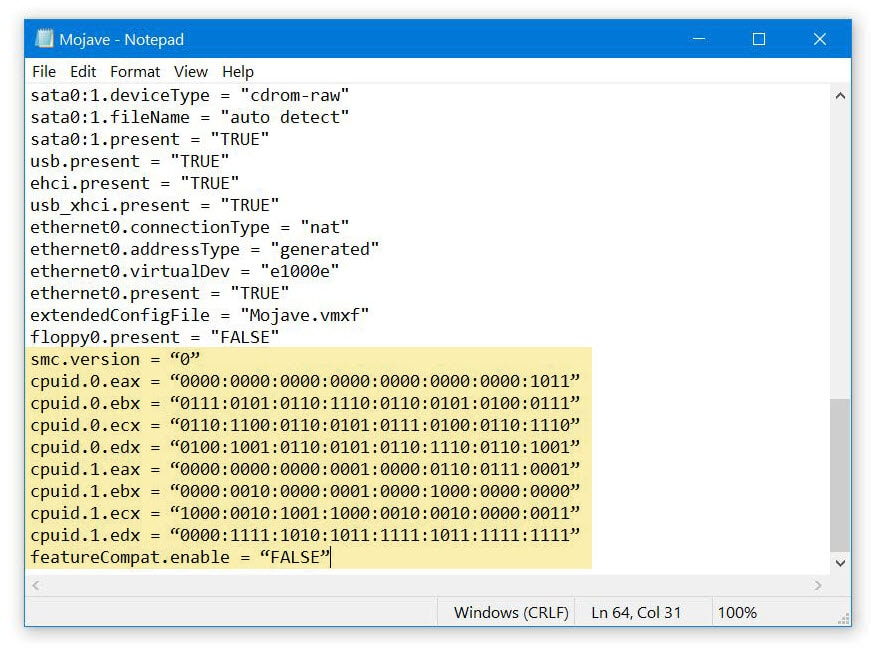
Now copy and paste the following lines to the bottom of the lines. If you’ve encounter VM Will fail to boot with a “Dictionary Compatibility” problem, you may fix it with this.
 smc.version = “0”

cpuid.0.eax = “0000:0000:0000:0000:0000:0000:0000:1011”

cpuid.0.ebx = “0111:0101:0110:1110:0110:0101:0100:0111”

cpuid.0.ecx = “0110:1100:0110:0101:0111:0100:0110:1110”

cpuid.0.edx = “0100:1001:0110:0101:0110:1110:0110:1001”

cpuid.1.eax = “0000:0000:0000:0001:0000:0110:0111:0001”

cpuid.1.ebx = “0000:0010:0000:0001:0000:1000:0000:0000”

cpuid.1.ecx = “1000:0010:1001:1000:0010:0010:0000:0011”

cpuid.1.edx = “0000:1111:1010:1011:1111:1011:1111:1111”

featureCompat.enable = “FALSE”

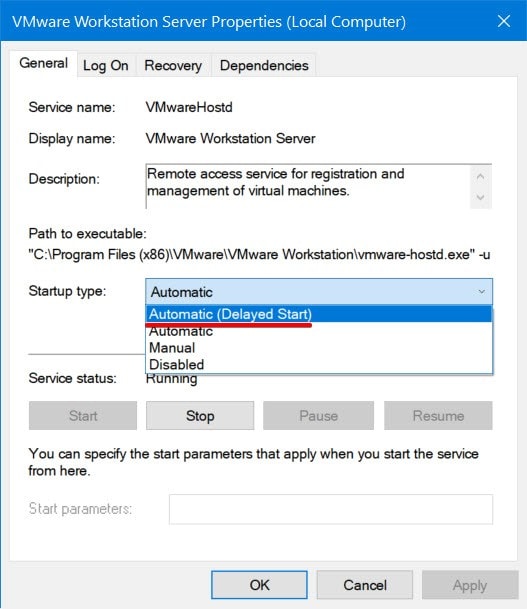
Step Three: Set VMware Workstation Server to Automatic – Delayed
Now that you’re done with those, the last thing you need to do is set the Workstation Server service to Automatic – Delayed.
Make sure your VMware Workstation Server is set to Automatic – Delayed, while the rest of the VMware services are set to just automatic.
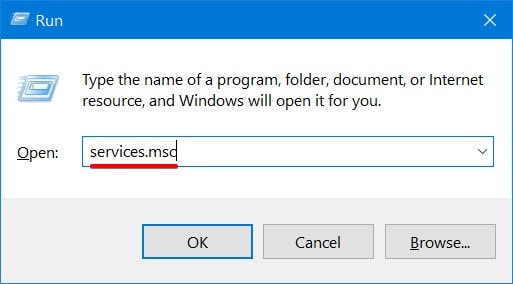
To set this feature, open Run by pressing Ctrl + R and type services.msc then hit Enter.

Now scroll down and figure out the VMware Workstation Server and click twice on it.

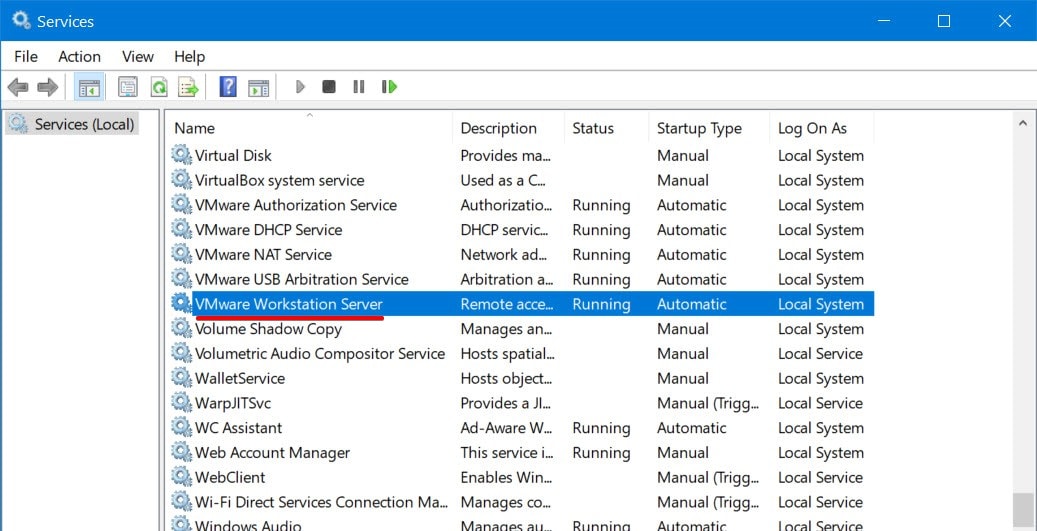
In this screen, click the startup options and select Automatic (Delayed Start).

Once you’ve done, you’re completely ready to begin the installation. Switch on the Mojave machine and you’ll straightly boot into the installation process. Here’s the tutorial to continue the installation.
- Install macOS Mojave on VMware on Windows PC
After the installation, you may set the Workstation Server to Automatic.


With that done, you’re out of the way. There’s nothing more you’d need. Just proceed with the installation and enjoy! Hope that helps, let me know in the comments down below.