


The macOS Catalina is certainly the most compelling operating system for Mac. This macOS was made available dramatically on the most inspiring event for Apple product lovers at WWDC (Apple Worldwide Developers Conference) 2019. Where everyone is so excited to hear about this wonderful macOS and many more products and software updates. In this post, I’ll show How to Dual Boot macOS Catalina & Windows 10 on PC.
While anyone with a Mac supported by macOS Catalina can install macOS Catalina. And even those who have unsupported old Mac can also install macOS Catalina on unsupported Mac. But also Windows users can install macOS Catalina on Windows in three different ways. First of those is install macOS Catalina on VMware, then install macOS Catalina on VirtualBox. And one more is to install macOS Catalina on PC. These are the possible ways to install macOS Catalina on PC what everyone assumes. But still, there is some lack.
The lack is performance. In virtual machines, users can enjoy macOS but it won’t perform well. In addition, you can’t also use it with much high performance even though you have assigned high resources. The problem is, you can’t assign everything to the virtual machine and leave your PC without any. This is the problem with macOS Catalina on a virtual machine which includes VMware & VirtualBox and any other virtual machine.
On the next option, we’ve the install, macOS Catalina, on PC. While we’ve shown how to create macOS Catalina USB installer for Hackintosh and also create macOS Catalina Installer via Transmac for Hackintosh. But yet we haven’t done install macOS Catalina on PC. There’s no reason behind and we’ll do it soon. But the problem is, when you install macOS Catalina on PC, you’d need to remove Windows and primarily install and use macOS Catalina.
As a beginner or a Windows user, even though you might really install macOS Catalina but you can’t rely on. As a typical Windows user, since you’re pretty new to macOS, you’d really be in problem and can’t do everything you’d do on Windows. This includes everything, from changing a wallpaper to the most complex task.
In between these two options, there a quite useful and effective option out there which is Dual Boot. We’ll first explain and talk about Dual Boot first and then head to the installation steps. While most might know what’s dual boot but we’ll explain in down in a few words.
Beside macOS, Dual-booting is also much popular. From the first macOS that most users want to use macOS and Windows in a single device. But at the same time users didn’t had this opportunity and specifically didn’t knew about it. In this post, I’ll show How to Dual Boot macOS Catalina & Windows 10 on PC. You’ll learn what is Dual Boot, how can you Dual Boot Windows 10 and macOS Catalina, what is need to Dual Boot and a few more hacks to Dual Boot macOS Catalina and Windows 10 successfully.
Table of Contents
What is a Dual Boot?
Dual Booting is the process of loading OS beside another. With the help of Dual Boot, you can install two or even more operating systems in a single computer. In almost all the computers and beside every operating system we can Dual Boot another operating system and you can definitely change, delete or update it. When your CPU version updates, the Dual Boot feature also updates. Dual Boot provides you 100% efficiency and performance rather than VMware and Virtualbox.
Why do users like to use Dual boot Instead of VMware & VirtualBox?
Dual Boot is quite familiar for everyone but with VirtualBox also users can have more than one operating system, test any operating system and can do the same thing as a Dual Boot does, so why Dual Boot is useful. Continue reading to know about it.
If you have installed an operating system with the help of VirtualBox & VMware your operating system won’t be able to do a few things like you won’t be able to make a 3D animation, you won’t be able to use heavy programs like Adobe Premiere or Adobe Premiere After-Effects and a few more programs but if you have installed an operating system with a Dual Boot you will be able to do all of them.
Virtualbox & VMware can do the same thing as a Dual Boot but with lower quality. When you are using Dual Boot, it is beside your actual machine. But using VMware or Virtualbox isn’t the same as dual-boot because it doesn’t provide as quality results as the dual Boot provides more than that.
- Install macOS Catalina on VMware on Windows PC [New Method]
- Install macOS Catalina on VirtualBox on Windows PC [New Method]
How to Dual Boot macOS Catalina & Windows 10 on PC
Dual boot is more useful because, with dual boot, you will be able to experience all the features of macOS Catalina. And even with a high performance. But since Virtualbox and VMware are inside your Windows and it divides the same resources between two operating systems which in result lowers the performance of both the OS. Particularly it’s like shared hosting those who know about hosting.
The use the Dual Boot in place of Virtualbox and VMware is pretty awesome. With VirtualBox, you can install a new operating system without removing the actual operating system. But Virtualbox and VMware divides one Hard Disk to partitions and it can’t provide the complete freedom of use and the new operating system will also work slow.
Now you can’t replace Windows or uninstall it not only for a day but what you can and would like to do is install another operating system beside it which is dual boot. To use both these operating systems in one PC is the dream of any user. To make your dream come true you need to follow these steps.
What You’ll Need
Before we start the installation process, you need the following thing. One more thing you need to know that this process will erase all the materials from your computer. You’ll also need to disconnect extra Hard drives for a smooth process.
- macOS Catalina Bootable Flash Drive – The first and most important step is to create a macOS Catalina USB installer. For this part, we’ve made the tutorial separately with the files included. Here’s how to create a working macOS Catalina bootable USB installer.
Create macOS Catalina Bootable Installer
Catch this step first and foremost and when you’ve done that, head to the installation.
Step One – Configure BIOS Settings
After you’ve accomplished with the first step, you’ll now need to set up the settings for booting macOS Catalina.
Once you’ve created the Bootable USB, disconnect the USB and restart your PC.
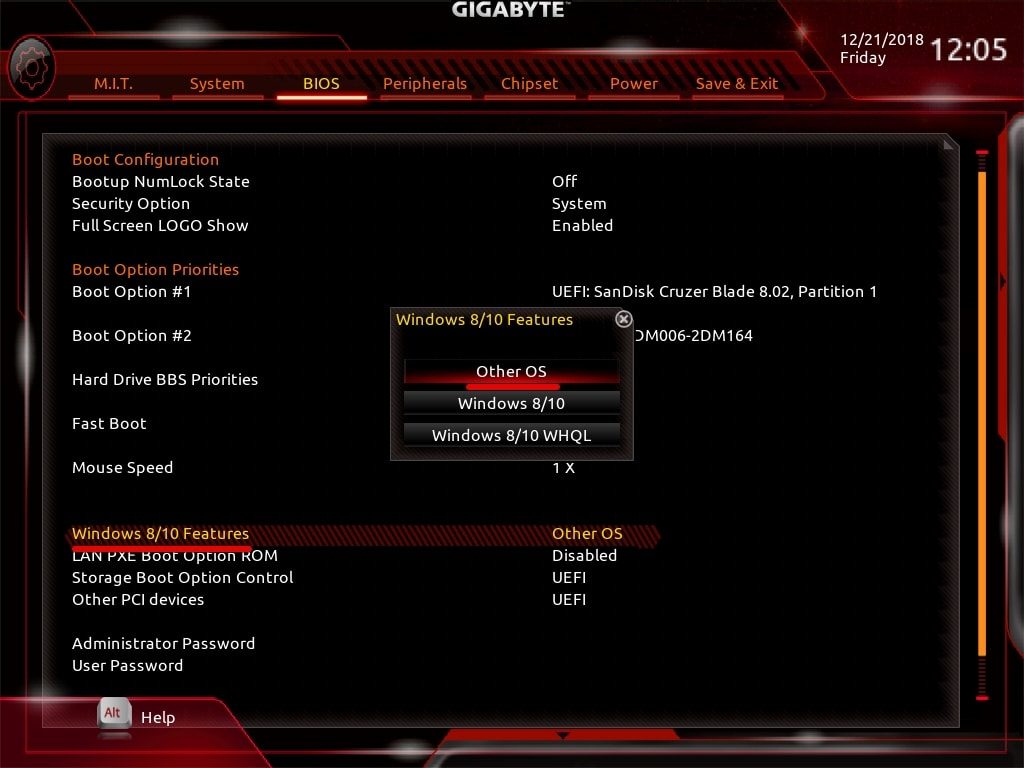
When restarting, press the Delete or F2 or BIOS button. Once you’re in, navigate to the BIOS features and head to the Windows 10 Features and change it to Other OS. These settings might be somehow changed in some other motherboards but in most of them, it is the same.

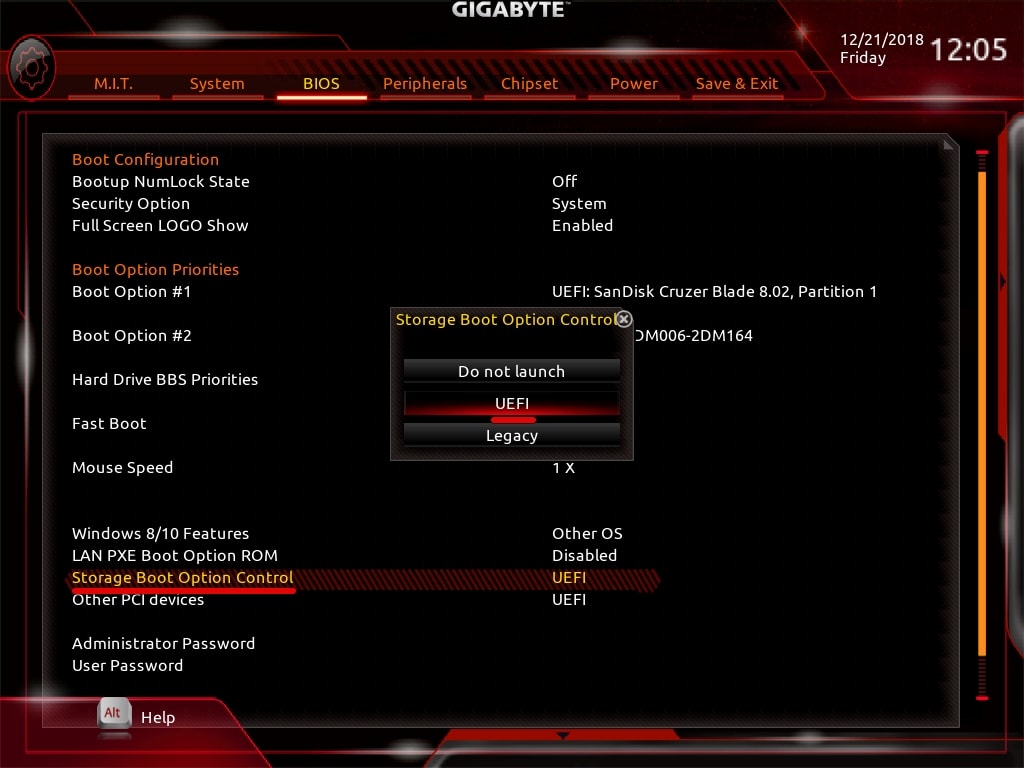
In the Storage Boot Option Control, hit Enter to open the panel. Then select UEFI.

In Other PCI Device ROM Priority, select UEFI Opere ROM. After selecting all the option check them according to us and then press the F10 buttons to save these settings and exit you from this part.
Once that’s done, press the F10 button which will ask does you want to exit, press Yes.
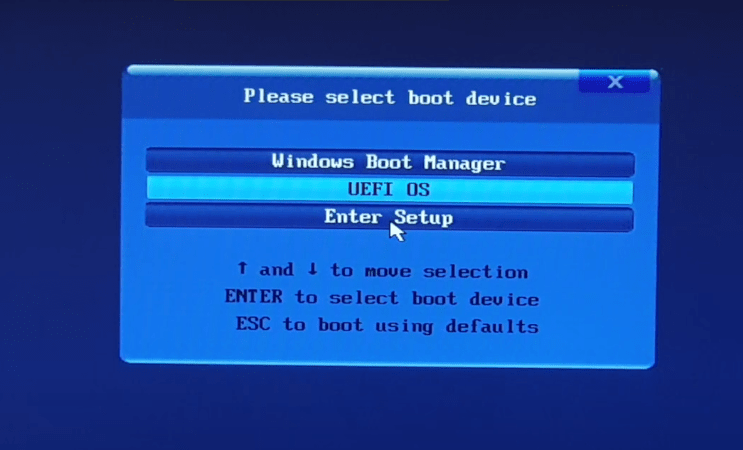
When you are out of those settings, keep pressing the F12 button and it will take you to the Boot Device Menu. And the Boot Device Selection option will appear where you have to choose UEFI OS. Which will boot your computer from the Flash Drive.

After choosing UEFI OS a new page will open. First of all, on this page, we are going to do the settings. For doing that you need to take your mouse on the setting Singh and under the new setting sign an option will appear, click on that.


After clicking on the Options button Click enter and there I am going to delete all the files there because I have a backup of them but if you don’t want to delete your files you can skip this part. After that just type this in the Boot Argument: -v GraphicsEnabler=Yes and click Enter.

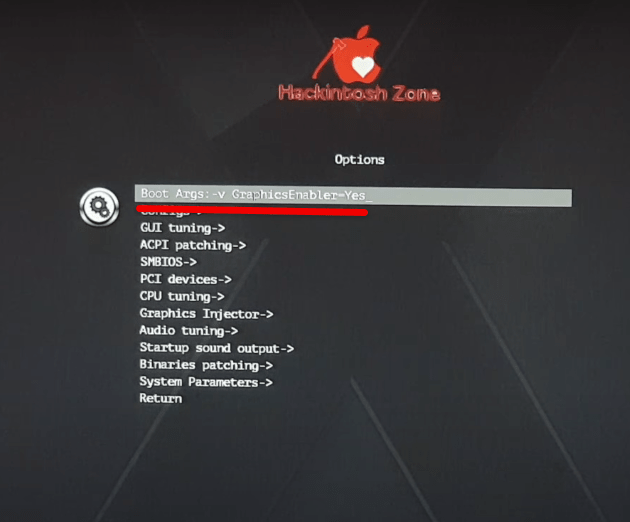
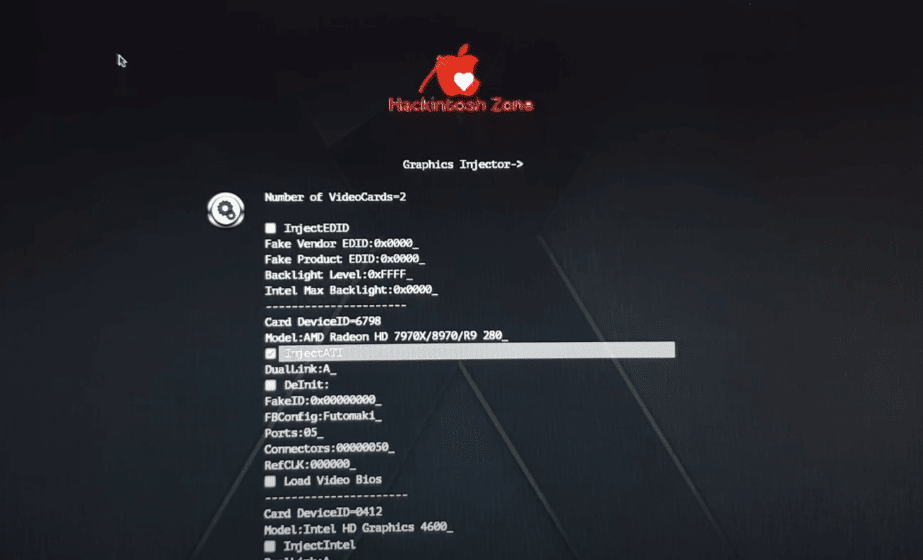
Go to Graphics Injector and press the Spacebar on Inject ATI and AMD Graphic card. As I’m using ATI Graphics Card but if you are using any other Graphic Card select that.

Scroll down and at the bottom hit Enter twice on the Return button.

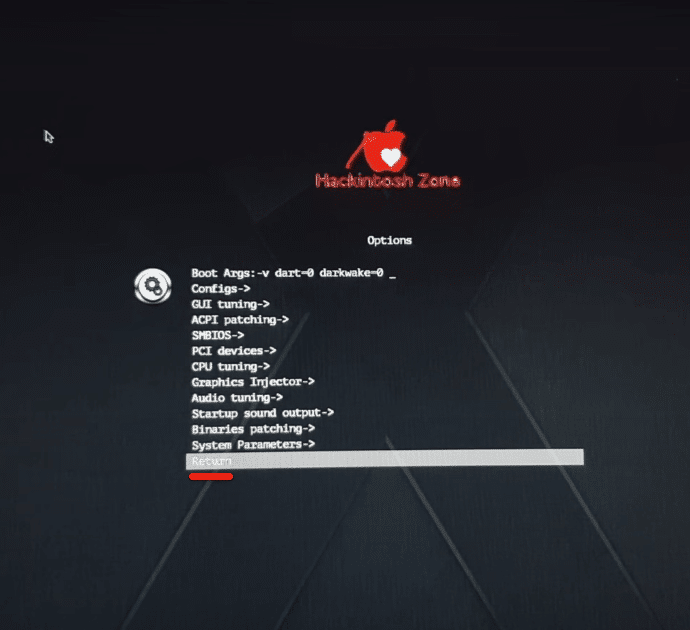
After entering two times it will take you to the first window. Go to the first option and press spacebar and select the first option which says Boot MacOS with a selected option. But if you are using a Nivida graphic card choose the Use Nivida web drivers option and press spacebar.

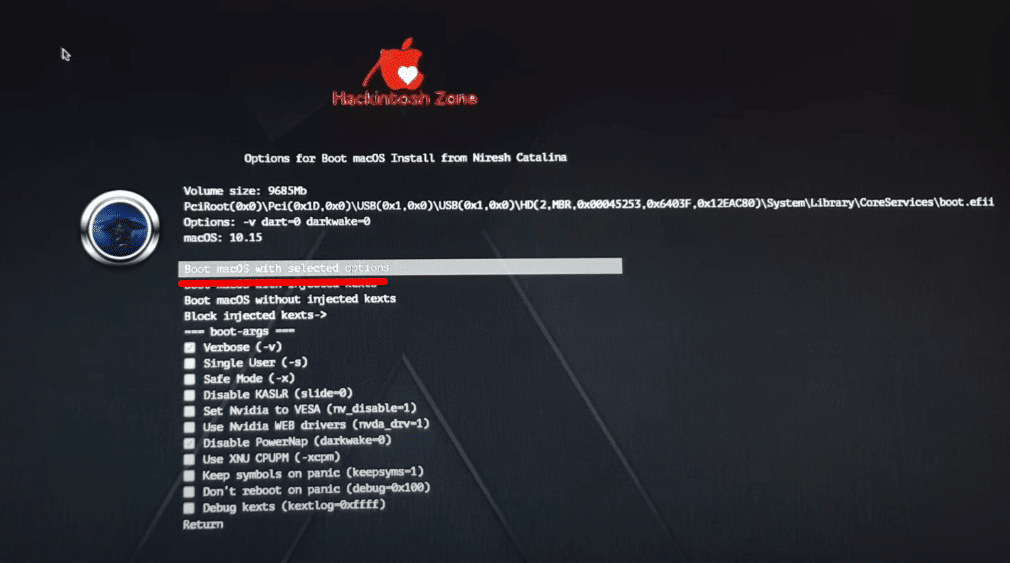
When the exit pop up appears, hit Yes. This will boot you into the macOS Catalina installation.
Step Two – Boot macOS Catalina in PC
That was the last step for setting up the BIOS settings, now wait for a while until the process is done.
After that is done the installer window will pop up and you need to go to Utilities and Click Disk Utility.

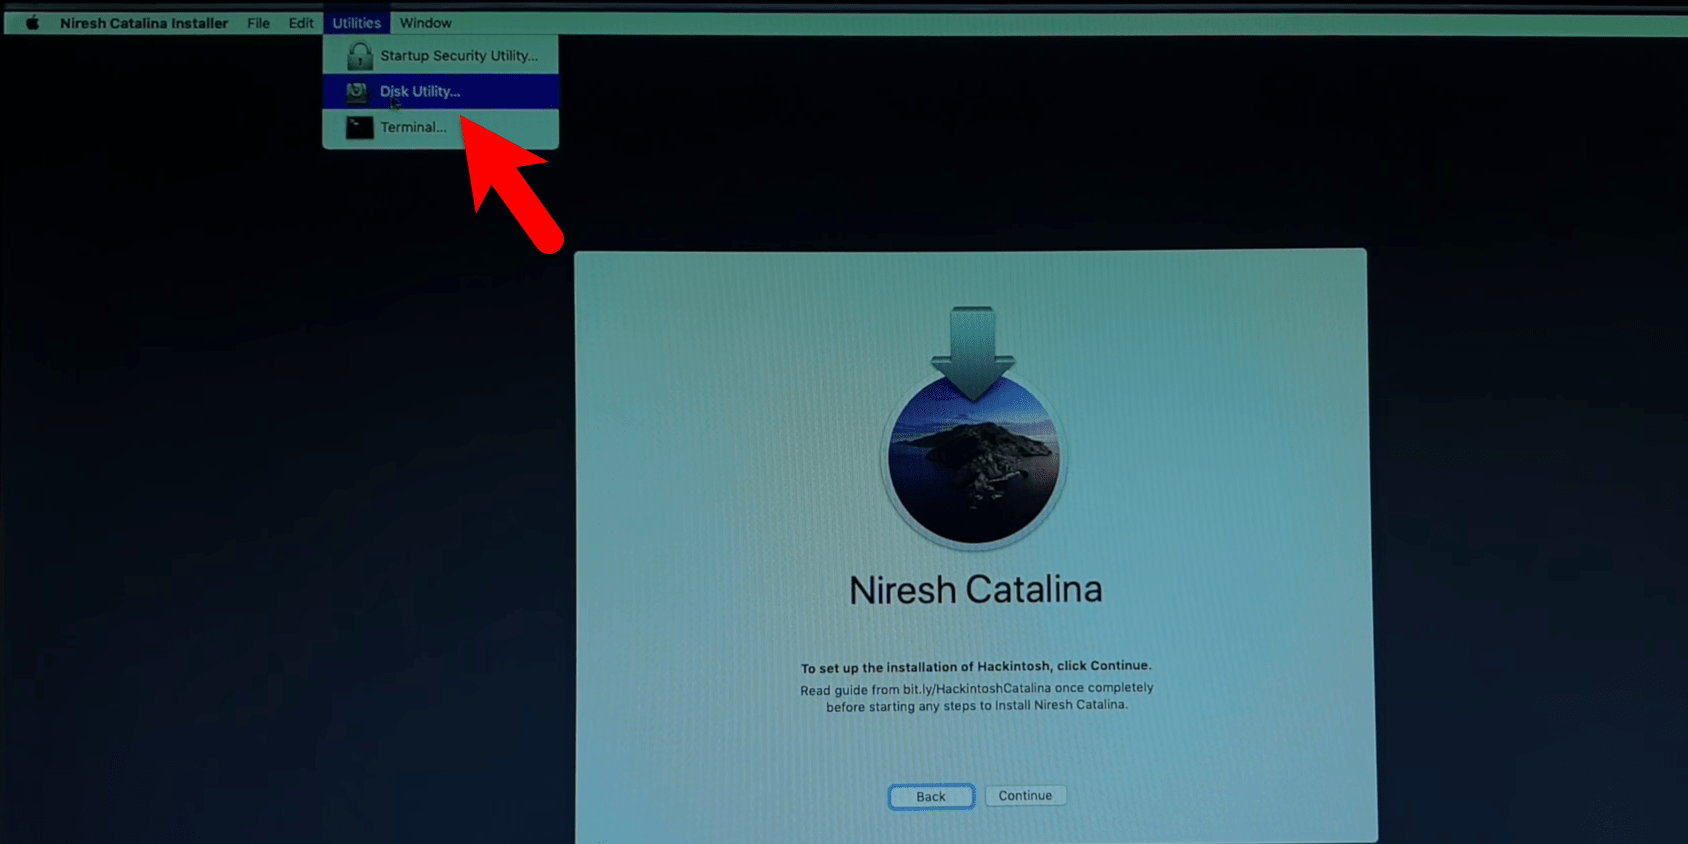
After the Disk utility appeared, open and click on this icon and click show all devices icon.

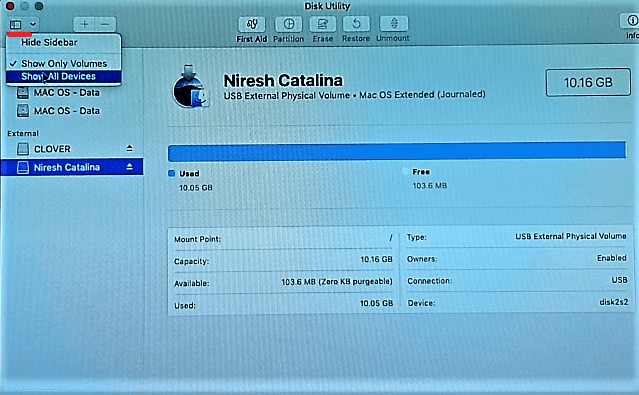
Your Hard drives will appear so choose the main hard drive. Click on the partition icon and click on the partition option.

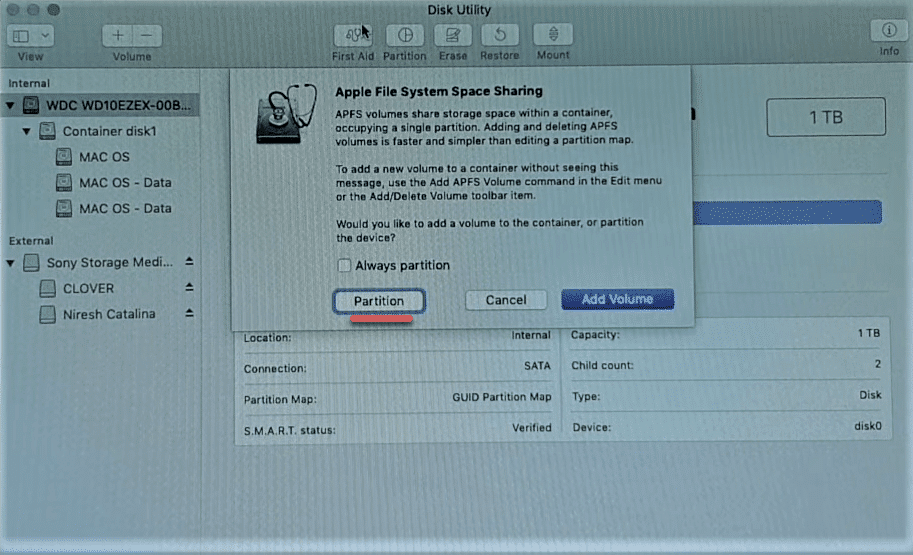
A new window will open, where the diagram of your entire hard drive space will be shown. You can divide as you want but I’ll click on the (+) option to divide the space equally.

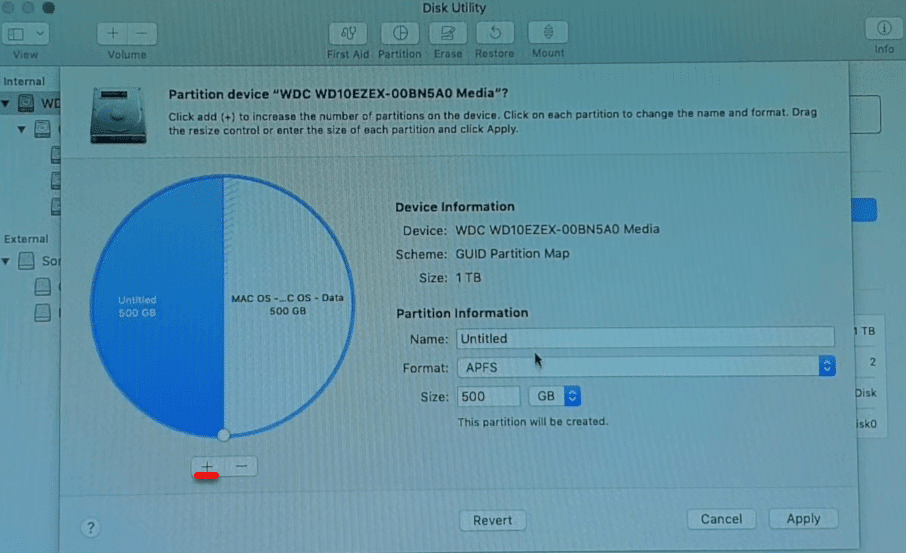
While you are dividing the Hard Drive space you may notice that the sides of the divided Hard Drive space don’t have names. Click on the sides by the step and set a name for the partition. You can name your partition anything. Choose the format of your partition, choose MS-DOS (FAT).

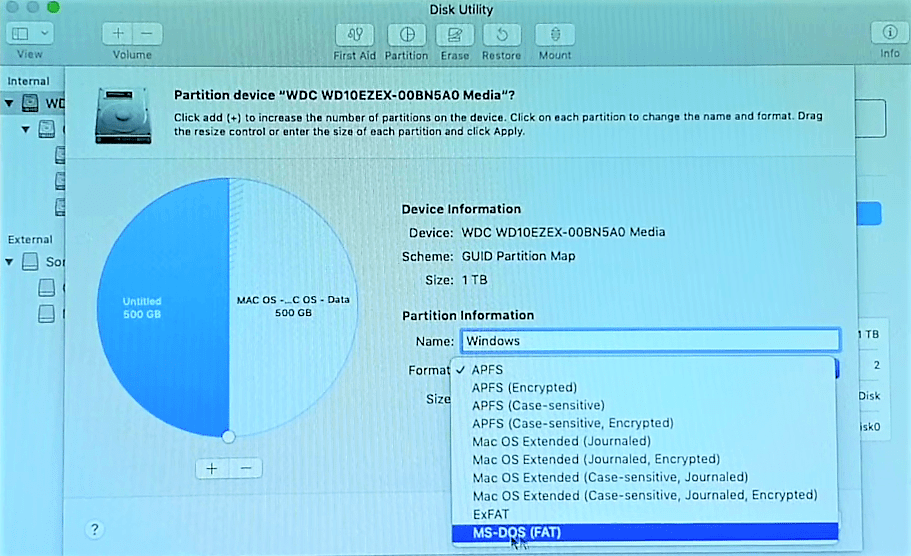
For the second step also set a name and choose the format macOS Extended Journaled.

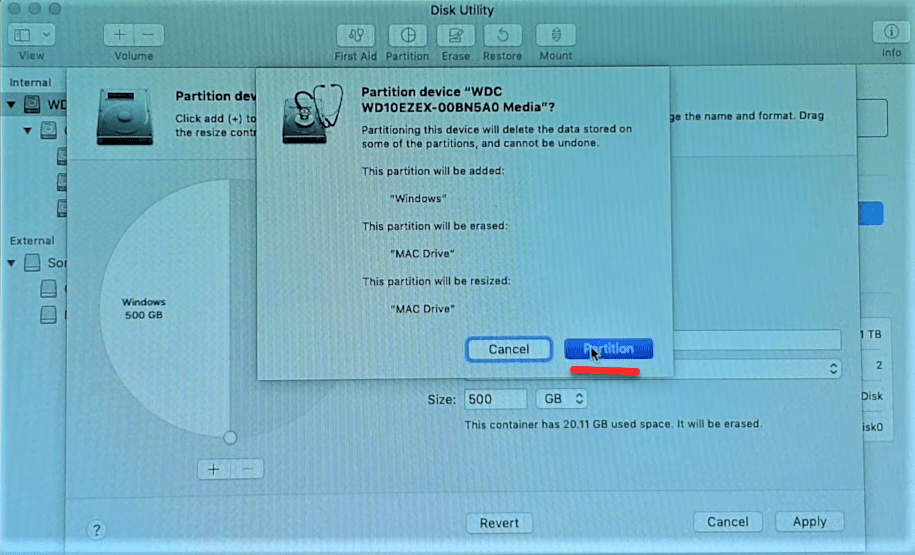
Click on Apply and then click on Partition and the process will start.
After the partitioning is done you can see the names of your positioned hard drive which will show as the first letter of the word that you have chosen. Now you can start the setup process of Catalina. Press Continue in the first window.

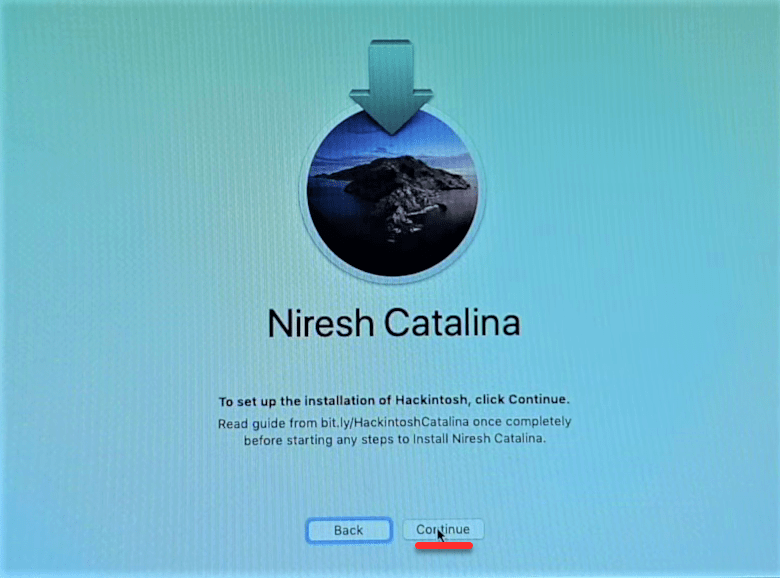
You can read the terms or you can just click continue again and press Agree to that notice which is asking you if you have read the terms or not.
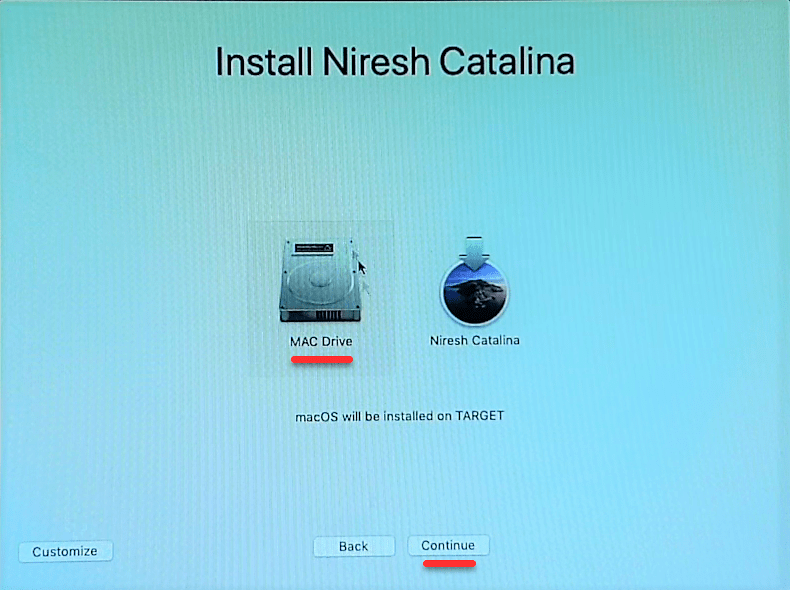
Click on your Mac Drive and press the continue button And the installation process has installed.

Step Three – Dual Boot macOS Catalina & Windows on PC
After installing is done, the computer will reboot. You need to press F12 to open the Boot selection. Click on the Bootable USB installer which in my case is Sony Storage Media.
When that’s done, you will be directed to another window where you need to head to boot options. For this, click on the Options button.

And open the Graphic Injector from there checks to inject ATI.

After that click on Return.
There click Boot macOS Install From Mac Drive. This will boot macOS Catalina into the installation process.

After the booting process finished you see the Apple logo loading. When finished, it will reboot. When restarting press F12 and repeat the process again until you see the setup page of macOS Catalina.

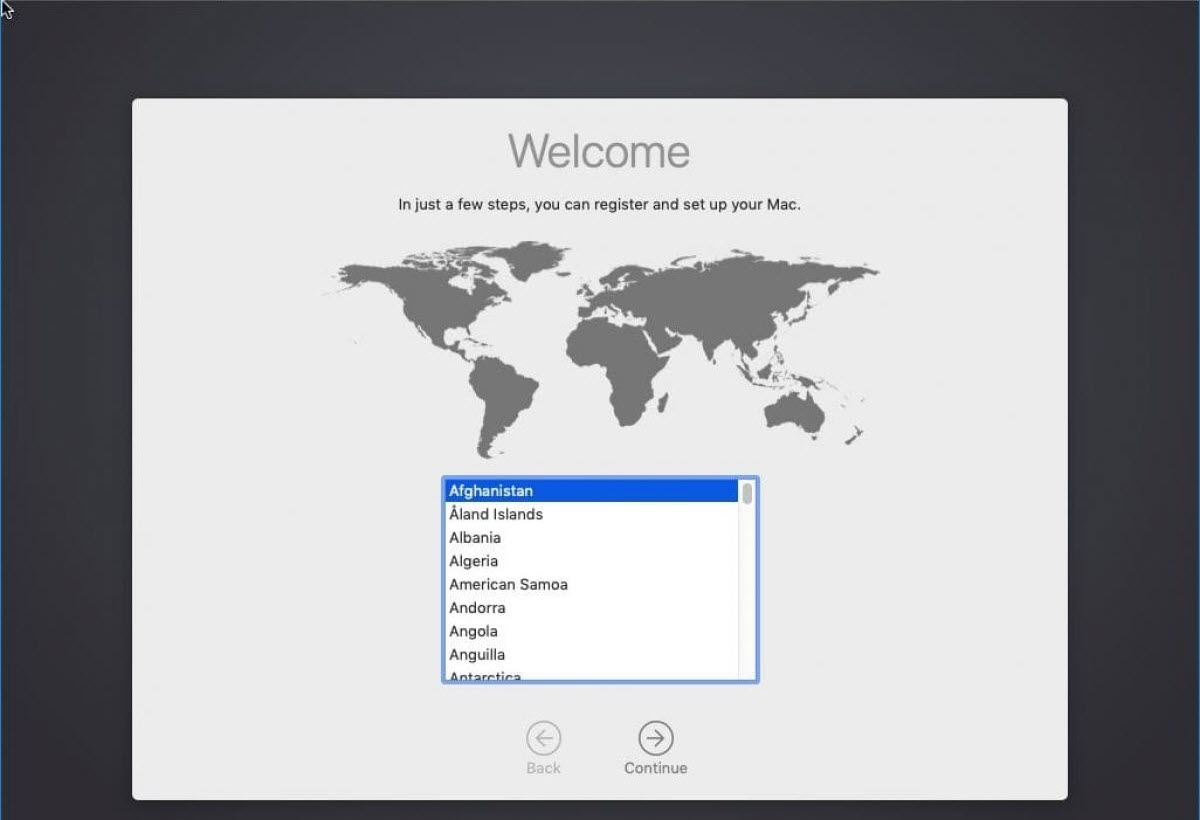
And that has come to the easy and enjoyable point. From this point, choose the appropriate things and create your account and customize whatever you’d like to and at the end, the macOS Catalina should be installed.
Step Four – Install Multibeast
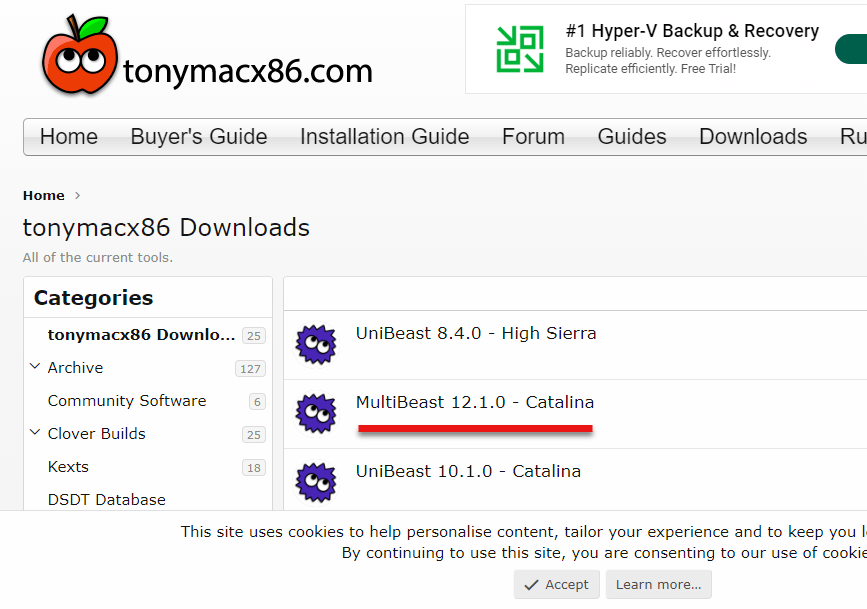
After the set up is done, like Windows, you need to install drivers to have everything work and enjoy. The drivers here doesn’t install by default so here’s how to install drivers, bootloaders and other required files in macOS Catalina. You need to download and install MultiBeast that installs macOS drivers. If you don’t have an account you can create one there but for now, you need to download MutiBeast.

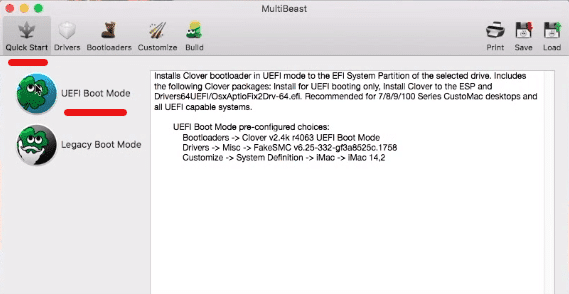
After it is downloaded, open it in your Mac and select Quick Start > from there chose UEFI boot according to your motherboard whether it supports UEFI or Legacy. If you don’t know which one is it, for most its UEFI.

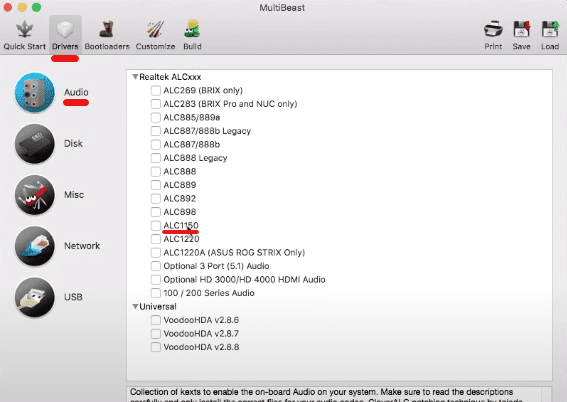
Go to Drivers > Audio and from there choose Realtek ALC 1150.

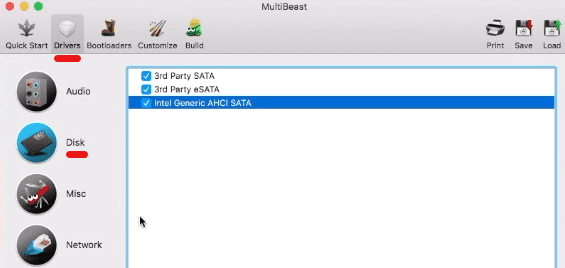
From Drivers > Disks and from there Choose all of the third parties SATA.

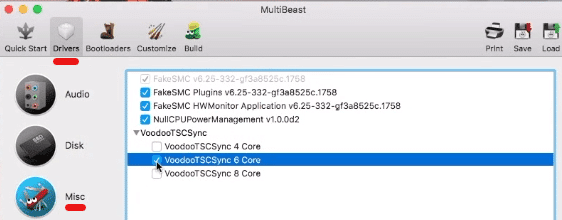
From Mac > select all the options. And click on VoodooTSCSync > From there click on the second option.

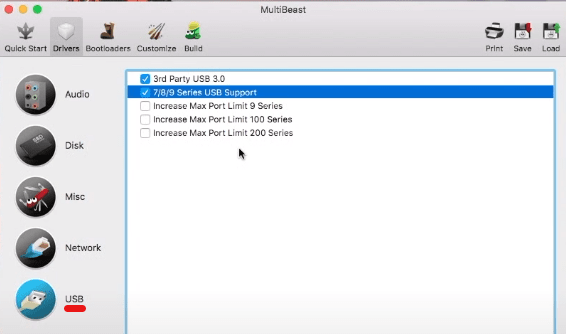
From USB select the first and second options but do not mess with other options.

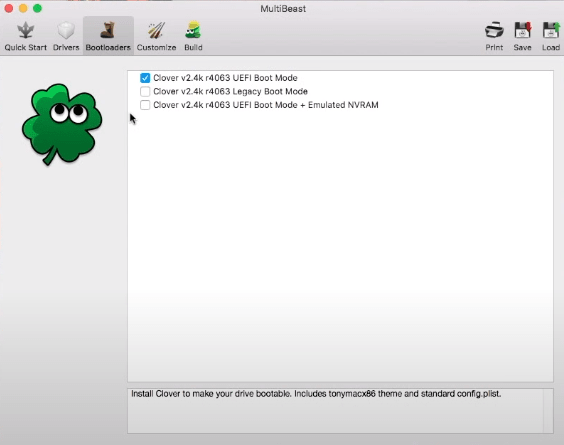
From the Bootloaders tab, select the first option which is the most suitable for your computer.

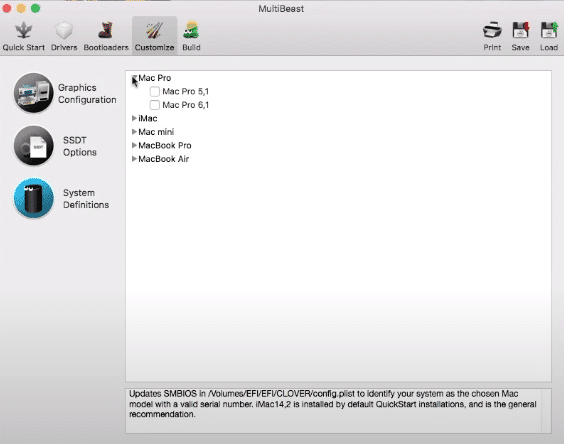
Go to Customize and don’t mark the first two categories. Go to the third one and choose according to versions of your computer.

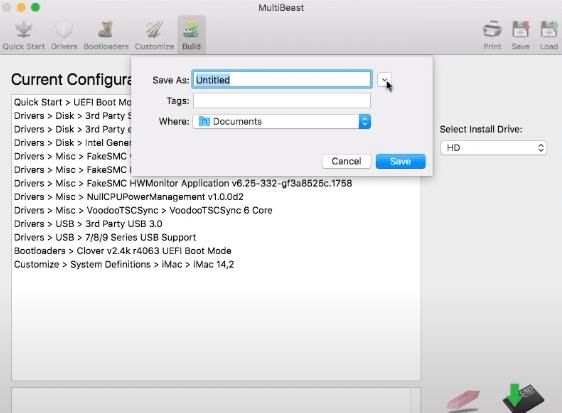
Go to Build, first save the setup, and then click on the Install option.

Agree to the terms and enter your password.

After the installation is completed all the text files and the drivers will be installed to your Mac.

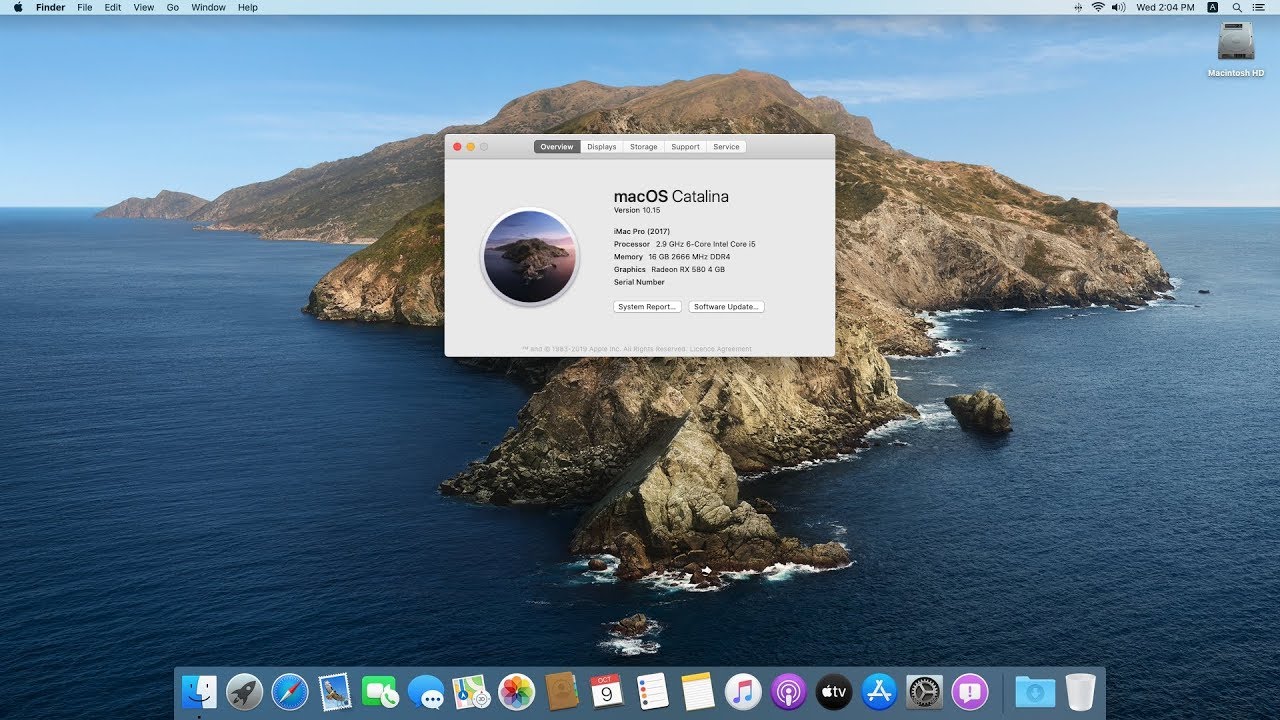
The installation is now perfectly done. This is similar to installing macOS Catalina on PC which removes the Windows and instead installs macOS Catalina in place of Windows. The only downside of this installation and also installing on PC is that when a update comes, and you update, it might likely break up things. If you don’t, there should be no changes and everything should work pretty fine.
Most users find this difficult and to be honest, it’s a little difficult and might be very difficult for some. However, we’ve break it down within the steps so it shouldn’t really complicated.
That ends up the installation. If there’s some problem or would like to make some nice suggestions, we’re happy to hear