Monterey is the latest release of Apple’s macOS operating systems. If you are the one who is passionate about new things, then it is really a great move to test macOS Monterey out as many new features are introduced.
However, things become more challenging if you want to build a Monterey Hackintosh or plan to install Monterey on an unsupported or crashed Mac as Apple does not provide an official solution to let users create bootable macOS USB installer on a Windows PC. Instead, we solely rely on third-party software to get it done.
No worries! It could be a super pleasant experience with the right software. In this dedicated post, we will tell you how to make a macOS Monterey bootable USB on a Windows PC.
Table of Contents
Exciting New Features in macOS Monterey
There are a couple of amazing new features in macOS Monterey that we can’t wait to try it out. Some of the ones we like most are:
SharePlay: Continue FaceTime conversation and do multiple other tasks at the time without disruption. It is one of the best ways to communicate with family members and friends on a Mac. You can also share computer screens with other users while on FaceTime calls.
Focus Mode: Turn off unnecessary notifications when you focus on something. You will only see specific notifications set by yourself. This will reduce noises when you are working on something.
Quick Note: You can now put anything in a Quick Note, such as links, tags, pictures and highlights.
AirPlay to Mac: Directly play or present content shared by another Apple device. This is great for a better viewing experience for content on a small-screen device like iPhone.
Shortcuts: Automatically complete tasks that require multiple steps. Save more time for the things you do regularly.
For a full list of macOS new features, you can check the macOS Monterey page on Apple’s website.
What You Should Prepare for
To create a macOS Monterey bootable USB on Windows, you need to prepare for three things:
Monterey DMG File: A macOS DMG file is a compressed and bootable disk image that contains all the necessary files to run macOS.It is an essential media to create a macOS USB installer on Windows PC.
Download link for macOS Monterey DMG file
USB Flash drive (at least 16GB): Usually, a macOS DMG file is larger than 10 GB. You have to get a USB drive larger than that.
SysGeeker UltraDMG: The software program to make a bootable macOS USB installer from the dmg file. Currently, this is the easiest solution to make Mac bootable USB. No command is involved and the user interface is self-explanatory. What’s more, it works perfectly on various Windows versions, including the latest Windows 11.
How to Create Mac Monterey Bootable USB from Windows
Once you have everything ready, and then follow the steps listed below to create a bootable USB installer for macOS Monterey on a Windows PC.
The first step is to make a full backup of your USB drive as it will be erased during the burning process.
Next, download SysGeeker UltraDMG from this link:
https://www.sysgeeker.com/dmg-burner.html
Once the installation is finished, open SysGeeker UltraDMG app from the desktop and you will see the following screenshot:
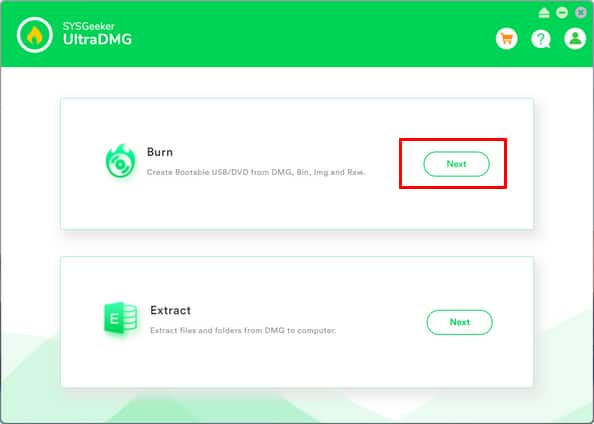
Now, insert a USB drive into the computer that is running UltraDMG software. And click the Next button on the right side of the Burn tab. This will be lead to a new window.
You need to configure two things in Burn Window. The first one is to import the macOS DMG file you downloaded earlier. The second one is to choose the USB drive you plugged into the computer. We recommend ejecting other USB devices to avoid full data loss for wrong device selection.
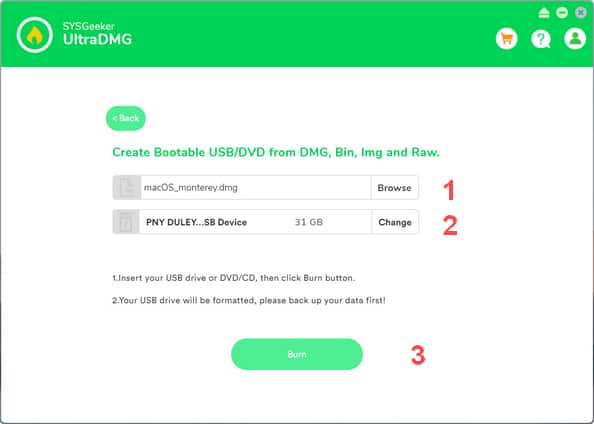
After the above settings, click the Burn icon at the bottom to format the USB drive and copy Monterey OS files to the USB drive. This will take about 5 minutes on a USB 3.0 flash drive. It would be slower for USB 2.0 devices.
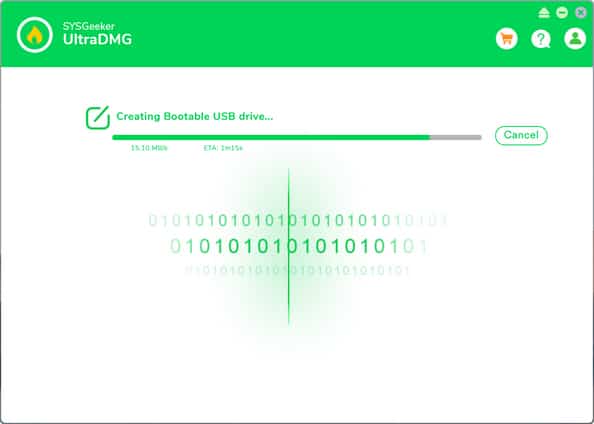
When the flashing process is done, the USB drive will be disconnected from the computer automatically.
Honestly, you won’t find any method better than this one if you really need to create macOS Monterey bootable USB on a Windows PC. The steps are clear and have no complex settings/operations.
Finally, you can use this bootable USB to upgrade or clean install macOS Monterey on a target PC or Mac.
Tip: To boot Mac from a USB drive, please hold the Option key for a few seconds during startup on an Intel Mac. This will open up Boot Manager Utility, where you can select a temporarily booting device this time. For Apple Silicon Mac, you need to shut down the computer and press the Power button for 1-2 minutes to launch Boot Manager.

