• About us
  • Contact us
  • Privacy Policy
GEEKrar
  • Home
  • Virtual Machines
    • VMware
    • VirtualBox
  • Mobile
    • Android
    • iOS
  • News
    • Windows (Microsoft)
    • iOS (Apple)
  • Discord
  • Windows
  • Mac
  • THE FORUM
No Result
View All Result
  • Home
  • Virtual Machines
    • VMware
    • VirtualBox
  • Mobile
    • Android
    • iOS
  • News
    • Windows (Microsoft)
    • iOS (Apple)
  • Discord
  • Windows
  • Mac
  • THE FORUM
No Result
View All Result
GEEKrar
No Result
View All Result
Home Windows

How to Create Bootable USB for Kali Linux on Windows

Ali by Ali
February 27, 2024
in Windows
0
How to Create Bootable USB for Kali Linux on Windows

How to Create Bootable USB for Kali Linux on Windows

58
VIEWS
Share on TwitterShare on Facebook

Kali Linux is a distribution of Linux family and which is mostly used by students, system administrators, network administrators, new and professional users. Linux is a family of open-source Unix operating systems that support newly developed operating systems. Kali Linux in use of professional users especially hackers but ordinary users can also make use of and learn quite many things. The Kali Linux has two interfaces for different users, that is graphical interface and command-line interface. Here’s how to Create Bootable USB for Kali Linux on Windows.

Just like its name, the graphical interface is more of graphical control like it’s similar to a typical desktop like Windows. Instead, the command line interface is only of commands where you can do everything via command which is perfect for professional users. These are only possible via Kali Linux installed. While there are various ways to install Kali Linux, we did install Kali Linux on VMware and VirtualBox. But for most, it doesn’t satisfy them and they want more of the actual experience than working on portable realistic Kali Linux on a virtual machine. In this case, the only way to adapt and use Kali Linux will be install Kali Linux on PC or Dual Boot Kali Linux with Windows 10.

  • Related: How to Install Kali Linux 2020 on Laptop PC

While you can install as many operating systems in a single computer as your computer’s resources are limited to, there’s no reason why you shouldn’t install another useful operating system as Kali Linux. Windows is amazing and has it’s own super useful features but that doesn’t mean Kali Linux doesn’t have. Like you can do most basic and also advanced things on Windows but when it comes to security and operation testing, Kali Linux is the hero.

Comes to why not have both when you can. Having both of these operating systems in a single computer is a dream of any user. You can definitely do it without placing your Windows out or making a change to your Windows. However, installing Kali Linux on PC will make you pretty happy when it will perform way better than installed on VMware or VirtualBox. But there might be a little hurdle as well but don’t worry we’re here to help. In this post, I’ll show how to Create Bootable USB for Kali Linux on Windows.

  • Related: How to Install Kali Linux on VMware or VirtualBox on Windows 10 PC

Table of Contents

    • Kali Linux 2020
    • What You’ll Need
  • How to Create Bootable USB for Kali Linux on Windows

Kali Linux 2020

If you are wondering of how Kali Linux is, how it will work, will I lose something or what’s required, Is it really helpful for you or not. All of these questions are answered within this post. Let’s head to how to Create Bootable USB for Kali Linux on Windows.

Kali Linux is an operating system like Windows macOS, Ubuntu, Linux Kernal, or any other operating system. Kali Linux is a widely-known operating system. With the help of Kali Linux, you can do many things in terms of security such as secure network or computer or server, discover and fix vulnerabilities, and more.

If you are thinking that someone might hack your system, network, or elsewhere, you can secure them with Kali Linux. The Kali Linux can be used for inappropriate purposes like hacking. In Kali Linux, you have various tools. And with them, you can do many things but if you want to hack something, it is illegal which we don’t recommend. This article is entirely for educational purposes and doesn’t support or promote illegal activities at all.

  • Related: How to Install Windows 10 on Mac with Boot Camp

There are many types of hackers, who use different tools for different purposes. The first group of hackers is known as White Hat hackers. This group of hackers hacks or works for useful and legal things. They use their expertise and tools for a useful purpose and they use Kali Linux but for beneficial things. Another group of hackers is known as Gray Hat hackers and Black Hat hackers. These two groups perform illegal jobs and use software like Kali Linux.  In this post, I’ll show how to Create Bootable USB for Kali Linux on Windows.

What You’ll Need

For the first and most essential part of the installation processes, you need a working bootable USB for Kali Linux. Without Kali Linux bootable USB, you can’t install Kali Linux with any chance. Here are what you’ll need for creating a successfully bootable USB.

  • An ISO File of Kali Linux – Goto the Kali Linus download window and select which version of Kali Linux you want to download and click on it.
  • A USB Pendrive with a minimum of 8GB storage.
  • Power ISO

Once that’s done, install the Power ISO and make sure it’s ready. If you are having any difficulty with making a bootable USB, another great tool is Rufus. Next, is how to Create a Bootable USB for Kali Linux on Windows.

How to Create Bootable USB for Kali Linux on Windows

Before we start, make sure you have the Kali Linux ISO with you. The ISO file for Kali Linux and Power ISO is the most important file of this process. We’ll move to how to Create Bootable USB for Kali Linux on Windows.

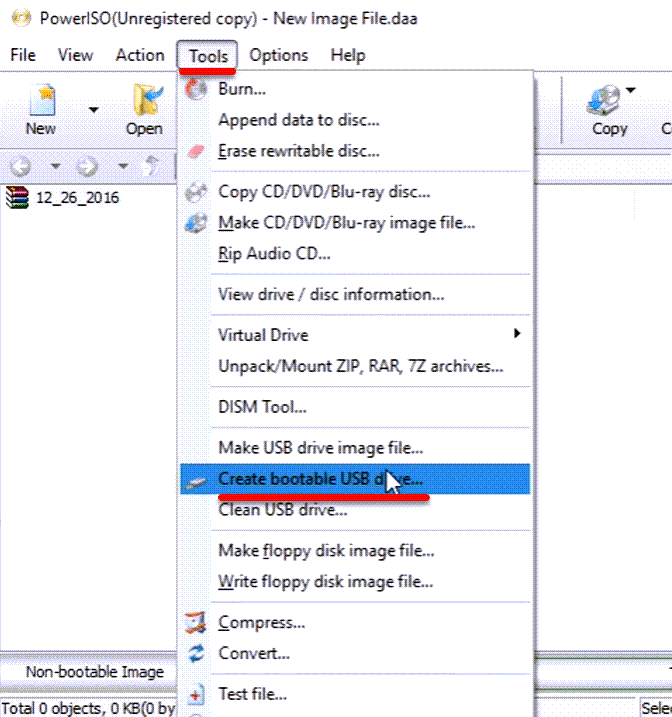
Once it’s there, open up the Power ISO. From there click on Tools then Create bootable USB Drive.

How to Create Bootable USB for Kali Linux on Windows
Power ISO

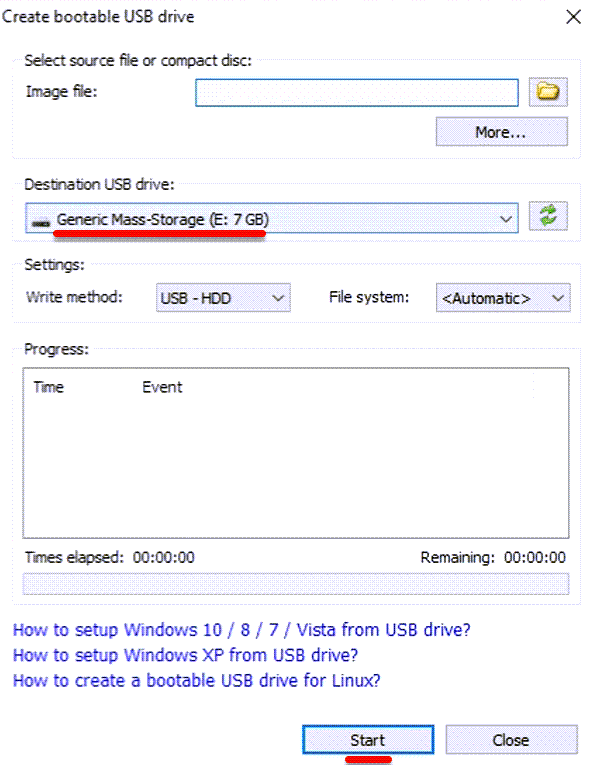
Insert your USB drive and select the USB under the USB drive option and click on the folder icon in front of Image file.

How to Create Bootable USB for Kali Linux on Windows

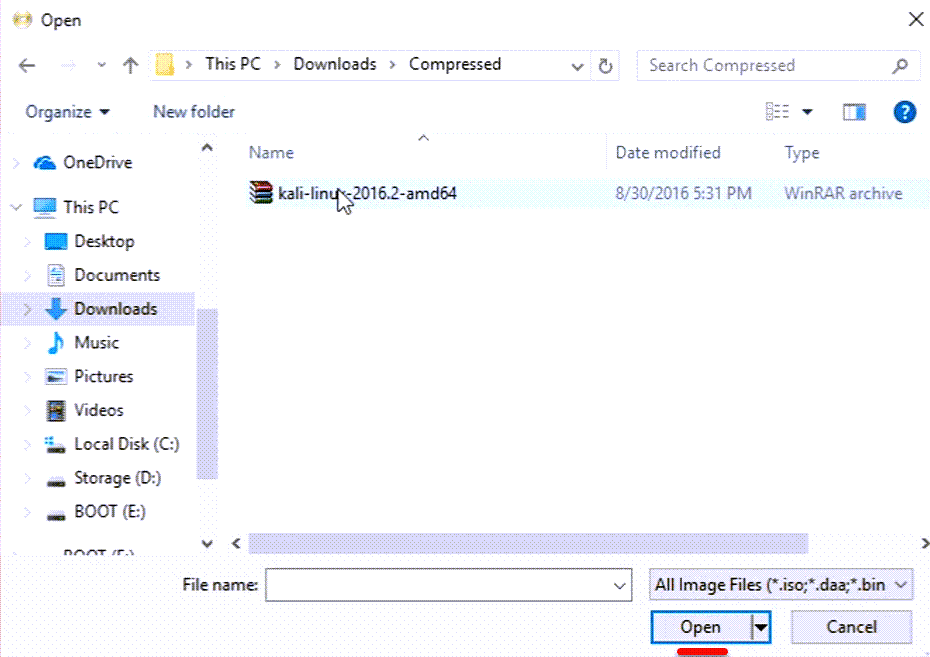
Choose the Kali Linux ISO and click on Open.

Browse for Kali Linux

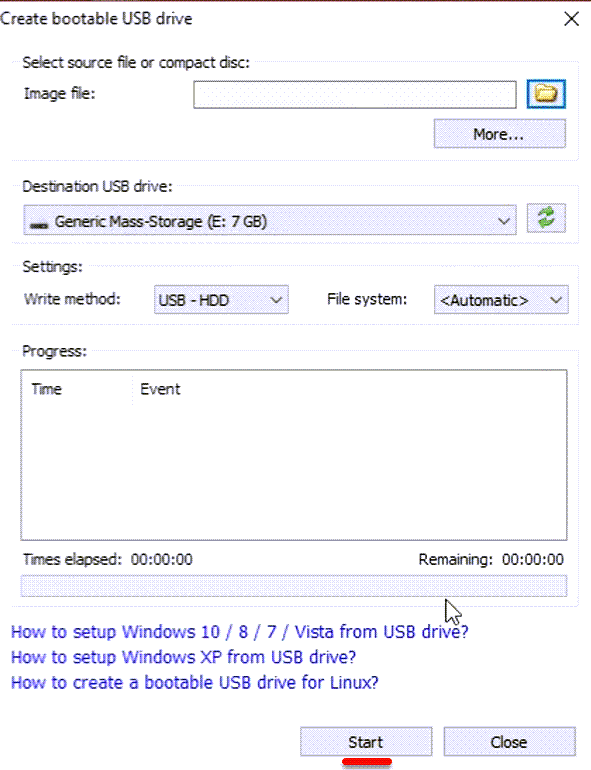
When you’re done, at the end click on Start.

Start it
Start it

Once the process is finished, the bootable USB drive has been created and is ready to use. We hope you enjoyed and learned something from this post. That was how to Create Bootable USB for Kali Linux on Windows. If you have any suggestions, questions related to the article you can let us know in the comments section.

Tags: CreateCreate Bootable USBCreate Bootable USB for Kali LinuxHow toKali LinuxWindows
Previous Post

How GPT-4 Turbo Is Revolutionizing Productivity as a Virtual Assistant

Next Post

UkeySoft Tidal Music Converter: Download Tidal Music to MP3 in HiFi/ Max Quality

Ali

Ali

Next Post
UkeySoft Tidal Music Converter: Download Tidal Music to MP3 in HiFi/ Max Quality

UkeySoft Tidal Music Converter: Download Tidal Music to MP3 in HiFi/ Max Quality

Leave a Reply Cancel reply

Your email address will not be published. Required fields are marked *

  • Trending
  • Comments
  • Latest
Download macOS Ventura ISO file

Download macOS Ventura ISO file

October 28, 2024
How To Bypass Mega Download Limits (2025 Update)

How To Bypass Mega Download Limits (2025 Update)

March 22, 2025
Download macOS X Lion 10.7 ISO and DMG Files

Download macOS X Lion 10.7 ISO and DMG Files

October 28, 2024
macOS High Sierra

Install MacOS High Sierra On VirtualBox 2024 (Easy Method)

April 10, 2025
How to Fix The CPU has been disabled by the guest OS

How to Fix The CPU has been disabled by the guest OS

253
Install macOS Catalina on VirtualBox

Install macOS Catalina on VirtualBox on Windows PC: 2025 Guide

124
Install macOS Catalina on VirtualBox on AMD Systems

How to Install macOS Catalina on VirtualBox on AMD Systems | 2025

86
Install macOS Catalina on VMware on Windows PC

Install macOS Catalina on VMware on Windows PC: 2025

82
Create macOS Sequoia bootable USB on Windows

Create macOS Sequoia bootable USB on Windows

April 29, 2025
Install macOS Big Sur on VMWare Windows 10

Install macOS Big Sur on VMWare Windows 10: 2025

April 29, 2025
macOS Unlocker for VMware

Install macOS Unlocker for VMware Workstation/Player 2023

April 29, 2025
Fix macOS Mojave Screen Resolution(HiDPI) on VMware

Fix macOS Mojave Screen Resolution(HiDPI) on VMware

April 29, 2025

Recent News

Create macOS Sequoia bootable USB on Windows

Create macOS Sequoia bootable USB on Windows

April 29, 2025
Install macOS Big Sur on VMWare Windows 10

Install macOS Big Sur on VMWare Windows 10: 2025

April 29, 2025
macOS Unlocker for VMware

Install macOS Unlocker for VMware Workstation/Player 2023

April 29, 2025
Fix macOS Mojave Screen Resolution(HiDPI) on VMware

Fix macOS Mojave Screen Resolution(HiDPI) on VMware

April 29, 2025
Facebook Twitter Youtube
GEEKrar

We are a team of skilled writers, editors and tech enthusiasts that help you how to get tech into work, pros and cons, explain hows and whys, hacks, and fixes of new modern tech.

Browse by Category

  • Android (24)
  • Discord (5)
  • Downloads (15)
  • Featured (17)
  • Internet (507)
  • iOS (26)
  • Linux (4)
  • Mac (150)
  • News (398)
    • iOS (Apple) (266)
    • Windows (Microsoft) (101)
  • Reviews (5)
  • Tech (21)
  • Virtual Machine (31)
  • VirtualBox (80)
  • VMware (66)
  • Windows (88)

Recent News

Create macOS Sequoia bootable USB on Windows

Create macOS Sequoia bootable USB on Windows

April 29, 2025
Install macOS Big Sur on VMWare Windows 10

Install macOS Big Sur on VMWare Windows 10: 2025

April 29, 2025

© 2022 geekRAR.com

We use cookies on our website to give you the most relevant experience by remembering your preferences and repeat visits. By clicking “Accept”, you consent to the use of ALL the cookies.
Do not sell my personal information.
Cookie settingsACCEPT
Manage consent

Privacy Overview

This website uses cookies to improve your experience while you navigate through the website. Out of these, the cookies that are categorized as necessary are stored on your browser as they are essential for the working of basic functionalities of the website. We also use third-party cookies that help us analyze and understand how you use this website. These cookies will be stored in your browser only with your consent. You also have the option to opt-out of these cookies. But opting out of some of these cookies may affect your browsing experience.
Necessary
Always Enabled
Necessary cookies are absolutely essential for the website to function properly. This category only includes cookies that ensures basic functionalities and security features of the website. These cookies do not store any personal information.
Non-necessary
Any cookies that may not be particularly necessary for the website to function and is used specifically to collect user personal data via analytics, ads, other embedded contents are termed as non-necessary cookies. It is mandatory to procure user consent prior to running these cookies on your website.
SAVE & ACCEPT
No Result
View All Result

© 2022 geekRAR.com

Go to mobile version