


If you notice your pc is slowing down or just not performing as it should, clear all cache in Windows usually helps in a significant way. Typically this often happens after web browsing, doing Windows updates, or not having rebooted your pc after long periods of time.
Clearing cache regularly improves your system’s performance for several reasons. Depending on your settings, the cache can grow considerably large and use a lot of disk space on your computer. The more information saved in the cache, the slower your computer will be browsing the web or executing regular functions. Deleting the cache data helps for troubleshooting, increase the loading time of web pages, and increase your computer’s performance.
We’ve created a couple of methods that are quick and easy to execute that should help speed things up. First, we’ll create script to clear out all the temp files, temp folders, and empty the recycling bin. Next, We will walk through a couple of steps to flush and reset the DNS chance. Once complete, restart your PC and test out the changes.
Table of Contents
Clear All Cache on Windows 10
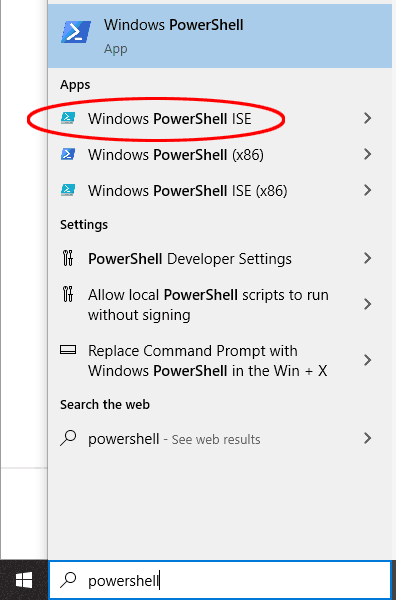
- Click the “Start” button, in the search then type “PowerShell” and select the option in the list ‘PowerShell ISE’
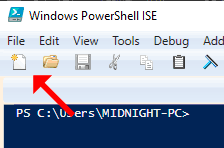
- Click on the ‘New File’ icon
- Copy the below script and paste it into the window
$objShell = New-Object -ComObject Shell.Application $objFolder = $objShell.Namespace(0xA) $WinTemp = "c:\Windows\Temp\*" #1# Remove Temp Files write-Host "Removing Temp" -ForegroundColor Green Set-Location “C:\Windows\Temp” Remove-Item * -Recurse -Force -ErrorAction SilentlyContinue Set-Location “C:\Windows\Prefetch” Remove-Item * -Recurse -Force -ErrorAction SilentlyContinue Set-Location “C:\Documents and Settings” Remove-Item “.\*\Local Settings\temp\*” -Recurse -Force -ErrorAction SilentlyContinue Set-Location “C:\Users” Remove-Item “.\*\Appdata\Local\Temp\*” -Recurse -Force -ErrorAction SilentlyContinue #2# Empty Recycle Bin # write-Host "Emptying Recycle Bin." -ForegroundColor Blue $objFolder.items() | %{ remove-item $_.path -Recurse -Confirm:$false} #3# Running Disk Clean up Tool write-Host "Running the Windows Disk Clean up Tool" -ForegroundColor White cleanmgr /sagerun:1 | out-Null $([char]7) Sleep 3 write-Host "Bada Bing! cleanup task complete" -ForegroundColor Yellow Sleep 3 ##### End of the Script ##### - Next, click ‘File‘ and ‘Save‘ this to a location that is easily accessible, I recommend your desktop.
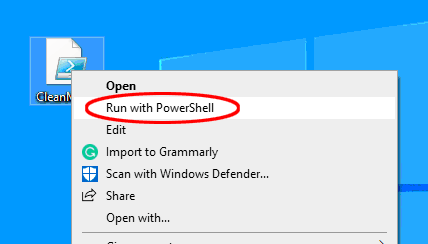
- Now we’re going to run the file. Go to the location where your file is saved, right-click, and select ‘Run with PowerShell‘.
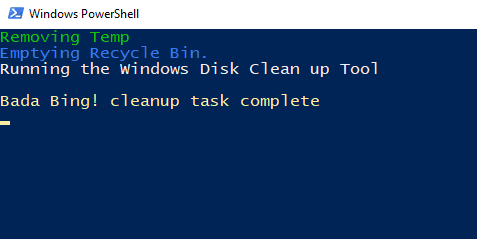


After the prompt opens and closes, you can restart your computer or continue to the next component for clearing DNS cache.
Flush and Reset DNS Cache
Flushing the DNS resolver cache can help resolve DNS related problems in Microsoft Windows 10. Issues would include website not found errors or not viewing individual web pages that have changed.
To reset the DNS resolver cache, perform the following steps:
- Click “Start” button, in the search then type “cmd “.
- Right-click “Command Prompt “, then choose “Run as Administrator “.
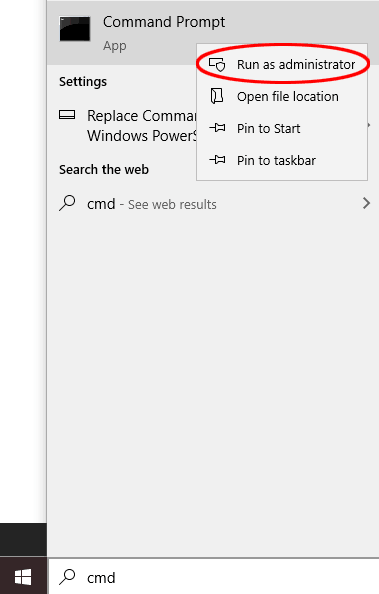
- If you are prompted for User Control, you should select ‘YES’
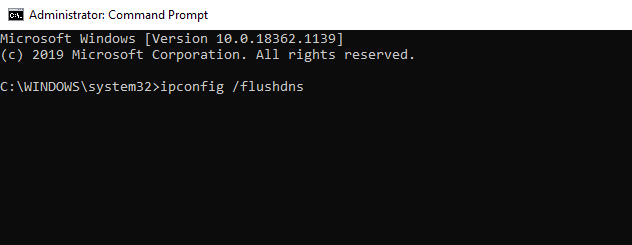
- Type ipconfig /flushdns then press “Enter “. (be sure there is a space before the slash)


Youtube Video for a visual walk-through