
While installing macOS specifically Mojave is pretty easy on an actual Mac, but if you are a Windows user, that is not the case. If you are a Windows user who wants macOS for some reasons, however, you can, but there’s a whole lot to do. From finding the right VirtualBox) image to creating a virtual machine and troubleshooting booting problems, there’s a lot of challenges to deal with. Here’s how to Fix UEFI Internal Shell on macOS Mojave on VirtualBox.
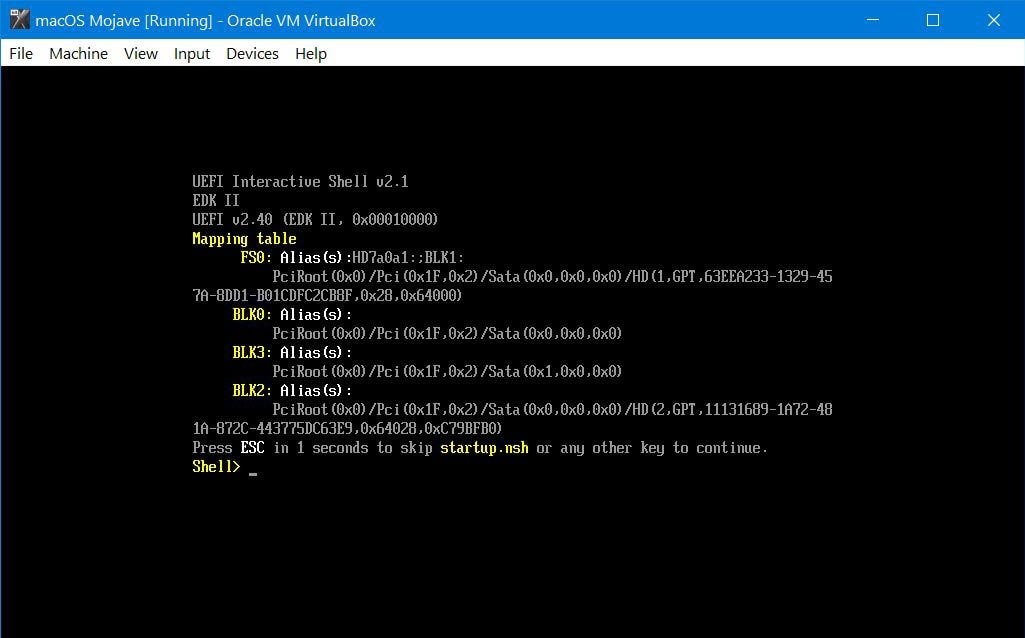
One of the problems that most users encounter when installing to boot is the broken UEFI Internal Shell which typically prevents booting machine into the installation process and getting Mojave installed. The Shell usually appears as a bunch of commands without allowing you to skip, continue, or get into the installation except entering commands.
Table of Contents
Fix UEFI Internal Shell on macOS Mojave on VirtualBox
Those commands are not understandable and don’t indicate a particular problem so you can’t fix it until you enter the correct commands. There are some reasons and fixes for them. If you have been the chase for one of those errors, look no further than here, here’s how to deal with them. To make things a little easier, we’ve figured out ways from a few different places into a complete step-by-step guide with screenshots. Let’s dive in and Fix UEFI Internal Shell on macOS Mojave on VirtualBox.
Close VirtualBox Completely Before Applying The Code
There are a couple of reasons why this happens. One of the most basic reasons that Fix UEFI Internal Shell on macOS Mojave on VirtualBox appears is not closing the machine app entirely before applying the VirtualBox code. When you create the virtual machine and go to apply the code to VirtualBox on Command Prompt, we have clearly noted you to first close the VirtualBox entirely. If you don’t, there’s a good chance of the problem to show up on the screen.
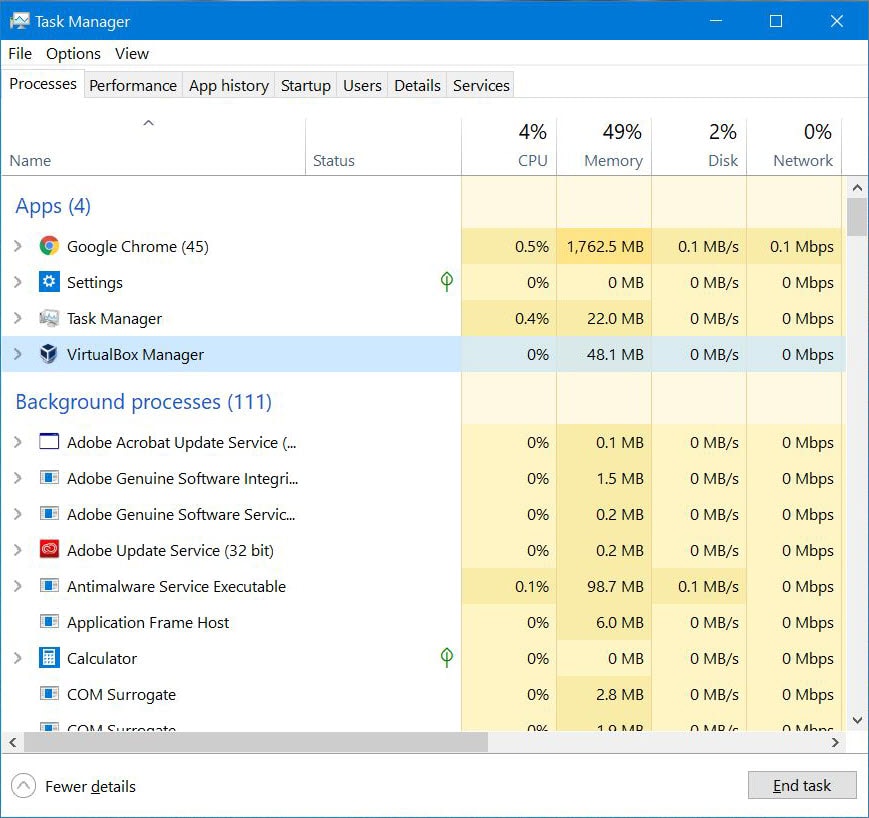
For anyone who is stuck at Shell, you can probably solve this by creating a new virtual machine from the instructions guide and basically apply the patch command when the virtual machine is completely CLOSED (even from Task Manager). This will definitely help if the problem was due to the reason so make sure you do it next time beforehand.
Boot From APFS UEFI Boot Image
Another reason that many user experience, is due to the Apple File System (APFS) which is not compatible with the virtual machine app whether VMware or VirtualBox. This appears in different styles, typically as EFI Internal Shell or UEFI Shell or after installation when you try to update Mojave, particularly from the App Store. When you download the Mojave update from App Store (which will work), and select the disk to install, the error pop up, indicating “The volume is not formatted as APFS”.
Add APFS UEFI Boot Image
The problem pops because the image is APFS and VirtualBox doesn’t recognize it so you need to download a boot the ISO from the APFS boot image and load a driver from that first then you can boot into Mojave. It can also be updated but when it reboots in the middle of update you should press the F12 key to get back into UEFI Shell where you should select boot.efi of the upgrade image.
This problem is happening to a huge amount of users and unfortunately, I couldn’t reach it real quick. Thankfully, that’s no longer the case, here’s how you do it. However, this problem doesn’t appear on VMware, since VMware supports APFS file system.
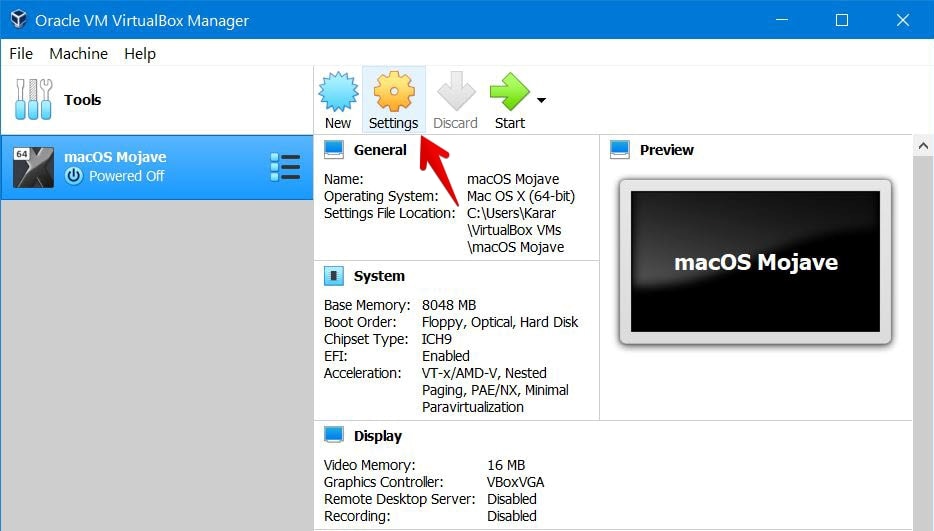
To get started, you’ll need the APFS UEFI Boot Image to add the ISO file. To do that, turn off the machine and goto “Settings”.
In the machine settings, select Storage, click on the CD or ISO file. Then click on the CD icon at the top right and click choose Virtual Optical Disk File.
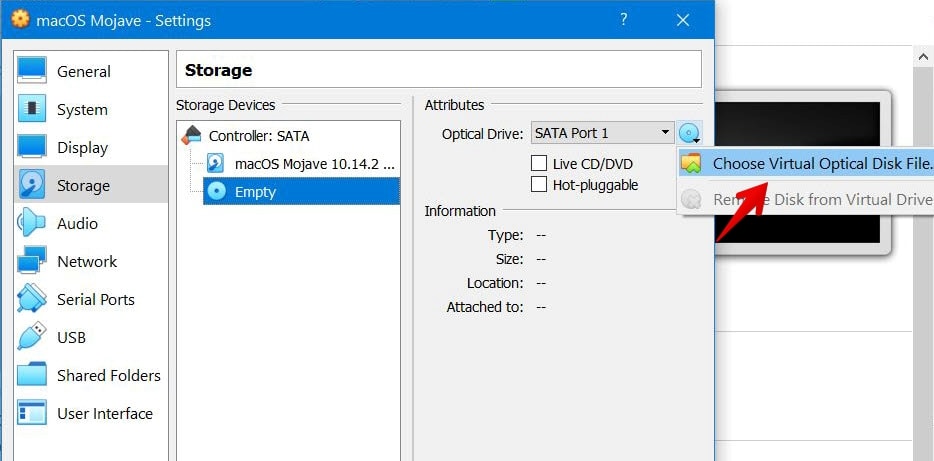
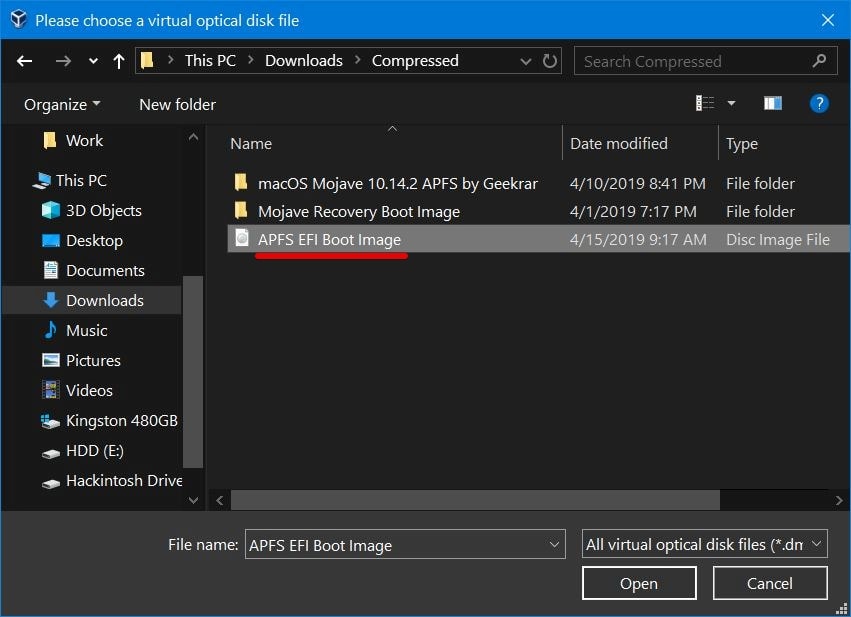
Then browse and choose the APFS EFI Boot Image file and click on Open then click OK on the machine settings.
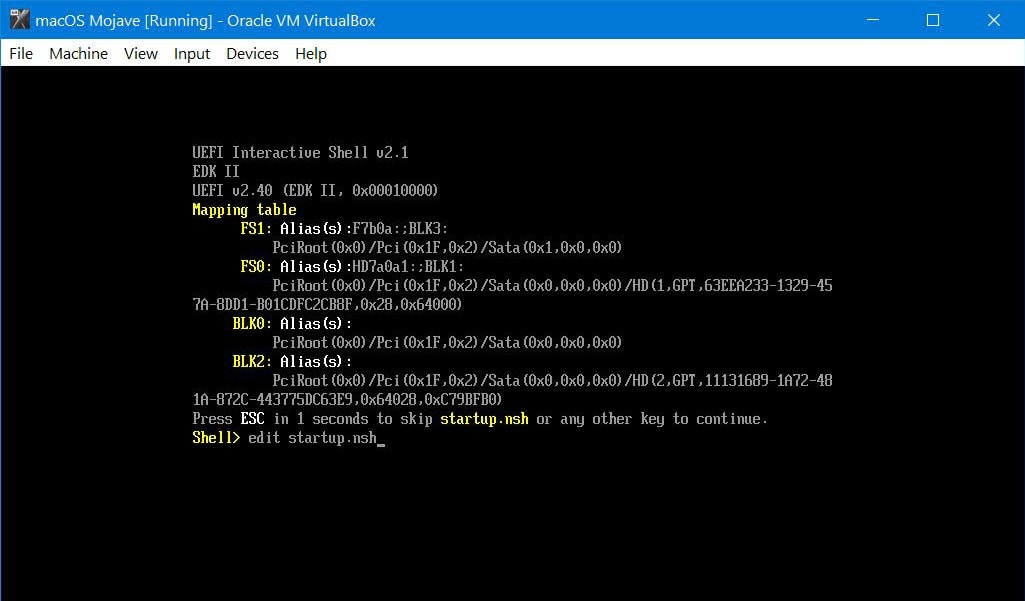
Now start up Mojave and you will boot into Shell. There, you need to enter the following commands by line one by one.
edit startup.nsh
This will load you into the startup.nsh where you can edit and apply the commands.
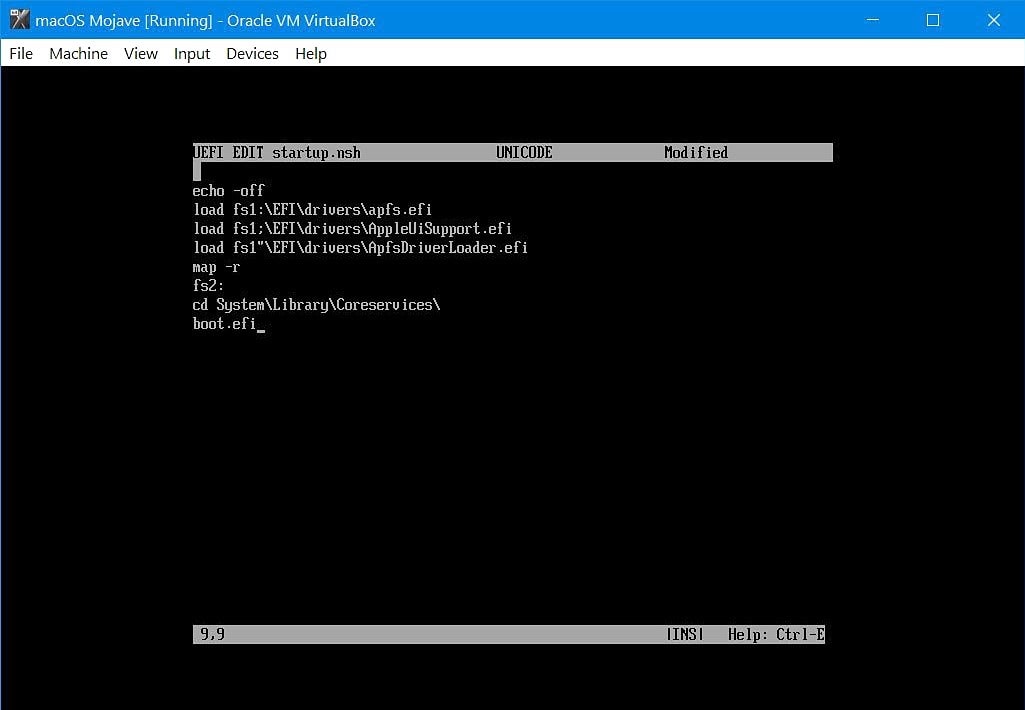
Now enter the commands here. When you are done press Commands Ctrl-Q and then press Y.
echo -off
load fs1:\EFI\drivers\apfs.efi
load fs1:\EFI\drivers\AppleUiSupport.efi
load fs1:\EFI\drivers\ApfsDriverLoader.efi
map -r
fs2:
cd System\Library\CoreServices\
boot.efi
In this screen, you will need to type exit, and then hit enter.
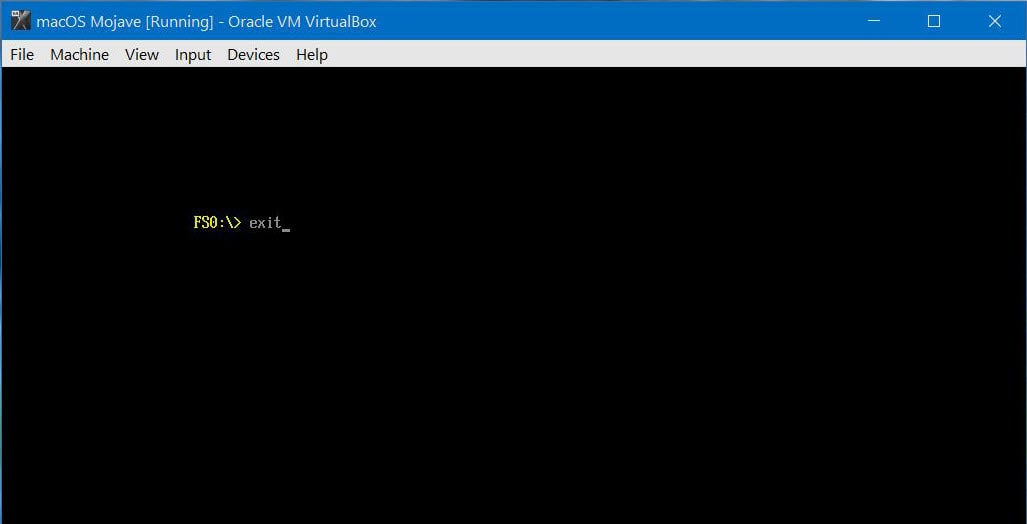
Next, you need to hit enter to Continue.
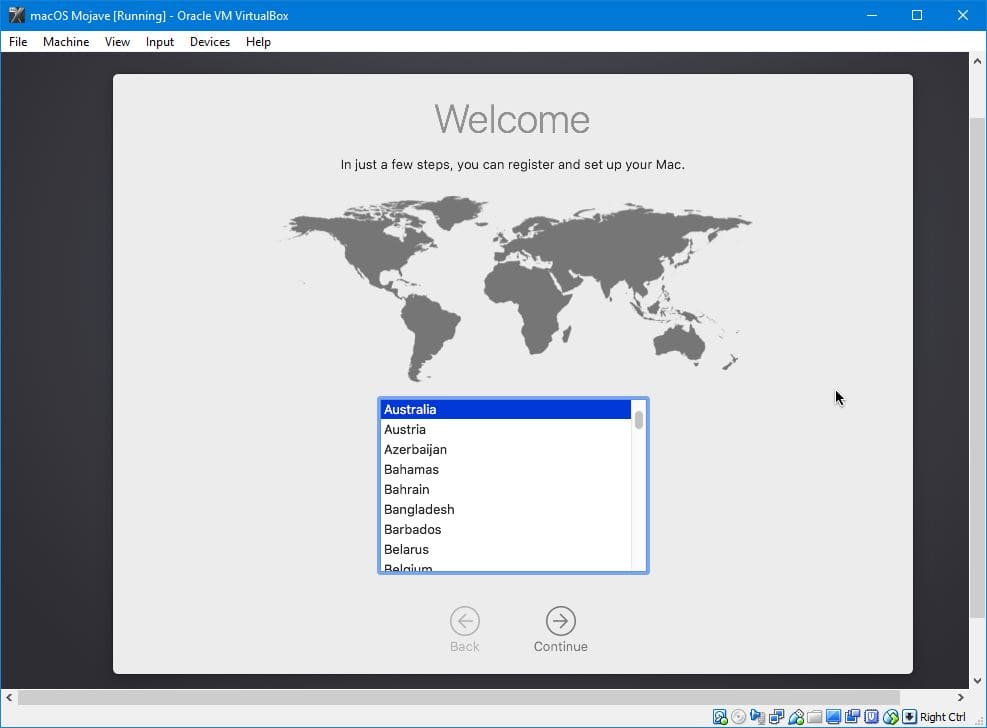
After you continue, the setup process is pretty cut and dry. You will see tons of codes running, they’re fine; just wait. When they finished, ultimately, you will go through choosing your country, setting up a user, and the rest of the initial setup process.
Fix EFI Internal Shell From The User Instruction
If you tried the instructions above and continue to experience the problem, you may want to try the troubleshooting steps. This is the solution from one of the users who had the problem and fixed it with the following move.
I also hit the problem of getting stuck at the UEFI shell prompt when booting from a viable disk (such as my case where MacOS had just been installed in a Virtual Machine).
I was able to fix the UEFI problems as follows (credit to VirtualBox forum):
- At UEFI prompt: Type exit
- You’ll be into an EFI text-mode GUI.
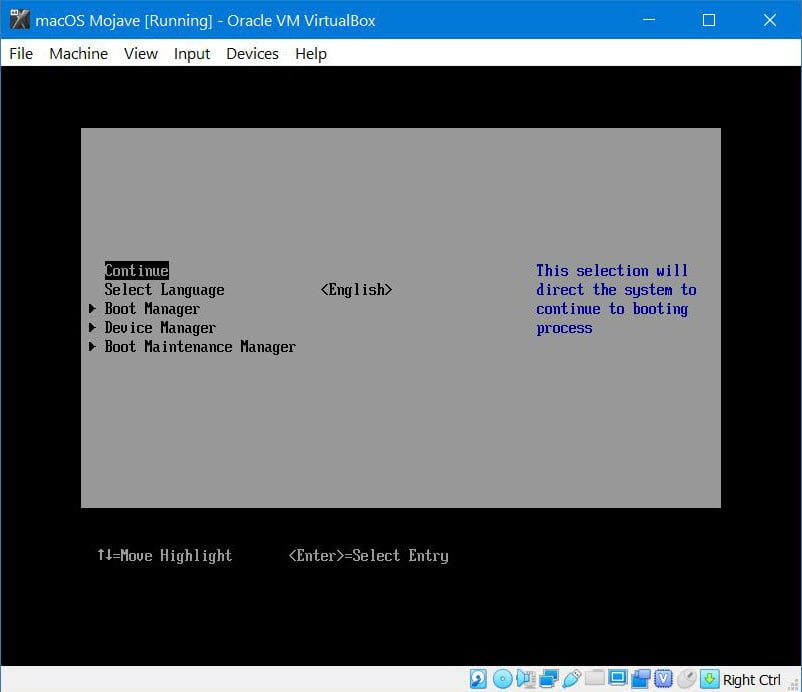
- Select Boot Maintenance Manager and click.
- Select Boot From File and click
You should see two entries in a list (they are cryptic looking PCI bus paths).
The first is the PCI path to a boot partition that isn’t working (corrupted or perhaps has no data or OS installed on it).
The 2nd partition is the recovery partition. The one you need to boot from to do the macOS installation. Or other maintenance/administrative tasks (including accessing Disk Utility to work on the System Volume partition without an OS running).
Click the 2nd entry, you should see (and then click):
macOS Install Data
Then click:
Locked Files
Then (if present), click
Boot Files
And finally, click:
boot.efi
At that point the installer boot will continue and you should get to the point where you can attempt to repair the volume or [re]install macOS.
Hopefully, this should exit you from the Shell and continue to the installation process.
With that all, a huge shoutout to AwsomeTech10, without whom this was not possible, a big thanks.
Did these methods work for you? Do you know another workaround or solution to resolve this problem? Let us know in the comments down below.


the command “edit startup.nsh ” is not working it is showing invalid file name or current working-directory…. please help
At UEFI prompt: Type exit
You’ll be into an EFI text-mode GUI.
Select Boot Maintenance Manager and click.
Select Boot From File and click.
You will want to select the pre-boot option, keep going through it till you find the boot.efi file and hit enter on it. (this is what worked for me).
Thanks Taylor
Hi, I am installing macOS Sierra and I wanna know if I have to just keep the .iso file you provided in the virtual box or do I have to include even the Sierra ISO file? And when I type in edit startup.nsh, it says access denied. Please help me I am stuck!
I used mojave with no problem. Suddently, I got the uefi shell. I followed the steps and used the ISO. there is no boot.efi inside my System\Library. Interesting enough, “Library” is empty! Do I have to assume my image got broken? If so, anyone knows how to fix a virtual drive?
I have problem here, I’m using macOS Catalina and when its start booting, its just stuck here, Any solution on this?
do a ls in fs2: and you have a file befor the \System\Library…..
The very first thing you need to do if you are stuck at boot is check if you have the “64bit version virtualbox” installed and Updated and you have the boot file from geekrar on the first boot. You are good to go.
Thank you for this tutorial. Can You help me with this problem: If it enters “strtup.nsh” I get the Error: “‘FS2:\System\Library\CoreServices\’ was not found. ‘boot.efi’ is not recongized as an internal or external command, operable program or script file.” I get the same result, if I enter install.nsh. Thank you
Lots of good info, but I ca’t get past the Shell prompt. Nothing boots, including APFS EFI Boot Image, and in the Boot Manager, there is nothing listed. It doesn’t seem to be mounting ISOs. The shell reports “Current directory not specified” for many commands, such as ls, cd etc
THANKS!!! This guidance allowed me to finally install Mojave on VirtualPC.
After the installation I had to re-edit the startup.nsh file to point to boot.efi on fs1 instead of fs2 because there was no more install drive present.
Your ISO image was the key that unlocked usccess after several days struggling with this – THANK YOU!
i get fs0, what does it mean
Hello,
Trying to install Mojave on my VirtualBOX but i’ve got a problem.
On setup my keyboard doesn’t work (it’s ok in virtualbox bios), so i can’t finish the setup….
Tried to change USB to usb1,2 or 3 and that didn’t change something (except with usb 3 my mouse is too slowly but ok in 1 or 2).
Does anyone have any idea to solve this ?
Thanks
SOLUTION FOR ALL PEOPLE FACING WITH THE ERROR:
Directory ‘FS2:\System\Library\CoreServices\’ was not found. ‘boot.efi’ is not recongnized as an internal or external command, operable program or script file.
SOLUTION:
WHEN startup.nsh stops with the error “not found”:
1) TYPE: FSx: (where x is 3 or 4 or 5…, in my case was FS4:) and press return
2) TYPE: ls (LS and press enter)
3) If is displayed only ONE directory with a alpha-numeric name that looks like (for i.e.):
ABCDEFGH-ABCD-1234-ABCD-123A12B34567
take a picture of screen (or carefully write back the name to a notepad).
If NOT, got to 1) and try with next number
4) Edit the file startup.nsh and replace the line
fs2:
with the correct number (in MY case 4) so after it looks like:
fs4:
5) Finally replace the line
cd System\Library\CoreServices\
with
cd ABCDEFGH-ABCD-1234-ABCD-123A12B34567\System\Library\CoreServices\
(of course ABCDEFGH-ABCD-1234-ABCD-123A12B34567 is a fantasy name, replace with your directory name)
6) CTRL-Q and Y to save
7) restart the VM
8) After the shell countdown the machine will perfectly start.
thank you very much!
Thanks for the guide!
I’m stuck with the following error:
——————-
Error. Directory ‘FS2:\System\Library\CoreServices\’ was not found. ‘boot.efi’ is not recongized as an internal or external command, operable program or script file.
——————-
I have tried changing FS2 to FS0, FS1, FS2, FS3…
Please help.
It’s missing a step to select the boot file as explain here: https://www.reddit.com/r/MacOSBeta/comments/bwqx7i/create_a_macos_catalina_virtual_machine_in/
stuck in EFI shell, downloaded the listed ISO and ran the commands, able to get further in the boot process, stopped at “Start CalculateAdler32”
Hi,
What is your system specs?
Access denied
Same with me!
Hello, I solved it just typping exit and booting from the Hard disk
there´s not an ISO image.
Same Problem here – with the boot image it starts everytim without the update information within the boot files
same problem here – update isn’t possible due we’re booting from the unchanged boot image – is there a workaround – perhaps with another injection point for the system?
It is working – you are the King _
Access denied
i got an error, ‘FS2:\System\Library\CoreServices\’ was not found. ‘boot.efi’ is not recognized
https:// thetechbloggerguy .blogspot .com/2018/12/ macos-mojave-virtualbox-win10.html
This one may help you. Please look at step 7 “Step Seven: Boot Installer Stage Two From the Virtual Hard Drive”
FS2 for me happened to be FS1. I found boot.efi. I execute it, and it do nothing!! Please help.
Hello
I followed what you said in the website “EFI Internal Shell Fix on MacOS Mojave on VirtualBox”
now ca boot and after it stops at “start calculateAdler32”
I searched for everything on the web but I did not find anything would you have an idea
I am on ubuntu 18.10 and virtualbox 6.10
I check the file download “‘Mojave 10.14.3 APFS by Geekrar.vmdk'”
I was able to ride it with apfs-fuse
it allowed me to see the data “private dir and root” I could make cd inside the root directory everything seemed good idea?
Hi,
The image we’ve provided is only for macOS Mojave, not other operating systems on virtual machines.
Hello
I followed what you said in the website “EFI Internal Shell Fix on MacOS Mojave on VirtualBox”
now ca boot and after it stops at “start calculateAdler32”
I searched for everything on the web but I did not find anything would you have an idea
I am on ubuntu 18.10 and virtualbox 6.10
I check the file download “‘Mojave 10.14.3 APFS by Geekrar.vmdk'”
I was able to ride it with apfs-fuse
it allowed me to see the data “private dir and root” I could make cd inside the root directory everything seemed good idea?
Thank you
I got nothing, second option after boot from file has no further options
i got an error, ‘FS2:\System\Library\CoreServices\’ was not found. ‘boot.efi’ is not recognized
cant use double point when i edit starrt.nsh with the keybooard of the lap
I got stuck on End RandomSeed after the EfiAPFS iso fix
In response to my last post: I found the fix for the mouse issue by changing to USB 3.0.
Thanks for sharing it.
Hi I have followed these steps and the VM boots to the welcome screen but the mouse cursor does not work. Is there any way to fix that?
I have also tried the PS/2 pointing option but the issue is the same.
After enter the command and continue and have a lot of tons code just wait, but after done lot of tons repeat again and repeat again. Any Solutions?
I am not getting APFS in my boot device. I don’t want to keep the virtual CD with the EFI drivers in the VM.
when I do the edit command, it doesn’t work: “Access denied”
i tried HFS & now APFS where my laptop screen freeses when i click on guest window of MacOs
Install boot loads – to Select Country if i click on the screen —- SCREEN FREEZES
am not able to install at all
i dont know where i went wrong
any help is appreciated
thanks
Do you all have audio work? mine does not….
Thanks! This solved my issue after spending hours looking for the answer.
this patch is one time process or i have to do each time i start my Virtual Mac ?
Thanks, with this method I can boot Mojave. But cannot update. When the system restarts the first time it appears to begin install the update but when auto restarted again, it boots directly to the non-updated mojave.