Since the last update in February 2021, there was a slew of instability with Call of Duty Warzone Crashing PCs. The main issue for most users was Call of Duty Warzone crashing PCs down to the desktop. There is no specific point that triggers the problem. Some people can start playing, and some users cant even finish launching the game.
The worst part, it didn’t seem to matter how good or bad your specs are. The game was failing. The GEEKrar youtube channel had a massive explosion of questions in the comment section related to this, so I decided to create a post and a video to document one fix that’s had success resolving it.
The fix is to increase the amount of virtual memory available to Windows for the game. By expanding the Page File system’s size, we help stabilize the game while it is running. The negative impact will be the speed at which your hard drive runs. But overall, this should at least get you up and running. If haven’t install the game and you are looking to grab a copy, you download it from Blizzard and watch this installation video.
Table of Contents
What is Paging File?
A paging file system in its earliest form is RAM (Random Access Memory). These days, users typically have ample space, but you can set Windows to allocate a section of the hard drive for page filing if you happen to run out. This is called Virtual Memory, and it’s treating the assigned disk space of the hard drive like RAM. By increasing the available space, you are growing the temporary storage needed for memory-intensive tasks such as gaming.
This fix will not help all users, but we’ve had a lot of positive feedback.
Related: DirectX Download for Windows 10 (A Quick Gamers Guide)
Call of Duty Warzone Crashing PC FIX – Step By Step
To begin, we will need to launch the Windows File Explorer. To do this, click on Start, and search for ‘File Explorer’ and open it.
In the window, on the left-hand side, locate ‘This PC’ and right-click on it. When the menu pops open, select ‘Properties’

You will now be in the About section of your Settings. To the right of the window, look for ‘Advanced System Settings’ and click on it.

In the Systems Properties window, ensure that you are under the Advanced tab. Then below, in the Performance section, click on the ‘Settings’ button.

Next, in the Performance Options window, click on the Advanced tab, and under the Virtual Memory section, click on the ‘Change…’ button.

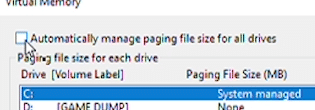
In the Virtual Memory window, uncheck ‘Automatically manage paging file size for all drives. ‘
By doing this, we are enabling the ability to set our page filing size. Now, you want to select the drive on which your game is installed. For most users, this is your C drive. Because this game is so large, we had to put it on our D drive when we installed it because this drive had ample room.
So, select your game drive, then click on ‘Custom size

Next, enter the ‘Initial size (MB)’ to 10000, and the ‘Maximum size (MB)’ to 10000. Then click on ‘Set’, and then ‘OK’

You will be prompted with a warning to restart your computer for changes to take effect.
<008>
You can click ‘OK’ and close out of the rest of the windows.
Once complete, Windows should prompt you again to restart your computer. You can go ahead and do this now for changes to take effect.

When you have rebooted your PC, launch Call of Duty Warzone and see how it runs. If you are noticing a significant improvement, you can leave the settings as-is. To tweak this and optimize the space used, you can roll back the allocated size down from 10000, to 9000 and drop it down by 1000 until you find the size that works best for you. If there is no improvement at all, then we recommend reverting the setting to the default and allow windows to ‘Automatically manage paging file size for all drives’
I hope you find this helpful. If you did, let us know which file size worked best for you.


